Search the Community
Showing results for tags 'guide'.
-
I was happily using NextPVR on a remote server with EPG info working without any 3rd party EPG provider (Schedules Direct etc) and now since the integration of EmbyTV into Live TV, I'm having issues. 1. I had to reconfigure my NextPVR tuners - got that working.. at least I can see them as "Available" tuners in LiveTV. 2. I have no guide data in Emby anymore! When I hit http://remotenextpvrserver:8866 I see the "beautiful" NextPVR web interface complete with EPG data. Any ideas why the EPG data isn't showing up in Emby under Live TV?
-
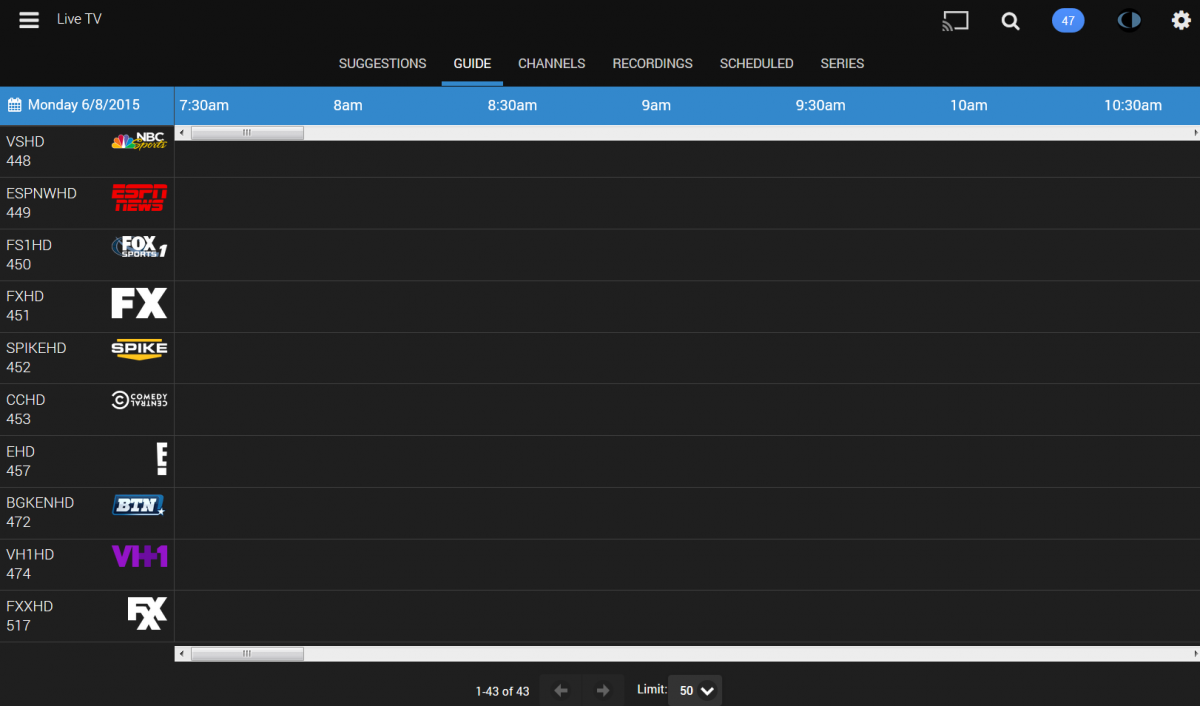
Version 3.0.5713.6 Live TV Service: New fancy internal Tuner support Tuner: HDHomeRun Prime Guide Source: Schedules Direct Other Things Installed: My Channel Logos XL Browser: Chrome Version 44.0.2403.157 m Note: Show favorites only is enabled is about 75 out of 250 channels showing. Hi folks, I'm seeing if anyone else is having this issue. My guide seems to be working fine, but the programs listed don't line up with the channel listings on the left. I'm not sure what the cause is, but I listed everything I could think of above that may be involved with the problem. Thanks everyone.
-
Hi, when viewing the tv guide in the web browser would it be possible to set a recording straight from the show info popup? This would be on the basis that you are going to accept your defaults for padding. It would be so quick to just hover then click record. Cheers Latchmor
-
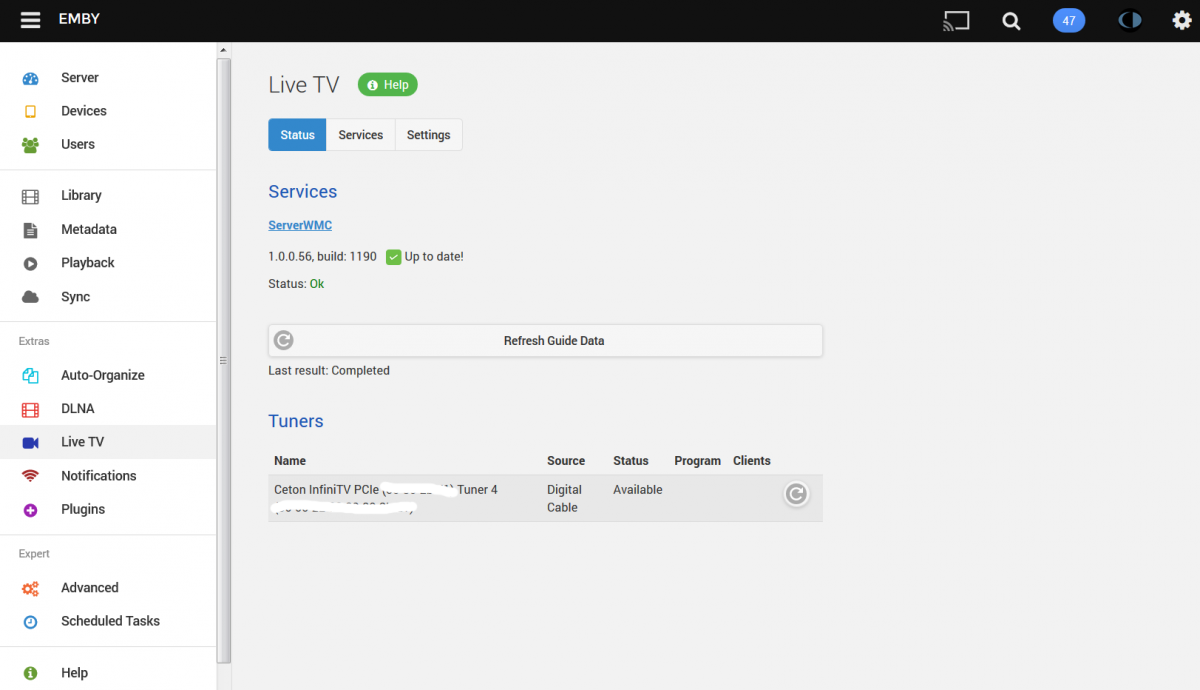
Emby Server Version 3.0.5621.4 Server WMC Version 1.0.0.56, build: 1190 This problem has existed for many versions now. In the web client, in the android app, and in the Fire TV app, no TV Guide data is displayed. I can tune channels and watch them.
-
For some reason I have a "Refresh Guide" task running every 4 hours - but this task does not exist on the Scheduled Tasks page, so I can't change that schedule. I don't even have Live TV installed - so why is that task even running at all? Please also see this related post: Triggers running at wrong times
-
As a temporary solution, you will now need to configure gamebrowser for Mediabrowser Classic manually by editing the xml file. This is a fairly simple process as you just need to edit your xml so it looks like the sample one below, changing the <executable>path</executable> section to the path of your emulator, and adding the appropriate <switches> The xml is found at programdata\mediabrowser-classic\plugins\configurations\gamebrowser.xml, just open it in notepad or something similar. The switches can be found at the bottom of this thread http://mediabrowser.tv/community/index.php?/topic/16380-gamebrowser-guide/ <?xml version="1.0" encoding="utf-8"?> <GameBrowserSettings xmlns:xsi="http://www.w3.org/2001/XMLSchema-instance" xmlns:xsd="http://www.w3.org/2001/XMLSchema"> <GameSystems> <anyType xsi:type="GameSystem"> <Name>Gamecube</Name> <Executable>C:\Program Files\Dolphin\Dolphin.exe</Executable> <Switches>"--exec={rom}"</Switches> </anyType> <anyType xsi:type="GameSystem"> <Name>Nintendo</Name> <Executable>C:\Program Files (x86)\Nestopia V1.36\nestopia.exe</Executable> <Switches>"{rom}"</Switches> </anyType> <anyType xsi:type="GameSystem"> <Name>Nintendo 64</Name> <Executable>C:\Program Files (x86)\Project64 2.1\Project64.exe</Executable> <Switches>"{rom}"</Switches> </anyType> <anyType xsi:type="GameSystem"> <Name>Nintendo Wii</Name> <Executable>C:\Program Files\Dolphin\Dolphin.exe</Executable> <Switches>"--exec={rom}"</Switches> </anyType> <anyType xsi:type="GameSystem"> <Name>PS2</Name> <Executable>C:\Program Files (x86)\PCSX2 1.0.0\pcsx2-r5350.exe</Executable> <Switches>"{rom}"</Switches> </anyType> <anyType xsi:type="GameSystem"> <Name>Sony Playstation</Name> <Executable>C:\Program Files (x86)\ePSXe190\ePSXe.exe</Executable> <Switches>-nogui -loadbin "{rom}"</Switches> </anyType> <anyType xsi:type="GameSystem"> <Name>Super Nintendo</Name> <Executable>C:\Program Files (x86)\ZSNES V1.51\zsnesw.exe</Executable> <Switches>"{rom}"</Switches> </anyType> <anyType xsi:type="GameSystem"> <Name>Nintendo DS</Name> <Executable>C:\Program Files (x86)\desmume-0.9.10-win32\DeSmuME_0.9.10_x86.exe</Executable> <Switches>"{rom}"</Switches> </anyType> <anyType xsi:type="GameSystem"> <Name>Game Boy Advance</Name> <Executable>C:\Program Files (x86)\VisualBoyAdvance-1.8.0-beta3\VisualBoyAdvance.exe</Executable> <Switches>"{rom}"</Switches> </anyType> </GameSystems> <DosGames /> <WinGames /> <EnableQuitKey>true</EnableQuitKey> <SelectedQuitKey>36</SelectedQuitKey> </GameBrowserSettings> sample xml courtesy of @@buddyweiser
- 1 reply
-
- 2
-

-
- gamebrowser
- guide
- (and 2 more)
-
Since I just did a clean install of an Openelec box with XBMB3C I figured I'd write a quick guide for new users interested in testing out XBMB3C and MBS. It's meant to be a no fluff, quick and dirty guide. Maybe I'll come back through and add pretty pictures for the illiterate later, but it's not a priority for me at the moment. Install Openelec and boot into XBMC Download the XBMB3C Repo and upload it to the downloads directory of your Openelec box In XBMC go to Addons, Choose 'Install from ZIP file', browse to the repo zip you just uploaded to your downloads directory, install it Go to Addons, Choose get more add ons, select the XBMB3C repo you installed, go to Video Addons, Choose 'XBMB3C', choose 'Install' Go to Addons, Choose get more add ons, select the XBMB3C repo you installed, go to Skins, Choose a skin you like (I recommend Aeon Nox Gotham), choose 'Install' Go to Programs, then XBMB3C, Press 'C' and choose Addon Settings, enter in your MBS information and tweak the settings how you like or leave most defaults Go to System, Appearance, at the bottom change settings level to 'Advanced' Go to 'Mode' section of Appearance settings, enable Media Browser modes Enjoy.
-
https://github.com/MediaBrowser/Wiki/wiki/Sync
-

How to direct play MKV/MP4 files on an Xbox 360 extender with MB3/MB Classic
theniteow1 posted a topic in Tutorials and Guides
Note: This process was contributed by a community member and we have no reason to believe it doesn't work if followed to the letter. However, we haven't verified the process lately so it is possible it is out of date. Please let us know of your experience if you attempt this. _____________________________________________________________________________________________________ Getting MKV and other media files to play directly on your Xbox 360 with Media Browser 3, and Media Browser Classic, can be a frustrating experience. Trust me, I’ve been there, and I have spent many hours banging my head trying to figure out how to get it to work. Seemingly at times I thought I had everything setup correctly, but Media Browser would end up transcoding the file, or unable to play it all. It was a mystery for a while to me, and the behavior was hard to track down. I’ve read countless forums, some even suggesting that this simply won’t work. That is the furthest thing from the truth. Through many efforts I discovered how to get this to work fairly easily, as long as you know what you need to do, and the exact steps to do it! With Xbox 360s going for under $99 now, more and more people are going to take the plunge. I figured I would write this tutorial to save everyone time and their sanity. You can finally start enjoying your Windows Media Center experience like you should. Simply stated having this work under Media Browser Classic is an awesome experience! The interface is unmatched to anything else that is out there. Setting up the server backend correctly: 1. You’ll of course want to have Media Browser 3 installed on a server already. In my setup I have Windows Media Center separated from my NAS. My NAS is simply a Windows 7 machine, with Media Browser installed on it, and all my media files are located on the same server. 2. Setup your Media Browser libraries. Ensure that Media Browser is pointed to your libraries by using UNC Shares and NOT local drives. Even if Media Browser is on the same system as your media files like mine, DO NOT use local drive paths (D:\Movies), instead type in the UNC path \\MEDIASERVER\Movies for example. 3. DO NOT use the Path Substitution option in Media Browser. If you use UNC paths, this should be more than sufficient. I’ve had strange behaviors when using this instead to translate local drive paths. 4. Create a user with Administrator rights to your Media Libraries. In my setup it is called mcuser. Create the same user on both your Media Center server, and your NAS. (If they are separate machines.) 5. Ensure you setup your media libraries in Windows Media Center as well, providing the credentials for mcuser. 6. Use this tool, to give the MCX#-SERVERNAME Administrator access to your media libraries by using the above wmcuser account. http://tobias-tobin.blogspot.com/2008/08/giving-media-center-extender-access-to.html Note: If your Media Browser server, and Windows Media Center machine are on the same server, step 5 and 6 may not be necessary, but I am unable to verify this at this time. In addition you'll need to have a separate account that has full Administrator rights to your libraries. More information on how the tool works is available on the website. 7. Load a CODEC pack on your Windows Media Center server. I prefer Shark007, but others may work with some tweaking. Get it here: http://shark007.net. Use Shark's recommended settings on both 32-bit and 64-bit CODECs, and says yes to the Live TV, Xbox 360 question. In addition under MKV, I choose to use Alternative Extender support. 8. If you have not already done so install Media Browser Classic on your Windows Media Center machine and make sure it launches. 9. Launch the Media Browser Classic Configuration program, and go to the extender+iso tab. Ensure that Enable Transcode 360 is UNCHECKED. Transcoding is bad, we do not want it! 10. While in the extender+iso tab under extender formats, ensure you put the media extensions you want to play natively, such as .MKV or .MP4 . Setting up your Xbox360: Here is where it got weird and this is key. It took me a while to figure these exact steps out. However, first, a little background: it’s a little known fact that Microsoft has released a new version of the Optional Media Update that will play MKVs and other media files natively. Originally Microsoft has had several versions of this program, but not all of them will play MKVs. This coincides with the update they have released for the Xbox ONE. However, the trick is getting the right version to download, which isn’t as obvious as you would think. From my experience, without having an Xbox LIVE membership it’s not possible to download the necessary update. In addition, I was NOT able to get the right version by downloading it manually (searching the app store). Like I said In order to get the proper version, it will be necessary to have an Xbox LIVE membership. As far as I can tell, the correct version is only available for XBOX Live members. If you are not already a member you will need to create an account and sign up for a membership. Note: The first month is free, so you can sign-up temporarily and cancel if you so desire once you get the update. The update should remain on the Xbox 360 even if you no longer have a membership. In order to get the correct update, perform the following steps: 1. If you do not already have an Xbox LIVE membership go to live.xbox.com and either create a new user, or setup an existing one that you will use on all your extenders with a subscription (this will unfortunately require a Credit Card). Note: You cannot just create an account. Simply, having an account will NOT be enough to download the correct Optional Media Update. 2. Now power on your Xbox 360 extender and navigate to the Xbox Dashboard. If your extender launches immediately to Windows Media Center, exit and go back to the Xbox Dashboard. 3. We first need to check to see if you have the older version of Optional Media Update first by going to Settings > System > Storage > Hard Drive > System Items. If it’s there delete it. If we do not remove it, the Xbox will not update the current version we have. 4. If you created a new account you will need to download the profile to your Xbox 360 Extender you just made from Xbox LIVE. Here is a link that explains how to do it: http://support.xbox.com/en-US/my-account/manage-gamertag-and-profile/download-your-xbox-live-profile-to-another-360-console 5. Once your profile is downloaded, ensure that you login to that profile by choosing it under the Social dashboard. You can also enable automatic login to this profile, by going to Settings > Profile > Sign-in Preferences > Profile Auto Sign-In > On which is preferable for a Windows Media Center extender. If you just added a subscription to an existing account, I found that I add to delete the profile on the Xbox, and download it again as described above to get it to recognize the new subscription. The key to this whole thing is to have an active connection to Xbox LIVE. If you don’t it won’t download the Optional Media Update that you need. 6. Now launch Windows Media Center on your Xbox 360. 7. In order to get the proper update, you’ll need to make sure that you have your movie or TV show media libraries available natively in Windows Media Center, WITHOUT using Media Browser Classic. Clicking on a movie or TV Show from the regular Windows Media Center interface, will allow the Xbox 360 to come up with a screen that will prompt you to download the new version of the Optional Media Update. For some reason if you use Media Browser Classic it will block the download from occurring even when though the screen comes up initially. However, the dialog box to download the update disappears. Using the regular Windows Media Center interface will allow you to do this. In addition DO NOT use Recorded TV, it will never prompt you because Windows Media Center sees these as native media files, which should be .WTV. The media file has to be an MKV or MP4 to have the Xbox 360 initiate a download for the Optional Media Update. 8. Reboot your Xbox 360 extender, and re-launch Windows Media Center. 9. Now go into Media Browser Classic, and navigate to your libraries. Choose your favorite movie or TV Show and enjoy direct playback without Media Browser transcoding them! Yay quality! You’ll also be able to tell if the program is being transcoded or direct played by going to the Media Browser dashboard. Under Server > Active Devices > hover your mouse on the device that is streaming and it will tell you if it is Direct Play or Transcoding the file. Note: You’ll need to do this on every Xbox 360 Extender you have. Hope this guide serves you guys and gals well. Enjoy!- 1 reply
-
- 5
-
-
- xbox 360
- mediabrowser classic
- (and 6 more)
-
I recently encountered all sorts of issues when setting up MBC and codecs in attempt to be playback all files types including subtitles. I finally figured it all out and took the time to write this guide which hopefully you find helpful. The codecs I use are Shark007 codecs and I can confirm works on Windows 7 and Windows 8.1 (both 32 & 64 bit versions). See attached for guide. MBC-Shark007-Guide.pdf
-
https://github.com/MediaBrowser/Wiki/wiki/Live-TV
-
https://github.com/MediaBrowser/Wiki/wiki/Transcoding
-
https://github.com/MediaBrowser/Wiki/wiki/Notifications
-
- 1
-
-
- notifications
- guide
- (and 3 more)
-
Hi, Am I missing something or does Android app really doesn't have guide page/tab under LiveTV? In browser I get nice TV guide but I can not find it in Android app...
-
https://github.com/MediaBrowser/Wiki/wiki/Channels
-
https://github.com/MediaBrowser/Wiki/wiki/Emby%20Connect
-
A quick video tutorial following the written gamebrowser guide here, It covers installing and setting up gamebrowser on the server and configuring Media browser Theater to launch games. Media browser-classic setup will be added in the future
-
- 5
-
-
- gamebrowser
- emulator
- (and 3 more)
-
https://github.com/MediaBrowser/Wiki/wiki/Parental%20controls
-
https://github.com/MediaBrowser/Wiki/wiki/Guests
-
https://github.com/MediaBrowser/Wiki/wiki/Users
-
https://github.com/MediaBrowser/Wiki/wiki/Camera-upload
-
https://github.com/MediaBrowser/Wiki/wiki/Devices
-
https://github.com/MediaBrowser/Wiki/wiki/Scheduled-tasks
-
https://github.com/MediaBrowser/Wiki/wiki/Movie%20naming
-
https://github.com/MediaBrowser/Wiki/wiki/3D-videos