Leaderboard


Popular Content
Showing content with the highest reputation on 11/30/24 in all areas
-
Well, I say that just so you won't keep stressing over something that may not happen in your lifetime. Pretend there is 'next' TV and enjoy what you have now, since that is all there is ...2 points
-
Be content ? Seriously ? You just can't go round saying things like that. Where would the world be if everyone was just content. Imagine if V. Putin was just content with Russia's existing borders, imagine if J. Bezos was just content with being just a millionaire and actually used the rest to pay all those employees a bit more...Anarchy I tell you, anarchy.2 points
-
Hey Everyone, My journey from Plex to Emby has been pretty smooth with the exception of setting up SSL encryption. There are lots of great posts on this forum and elsewhere on how to do this, and I consider myself pretty computer literate. But I'll be honest, this was a bit overwhelming for me as I have no experience at all in hosting web servers, DNS, or encryption certificates. After many hours, I've got it all working, so I thought I'd share what I've learned. I'm going to try to write this for the newbie, so don't be offended if it seems like I'm explaining lots of simple stuff. That's really what I needed a week ago, so maybe it'll help someone else in my shoes. Also, this is for Windows, although most of it applies to any OS. There's lots of text, but it's really very easy. Let me also say, I understand that a reverse proxy gives you lots of benefits and flexibility for securing your server. But that was a step too far for me. If you want a reverse proxy this post is not for you, but there are many posts in this forum to help you. If you want to access your Emby server from outside your home network you will want to require secure connection mode for all remote connections (see "Network" tab in Emby server configuration). To do this you need an SSL certificate. To get an SSL certificate you must have your own registered domain name. Here's a step-by-step. Domain Name Registration A domain name is the readable text part of a web address. So emby.media, or google.com, or media.yourdomain.net. Most home users don't have one, but you need one to get an encryption certificate. While (Edit:)There are many options for purchasing a domain (godaddy.com being very popular), I chose to buy my domain from domains.google. It cost me $12/year, and this is the only cost to getting your Emby server working with encryption. Go to https://domains.google, pick a domain, pay your money, and you're ready to go. For the rest of this discussion let's say you registered the domain name yourdomain.net. Now you need to associate your new domain with your home IP address. Most home users get their IP address assigned to them by their internet provider and it is "dynamic," meaning it can change. So you need to be able to tell your domain provider what your address is and update it when it changes. This can be done automatically, and is called dynamic DNS (DDNS). (Edit:) Before obtaining a domain, ensure the provider supports Dynamic DNS. Google domains supports this easily, here is the help page explaining how to set it up. Fortunately, my ASUS router has this capability built in so it was easy, but it's easy even if your router doesn't (follow google's directions). (Edit:) In case you have a static IP (obtained from your ISP), DDNS support is not mandatory. That's it for domain name registration. Now yourdomain.net points to your home network IP address. SSL Certificate Now you need to get an SSL certificate. This has the encryption keys you need, and must be issued by a recognized certificate authority or it gets blocked by your browser. Lets Encrypt will give you a free SSL certificate but it has to be renewed every 90 days. This was the part I was most confused by, but it's actually really easy. The part to understand is that Lets Encrypt must have some way of proving you own your domain name before they can issue you a certificate. There are two options, 1) they give you a little text file to place on your web server in a certain location. I don't have a web server so this is a no-go. 2) They give you a text string to add to your DNS registration in what is called a "TXT Record." You do this with google domains, it's very easy. To get a certificate you need an ACME client program that knows how to talk to the lets encrypt server. They recommend certbot, but it doesn't work in windows. Dig enough and you'll find ZeroSSL, they have a nice downloadable program that does it all and is really easy. Download here. Make a directory on your computer (I used c:\ZeroSSL). Put the le64 (or 32) exe in this directory. A single command will create your certificate. I think the easiest way to do this is create a text file in the same folder as the program, call it "get_cert.bat" and put the following three lines of text in the file. Edit the second line to have your actual domain name (instead of "yourdomain.net"), and to have your actual password for your PFX file (whatever you want it to be, just replace "yourpasswordhere" in the code below. @[member="Echo"] off le64 --key account.key --csr domain.csr --csr-key domain.key --crt certificate.csr --domains "yourdomain.net" --generate-missing --handle-as dns --export-pfx “yourpasswordhere” --live pause Save the text file as get_cert.BAT and then double click it to run. This runs the le64 program, creates the public/private key pair, asks lets encrypt to generate a certificate, saves that certificate, and converts it to a PFX file format that Emby requires. All in one command! When you run this, a command window will appear and you can see what it's doing. After a few seconds it'll pause and ask you to place the TXT record in your domain. It gives you a name and value, the name will be something like _acme-challenge.yourdomain.net, and the value will be a bunch of random letters and numbers. The program pauses here for you to put this into your domain. So now you just log in to your google domain again, go to "DNS" on the left menu, scroll all the way down and enter a "Custom Resource Record." The type is TXT, the name and value are what le64 gave you. Put them in, wait a few minutes for the change to take effect (took just a couple of minutes for me). Then go back to the command window where le64 is running and press enter to continue. It'll then verify your TXT record is there and issue your certificate. You'll find a file certificate.pfx in the le64 directory, that's it! Emby Setup Now log in to your Emby server setup. Go to "Network," in the field "External Domain" you put your domain name, so yourdomain.net or whatever you chose. For "Custom SSL certificate path," browse to the .pfx file that was created by the le64 program. In the "Certificate Password" field put whatever password you used in the .BAT file above when you created your certificate. Then for "Secure Connection Mode" I recommend you choose "Required for all remote connections." You also have to log in to your home router and forward port 8920 to the computer running your Emby server. I'm not going to give directions on how to do this, it depends on your router, but it's super easy. That's it. You need to restart your Emby Server, and then you're done! You can now access your server remotely and securely at https://yourdomain.net:8920. Certificate Renewal Now, I mentioned before that the Lets Encrypt certificates are only good for 90 days. So every 90 days you have to renew the certificate. Take that "get_cert.bat" file you made earlier and make a copy of it called renew_cert.bat. At the end of the second line, just add the text "--renew 20" (without the double quotes). When you are within 20 days of your expiration date run this file, it'll renew your certificate. I believe it'll ask you to place a new TXT record in your domain, so certificate renewal cannot be made fully automatic. You'll have to run it manually and add this TXT record into your google domain just like when you created the certificate in the first place. But it takes just a few minutes and then your certificate is renewed. You'll have to restart your Emby server for it to take. The file locations all stay the same, so you don't have to update anything in the Emby setup, just restart Emby. That's it! Well, I hope this helps someone. Sorry for the long post. I would have benefited from this level of detail a week ago, so maybe it'll be good for someone. If anyone sees something wrong here, feel free to correct me.1 point
-
Gamebrowser The Gamebrowser plugin brings game support to your living room, GameBrowser fetches game art and metadata automatically, and launches games using supported Emby clients. Get started with the correct folder structure The first thing you will want to do is make sure your games have the ideal folder structure, Start with a ROOT Games folder, then each game console should be in its own folder, with each game in their own subfolders. Games > ATARI > Asteroids > Asteroids.a26 > Pitfall > Pitfall.a26 > SNES > Donkey Kong Country > Donkeykongcountry.smc > Super Mario World > Supermarioworld.smc MAME is the one exception to this structure, as you can have all the game .zip files in the same folder Games > MAME > Aliens.zip > Btoads.zip > Dkong.zip Setting Up the Gamebrowser Plugin on the Server Gamebrowser is added to the server via the plugins tab on the server dashboard by navigating to Plugins > Plugin Catalog > Server > Gamebrowser and then clicking Install. Once it completes restart the server. Platform Configuration Continue setup on the server dashboard by navigating to Plugins > My Plugins > Gamebrowser and click + Add next to Game Systems, This page is where the game systems are configured. Start by choosing the path to one of your game folders, and then choosing the appropriate platform from the drop-down box. Then click Save. A UNC path is recommended if you plan to stream games over LAN/WAN connections. More info on using UNC paths //here Repeat this process for each game platform. Adding games to your Library Games are added to your library on the server dashboard by navigating to Library > and clicking + Add Media Library, choose Games from the drop-down box and name your game library, then click + Add next to Folders. Choose the path to the ROOT of your games folder. After the automatic library scan completes, your games should show up in the web client. Setting up Clients to Launch Games Emby Theater Launching games from Emby theater only requires a simple setup of external players. Open EmbyTheater, in the top right corner click on your profile icon in the top right corner, then navigate to Settings > External Players > Add Player Change the Media Type to Game, and the Game system to whatever system you would like to setup. In the Player Path type or paste the location of your emulator. Enter the correct command line argument for your emulator (listed at the bottom of this guide) Click save, and repeat for each game platform Emby Classic In order for games to be recognized in Emby Classic, you will need to install the GameBrowser-Classic plug-in in that app. GameBrowser-Classic can be installed from inside the Emby-Classic config pages by navigating to Plug-ins tab > Plug-in Catalog > GameBrowser-Classic. The plugin is free but requires the server to have a valid supporter key. After the plugin is installed, navigate to Emby Classic Configurator > Plug-ins tab > GameBrowser-Classic > Configure Select the game system you would like to setup, using the button on the right next to executable location, select the location of your emulator. Repeat for each game platform. For the switches section, most emulators will work using "{rom}", other emulators will require special switches, which will be listed at the end of this tutorial. Extra Setup Windows and DOS Games (Emby Classic only) Due to the client-server nature of Emby, to get Windows and DOS games to be visible to the server, you will need to follow this guide. Navigate to your ROOT Games folder, then create folders for Windows and/or DOS, with each game in their own subfolders. If it's a windows game place a game.gbwin file within each game directory. If its a DOS game place a game.gbdos file within each game directory. This file can be anything such as a blank text document or zip file. Just make sure to change the name to game and the extension to gbwin / gbdos. Games > WINDOWS > Baldur's Gate > game.gbwin > Borderlands > game.gbwin > DOS > Zork > game.gbdos > Wing Commander > game.gbdos After this step navigate to Emby Classic Configurator > Plug-ins tab > GameBrowser-Classic > Configure > Windows Games tab Select a game you wish to setup on the left, then click the button on the right next to Local Executable and select the .exe of the game. Repeat for each game. The setup for DOS games is the same as it is for Windows games. Navigate to Emby Classic Configurator > Plug-ins tab > GameBrowser-Classic > Configure > DOS Games tab Select a game you wish to setup on the left, then click the button on the right next to Local Executable and select the .exe of the game. Repeat for each game. Most DOS games don't run well in modern windows PC's. DOSBox is a great tool to overcome that. If DOSBox is configured in GameBrowser-Classic, then any games with a game.gbdos file will be launched through DOSBox. To use DOSBox follow this extra step. Navigate to Emby Classic Configurator > Plug-ins tab > GameBrowser-Classic > Configure > Miscellaneous tab Click the button on the right next to DOSBox and select the DOSBox.exe Emulator Command Line Arguments EMBY CLASSIC USAGE Atari > Stella > "{rom}" Nintendo 64 > Project64 v1.6 or earlier > {rom} > Project64 v1.7 or newer > "{rom}" Nintendo DS > DeSmuME > "{rom}" Nintendo Gamecube > Dolphin > --execute="{rom}" Nintendo GBA > VisualBoyAdvance > "{rom}" Nintendo NES > VirtuaNES > "{rom}" > NEStopia > "{rom}" Nintendo SNES > ZSNES > -m "{rom}" > snes9x > "{rom}" Nintendo Wii > Dolphin > --execute="{rom}" Sega Genesis > Fusion > -fullscreen "{rom}" Sega Dreamcast > NullDC > -config ImageReader:DefaultImage="{rom}" Sega Saturn > Yabause > -a -f -i "{rom} Sony PS1 > ePSXe > -nogui -loadbin "{rom}" Sony PS2 > PCSX2 > --nogui --fullscreen "{rom}" Sony PSP > PPSSPP > "{rom}" EMBY THEATER USAGE NOTE: Each argument needs to be on its own line, so for instance for SNES/zsnes, -m and {path} should be on 2 seperate lines. Like so: -m {path} Atari > Stella > {PATH} Nintendo 64 > Project64 > [PATH] Nintendo DS > DeSmuME > {PATH} Nintendo Gamecube > Dolphin > --execute={PATH} Nintendo GBA > VisualBoyAdvance > {PATH} Nintendo NES > VirtuaNES > {PATH} > NEStopia > {PATH} Nintendo SNES > ZSNES > -m {PATH} > snes9x > {PATH} Nintendo Wii > Dolphin > --execute={PATH} Nintendo Wii U > Cemu > --rom {PATH} Sega Genesis > Fusion > -fullscreen {PATH} Sega Dreamcast > NullDC > -config ImageReader:DefaultImage={PATH} Sega Saturn > Yabause > -a -f -i {PATH} Sony PS1 > ePSXe > -nogui -loadbin {PATH} Sony PS2 > PCSX2 > --nogui --fullscreen {PATH} Sony PSP > PPSSPP > {PATH} With ePSXE if you get an error "PSX Bios not found", use this switch to specify the location of the bios, just change the path to where your bios is located. EMBY CLASSIC USAGE Sony PS1 > ePSXe bios error > -nogui -bios "C:\Program Files\ePSXe 1.8\bios\scph1001.bin" -loadbin "{rom}" EMBY THEATER USAGE Sony PS1 > ePSXe bios error > -nogui -bios "C:\Program Files\ePSXe 1.8\bios\scph1001.bin" -loadbin {PATH}1 point
-
Emby Party is a solution for watching videos with multiple friends through your Emby web client. It requires no additional dependencies - only a device running Emby (presumably with good enough hardware for serving all the attendees, especially if you're transcoding) and at least one web browser. It consists in two halves: A server plugin and a web client module. They must be used together! Each half expects the other to be present. This is an experimental open source project. Feel free to fork and contribute pull requests and issues (my availability for fixing issues on my own may vary wildly and may be low in the near future). The source code and all known issues can be found in the github repository. Any information there should be considered the most up to date. Currently testing in Emby 4.8.10, Windows and Debian Bookworm (Linux), Firefox, Chrome and Edge. Features Hassle-free hosting: Doesn't matter who creates the party. Whoever initiates playback while in a party transparently becomes the party host, and host is reassigned if they leave. No need to recreate the party for someone else to host something later. The hosts controls the party video and video position. Video access permission check: Will only play a video if all party members have access to it, and will prevent new party members who don't have access to the current video (if any). Accurate synchronization of video player positions when the host seeks or changes videos using a multi-part protocol that leverages remote control commands under the hood. Accurate catch-up seek commands issued for guests when they fall behind or are otherwise offset from the host. Efficient transition between videos in a playback queue that accounts for slightly offset attendee positions and allows each attendee to start loading the next video while others finish the previous one. Late joiner support: Brings late joiners immediately into the video at the correct position. Joiners already watching a video will automatically start hosting that video if the party was idle. Host can change audio and subtitle streams for all attendees (guests can change it back for themselves if they want). Distributed pause/unpause requests - all users can pause and unpause. Return to video button for guests to return to the video being watched by the host if they closed it for some reason. Guests are automatically returned to the correct video if they open the wrong one or under certain other circumstances. Keep alive: Plugin keeps party member sessions and websockets open as needed and disconnects party members who time out. Support for multiple sessions/devices per user account. Just don't duplicate browser tabs! Support for remote control: Party members can control other Emby clients and those clients will benefit from party synchronization. (Caveats: Working, but not thoroughly tested yet. Due to the lack of client-side support, remote controlled clients are capable of issuing pause/unpause commands that break synchronization. I recommend being careful about pausing/unpausing in a device being remote controlled by a party member.) Cool resizable sidebar with list of party attendees and log of chat and events. The sidebar has docked (squeezes the video aside) and undocked (overlaps the video) modes and uses your Emby profile picture. Dark and light mode supported. Visual indicators for synchronization states of party members when synchronizing with host (icons). Visual indicator when receiving seek commands from the server (your name flashes orange). Host remedies for synchronization issues: Guests who are not responding can be sent another playback command by the host or kicked from the party after 20 seconds have passed. Emoji support in chat using :shortnames: or emoticons. Markdown styles support in chat, including spoilers and preformatted text. Preserves chat focus and selectively blocks keyboard shortcuts or UI interactables when chatting or syncing in order to prevent control mistakes/command spam. Chat bridge endpoint: External applications can connect to `ws://localhost:8196/bridge` to exchange chat (and some events) with the party sidebar. I threw together a module for my self-hosted Discord bot that shows how to use it. Remote control chain resilience for party attendees only: Prevents you from creating a loop of remote control targets. If you do this in vanilla Emby your clients will nuke the server with requests. Automatic skip to next video for videos stalled at the end because the last segment isn't decoding. This is also for party attendees only. Installation To install the server plugin, download it or build it in Visual Studio, then copy it normally to your Emby server's plugins folder and restart the server. Currently the plugin doesn't modify any Emby files (yet?), so you'll have to manually edit one of the web client's existing modules and import the Emby Party module there. Head on over to system/dashboard-ui/modules/appheader/appheader.js and locate the end of the render function, which in Emby 4.8.10 is in position 21877. Insert this code there: , Emby.importModule("./modules/embyparty/partyheader.js").then(function(PartyHeader) { return (new PartyHeader()).show(skinHeaderElement.querySelector(".headerRight")); }); Save, clear your browser cache and refresh. If the party button appears in the top right corner, you're good to go! I'm sure someone will tell me a better way to do this soon enough. I don't know if there's a commonly accepted way and haven't really put any thought into it yet. Whole bunch of disclaimers Use at your own risk! If something breaks that you don't want broken, revert the steps above to remove the plugin from your server installation. Emby Party was iteratively developed and tested with several friends over several weeks, but it was developed to suit our own needs. It was not (yet) tested alongside features we don't use, including, but not limited to, Emby Connect, Emby Premiere, Live TV, the audio player, conversions, cinema previews, most other plugins, etc. Currently no mobile styles. Not tested on mobile. We've been in active development until now. There are vaguely known issues that are hard to reproduce and instability can be caused by video decoding failures, networking issues, browser crashes, browser extensions, lack of hardware resources, forgetting your browser won't play until you click the window unless you've given Emby autoplay permissions.. New and exciting bugs should also appear as we get more people using it. Thanks in advance for helping test, report or fix this stuff! Otherwise, check back for updates, I guess? Please keep comments and suggestions in this thread. Issues should be reported only on github so they're all in the same place. You may notice a whole lot of things in the source code that make you think, wow, it sure would be nice if this was in the Emby settings. I agree! If you would like to implement a plugin settings page, please submit it as a pull request on github! I'm so horribly far behind schedule with this project, and my free time is far in the negative right now. There may be better ways to do some of the things Emby Party does that I am simply not aware of at this time (one of the reasons I'm keeping these instructions outside the repository for the moment) or were simply not considered because the feature grew organically. Pull requests please! Also recommended If you're feeling adventurous, consider improving your watch party's subtitle experience with these (much harder to apply) client-side fixes we worked out in tandem: Temporary workaround for subtitles coming in too early when resuming a video with transcoding (Important for this whole thing if you watch videos with subtitles) Web client ignoring AudioStreamIndex and SubtitleStreamIndex (Required for party host to guest stream index sync if you use that) Fixing mismatch between subtitle canvas and video aspect ratio breaking ass subtitles Fixed in vanilla as of 4.9.*! Playing plaintext subtitles through Subtitles Octopus by faking subtitle type Support mkvs with embedded fonts (requires the associated plugin) Fixed in vanilla as of 4.9.*! These may become obsolete over time if things are fixed or integrated into the main software. Don't forget to clear your cache and refresh after making changes to the client.
 1 point
 -
Hey, ignore this - turns out my server had updated but the service had not restarted (I'm running as a service). Stopping and restarting the service fixed the lag. P.1 point
-
It's hard to explain, IMO the Android TV app just feels better some how to use. If i was forced to say what was different i would say slightly more fluent, better looking and more options. How ever slight the differences are they do add up to something that feels better to use. The extra options like fx. down mix to stereo can be very useful when having trouble.1 point
-
Sure. IMG_0458.MOV1 point
-
Hi @AngelSing I tested this and I agree something's not working at the moment. I'll get it fixed and let you know when it's ready. Thanks.1 point
-
@LukeYes, what I need is them to play before they watch anything in all sections1 point
-
A dev will have to confirm, but I believe this is to combat Google incorrectly flagging emby media servers and their domains as 'deceptive sites' and presenting users with a big flashy error page instead of connecting (chrome). https://emby.media/community/index.php?/topic/96439-my-emby-server-has-been-flagged-as-a-deceptive-site/1 point
-
It works! Thank you.1 point
-
Ok I succeeded by redirecting port 8096 to port 8096, I didn't understand anything but it now works on my smartphone in 4G, thank you very much I will see if my friends can now connect to my server.1 point
-
Ok, don't hold my breath. Got it. Thanks Luke.1 point
-
*fixed in v1.0.34. TY!1 point
-
@VicMooreDisregard my last post! I started working when I re-saved the new settings and went and did a manual scheduled task refresh guide. Great work!1 point
-
Darker than Black doesn't require any special handling; just number the episodes to match TVDB, with the OVAs in the Specials folder numbered from s00e01 to s00e05. You will then get three folders: The first folder contains the specials - you can't hide this, sadly, but keep going... But the metadata provided by TVDB includes the positions that the OVAs fit in, so looking in each season we get: @LukeIt would be logical if specials that are displayed within seasons were hidden from the Specials folder (which would then vanish when empty), but Emby haven't done that (yet?). The present behaviour has the undesirable side effect that in the displayed total count of unwatched episodes, those specials count twice, which is misleading. Hope that helps. Paul


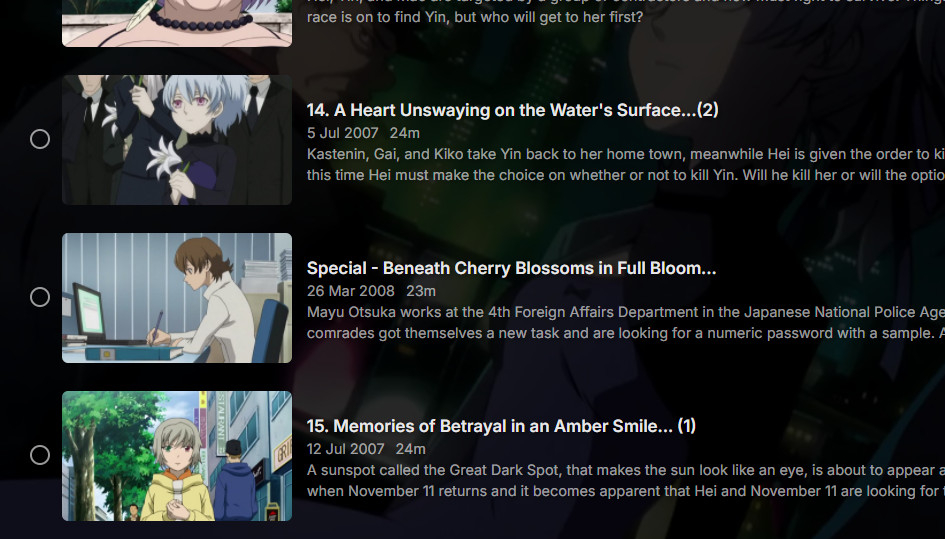
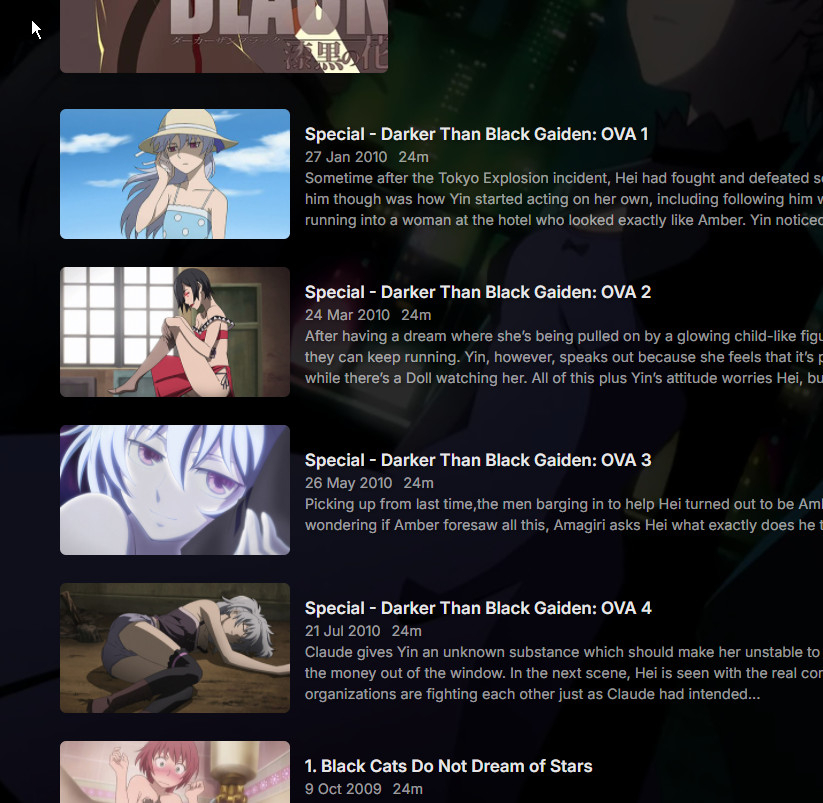 1 point
 -
Also, you do not have the latest Intel drivers installed: https://www.intel.com/content/www/us/en/download/785597/intel-arc-iris-xe-graphics-windows.html During installation, choose "Clean Install" (or similar) Then you'll also see QuickSync codecs for the ARC card. Also make sure you have "Resizable Bar" enabled in the BIOS.1 point
-
And then, please clean up the logs folder, restart Emby, reproduce and send those log files only. Can't look into 20 and guess which one might be the one showing the problem. (that it always produces 3 ffmpeg logs it our fault, so no worries about sending three). Thanks1 point
-
No official support until next major version of unraid since the gpu support is in the kernel. If you run a custom kernel it will work though1 point
-
Regarding season extras, they are being listed at the end of the season, but they are being counted as episodes. Meaning if I play the S1 finale, the next video that plays is the first extra listed, rather that the S2 premiere. Season extras should not contribute to the episode count of a season, not the episode progression of a season or series. They should be in a distinctly separate UI area as well.1 point
-
So restoring from backup worked. All I know is that when I created one of the new libraries, instead of pointing the folder to it completely, it looks like I accidentally pointed it too /share/CACHEDEV1_DATA/Multimedia/, then I seen that it was wrong and deleted that library, at that time all the libraries disappeared. Thanks @Lukeand @GrimReaper Appreciate your time !!!!1 point
-
You have likely broken your database: by adding/removing overlapping/nested folder library paths: I'd assume you have added (and potentially removed?) top level folder /share/CACHEDEV1_DATA/Multimedia/ as library path at some point which broke all the other libraries that had it's children as paths: You can try to recover database with steps listed in the above linked KB article though it is highly doubtful you'll have any success and it is much more likely you'll have to completely rebuild your library/database (or restore from backup if you have any).1 point
-
That's great, thank you so much! As long as it's possible to organize by a date, the order can always be adjusted by accessing the metadata. I believe the "Added On" option should not be missing from any section, as for me, it's extremely important to view everything in chronological order. Once again, thank you very much for your attention.1 point
-
How many Emby libraries have you created, and what folder paths are added to each one?1 point
-
Hi, did you see all of the access denied errors: System.UnauthorizedAccessException: System.UnauthorizedAccessException: Access to the path '/mnt/Dok_Filme' is denied. System.UnauthorizedAccessException: System.UnauthorizedAccessException: Access to the path '/mnt/Drama' is denied. And many others. It looks like the server is being denied access to your folders.1 point
-
Hi there, please attach the emby server log from after you ran the library scan: How to Report a Problem Thanks.1 point
-
This feature request will be 7 years old in less than 2 months —SEVEN!!! and with 13 pages of comments. What is the point of the feature request forum?1 point
-
He's not asking to seperate them, hes asking to be able to stop providers for people running on certain libraries. Example, stop tmbd people provider running on Anime etc, so you could prevent errornous people coming back if you dont have a provider id match.. So you could write a plugin that accesses just voice over actors for cartoons and Anime, Many voice over actors have same names as hollywood actors.... We are now at a time where creating your own plugin provider, and having your own database is a reality, but emby is not supporting this out of the box, it is still using tmdb, tvdb, tvmaze etc and we have no choice in the matter. So even if we write our own plugin and it fetrches the RIGHT person, the other providers will still "fill in" the other provider id fields with the wrong ids.1 point
-
Hi, more options to control this are certainly possible. Thanks.1 point
-
I just sent the log. I started the app, navigated to the guide and then tried to navigate inside the blank guide. The app stopped responding and within about 15 seconds it rebooted The failure occurred at November 29, 2024 at 2:03 PM Eastern The Emby user name is 'Fintel Family'1 point
-
I PM you the information. Thank you.1 point
-
I had the same problem where a receiver of a controller plugged into the PC would cause this weird behavior on FireFox, even when the controller was not turned on. You can fix this by going to about:config and disable the dom.gamepad.enabled setting. Hope this still helps someone!1 point
-
Quiero agradecer a todo el equipo de Emby su maravilloso trabajo y su generosidad con la oferta por Thanksgiving day. Much appreciated it! best regards and happy christmas!1 point
-
Ha ha @Luketoss your Apple TV out the window. And try the difference between Android TV and Android ( want to be all ) app.1 point
-
Adicional a esto intenta reiniciar los dispositivos de red switches, routers, etc. Pudiera ser algún dispositivo de red que este fallando.1 point
-
Hello, Good news, i have recovered my password, from my old local account. I used this process : Was i little bit afraid of enabling admin account on my Synology NAS, but it was fine. I have now acces to Emby again, will try it. Thanks for you help.1 point
-
Hi, no ETA but we are working hard on it. Thanks.1 point
-
WELCOME TO THE HISTORY OF EMBY! A lot of our users are new to Emby and we thought it would be a good idea to share some of the backstory of how Emby came to be, where we started and where we are headed. We have grown significantly since our inception. Once a humble open-source project, Emby has evolved into a sophisticated platform that allows users to organize, stream, and enjoy their media libraries with ease. In this post, we'll take a look back at the history of Emby, explore its development journey, and highlight the key milestones that have made it what it is today. The Early Days: An Open-Source Beginning Emby started its life as Media Browser, an open-source project focused on creating a simple, user-friendly interface for accessing digital media collections. Originally, Media Browser was a plugin for Windows Media Center, and its primary goal was to offer users a better way to manage and play their media files. Back then, it was a community-driven project, with developers and enthusiasts contributing code, features, and plugins to expand its capabilities. Media Browser gained a loyal following among tech-savvy users who appreciated its customizable nature and flexibility. The Shift to Emby and the Rise of the Media Server In 2014, Media Browser underwent a major rebranding and evolved into what we now know as Emby. This change wasn’t just about a new name—it marked a shift in focus from a media center add-on to a full-fledged media server solution. Emby’s developers wanted to create a standalone server capable of managing large media libraries, transcoding content, and streaming to multiple devices. The introduction of the Emby Server brought a range of new features: Library Management: Users could organize and manage their media files with a sleek web interface. Metadata Scraping: Automatic fetching of metadata like cover art, descriptions, and ratings. Transcoding: On-the-fly transcoding for seamless streaming to any device, regardless of format. Multi-Device Support: Streaming became possible on a variety of devices, including smartphones, smart TVs, web browsers, and gaming consoles. This new direction attracted more users who were looking for a flexible media server that could handle diverse formats and provide a unified experience across different platforms. Open Source to Closed Source: In 2018, Emby made a significant decision: it moved from being an open-source project to a proprietary, closed-source model. The change allowed the development team to maintain greater control over the codebase, improve security, and introduce features more rapidly. Key Milestones in Emby’s Development As Emby transitioned to a proprietary model, the development team pushed forward with a series of updates and improvements: Emby Premier: The introduction of a paid subscription model called Emby Premier brought exclusive features like DVR support, cloud sync, offline media, and hardware-accelerated transcoding. Emby Premier gave the development team a sustainable revenue stream to fund further development. Improved Mobile and TV Apps: Over time, Emby released a series of polished apps for mobile platforms (Android, iOS) and TV devices (Roku, Apple TV, Amazon Fire). These apps received regular updates to improve stability, user experience, and customization options. Live TV and DVR Integration: Emby expanded its offerings to include Live TV and DVR functionality, allowing users to integrate live broadcast channels, schedule recordings, and manage live content alongside their media libraries. Enhanced Transcoding and Streaming: Emby has continuously improved its transcoding capabilities to support modern formats like 4K, HDR, and Dolby Atmos. These improvements allow for a high-quality viewing experience regardless of the device being used. Security and User Management: Emby introduced advanced user management features, including user profiles, parental controls, and access restrictions. This makes it easier for families to share media without compromising on privacy or security. Emby Today: A Comprehensive Media Experience Today, Emby is a mature and feature-rich media server solution that caters to a wide range of users—from casual media consumers to serious home theater enthusiasts. It supports a broad spectrum of devices, offers robust customization options, and remains focused on providing a powerful yet easy-to-use interface. Some of Emby’s standout features today include: Unified User Interface: A sleek, modern interface that makes browsing and streaming media a joy. Customizable Libraries: Tailor your media collections with custom artwork, genres, and metadata. Cross-Platform Syncing: Keep your media in sync across multiple devices and platforms. Comprehensive Live TV Support: Access live TV, manage recordings, and watch DVR content effortlessly. Community Engagement: Emby continues to value its user base, with an active community forum, feature requests, and beta testing for new updates. The Impact of the Community and the Road Ahead Despite its shift to a closed-source model, the Emby community remains strong. Many long-time users contribute by creating plugins, themes, and offering technical support. The Emby team regularly interacts with the community, implementing feedback and adjusting features based on user needs. Looking forward, Emby is set to continue expanding its feature set while focusing on performance enhancements and cross-platform support. Emby’s development is driven by innovation and user feedback, ensuring that it remains a competitive choice in the world of media servers. Conclusion Emby’s journey from a simple open-source plugin to a leading media server solution is a testament to its adaptability and the passion of its developers. While the shift from open-source to closed-source was a turning point, Emby has continued to evolve, delivering a reliable and customizable media experience for millions of users worldwide. The history of Emby is one of growth, change, and a dedication to providing users with a comprehensive and enjoyable way to manage their digital media. View the full article1 point
-
I think he was just trying to add his experience corroborating yours. As you know and mentioned earlier in this thread, there are multiple tens of millions of reasons "why" they get more exposure but that's also exactly why they are moving the direction that they are - they have to provide a return on that investment. IMO we don't really need to step up our game in marketing. Instead, I think we need to step it up in development - and we're working on that.1 point
-
Anyone open to reviving this topic? Themes would elevate the experience quite a bit1 point
-
Hey Luke, would it be possible at all in the future to allow server admins to control when these themes are applied? Not sure if this is hard-coded in the app or on the server side... I love the themes...and I wish that the Halloween theme would start on Oct 1st and end on Halloween, not start on Halloween. If there is a way I can change this via API, or anything at all I would love to. The themes are such a fun part of Emby and I look forward to it every year, but it's so short lived. I know I can apply the theme manually in the settings, but I am wanting to change the automatic application and keep the howling/jingle bells etc1 point
-
There's a "Register with PayPal" button right there on the plugin's catalogue page, just below the "Install" button. Paul1 point
-
Display Control: Refresh Rate and HDR Mode Switching The new Windows and Xbox apps include an entirely new component for controlling display refresh rates and automatic switching of HDR enablement. Display-Control.mp4 Features Detects GPUs, connected displays and the connection type Detects possible refresh rates for each connection (depends on GPU capabilities, display capabilities, connection type, current resolution, current color mode) Detects availability of HDR mode for each connection Detects the display on which the Emby app is currently being shown (Windows app only) Dynamically updates the settings view when changes are made to OS settings or displays are connected/disconnected Allow manual switching of refresh rate and HDR mode (three-dot menu) Automatic switching of refresh rate and HDR mode on playback start can be enabled independently and separately for each display This will only be applied to the display on which the app is currently shown Revertion of refresh rate and HDR mode on playback stop can be disabled to reduce display mode changes (which can take a few seconds) How to... ...access the Display Control settings? Go to Settings (Gear icon), in the left sidebar choose "Display Control" Applies To Windows App Xbox App1 point
-
OK maybe the changes didn't get built in the version I gave you, so please try this: Emby.XmlTV.zip If there's still an issue then please provide screenshot examples. thanks.1 point
-
While Emby already has recommendations built in based on previously watched items I find they are not all that helpful. They seem to be based on genre only, for example, because you watched a comedy here are other comedies in your library. I do like how the also directed by/appear in recommendations work though. What would be great is if Emby could incorporate Trakt's recommendations as they are much more sophisticated. Trakt's recommendations are not only based off of what you have previously watched but also what your Trakt friends and other Trakt users have watched. It takes user ratings and trending/popular media into account. Ideally Emby would include full Trakt integration allowing users to rate media after watching, view lists and recommendations, and view upcoming media all from within Emby but for now I think recommendations would be a nice addition. Trakt has the potential to give Emby that community feel and allow users to discover new media, find something to watch, and recommend media to other users. http://docs.trakt.apiary.io/#reference/recommendations1 point
-
Don't hold your breath. It seems changes are made to suit the programmers..... not the people that pay for the software?1 point
-
Great news. Emby for Samsung is now available in the Samsung app store for more countries. If you're in any of the following countries, you can now install the Emby app using the Samsung app store: Argentina Australia Canada Czech Republic Denmark Finland France Germany Greece Iceland Ireland Italy Netherlands New Zealand Poland Portugal Spain Sweden Switzerland Turkey United Kindgom United States Virgin Islands We are working on adding more countries so stay tuned! View the full article1 point
-
I'm very familiar with the Media Stub naming found here . Are there any stubs for 4K UHD discs or any plans to add them? I've been continuing to add mine as blu ray discs, but would like to be able to differentiate between HD and UHD discs in my library. Thanks!1 point
-
Hi there, why exactly do you feel like it wasn't meant to be used with a remote?0 points