Leaderboard


Popular Content
Showing content with the highest reputation on 01/28/24 in all areas
-
3 points
-
I believe this thread got off topic ie: discussing omv vs truenas. lets get back to the point of it, pestering emby to release 4.8 Luke, please release 4.8 already.3 points
-
This might be the solution.2 points
-
Ah, sorted it, my account was set to use the email, that was what I set it up with originally and has worked. I tried it with the username instead and now it works.2 points
-
Thanks so much for your response! You nailed it, ended up being the password for the PFX, I feel like an idiot. (need more coffee) After removing the type-o in the password and rebooting Emby all is live and well. Thanks again Grim!2 points
-
I don't know why this specific discussion is happening here in this thread. But i have to add this because your rant against FreeBSD/Truenas is quite uninformed. A NAS primarily should do network-filesystem-things and nothing more. And for that purpose Truenas Core (formerly Freenas) is perfect. People even pay for it in business. When you recommend something like OMV to people for their data, you should add that OMV is a solution for lesser critical data and for more flexibility. Nobody pays for OMV. It is a "toy" basically. Also generally iocage(jails), when you need that functionality, are way more secure than your Docker-Containers. Docker is an absolute security-hazard for lazy people. You pull preconfigured images from third-party sources into your system and run it with root? I mean really? For purposes like WAN-side router (->pfsense, another freebsd-appliance that people pay for in professional environment) or NAS i would always opt for a BSD-approach and i always would recommend this for people when housing their data. Because for most people it is not only images from bluray disks but family-photos and videos and other unique and private things. For making a server for your jails, containers, VMs you should have a separate machine.2 points
-
Hi, we're working hard on it. Hopefully we'll have something soon.2 points
-
At this point, any idea on when there will be a beta with M1/M2/M3 VideoToolbox hardware accelerated transcoding support? Starting to feel like an idiot paying for Emby Premiere when it can go years without basic functionality working, and over a year since the “wait for 4.8” update on the issue.2 points
-
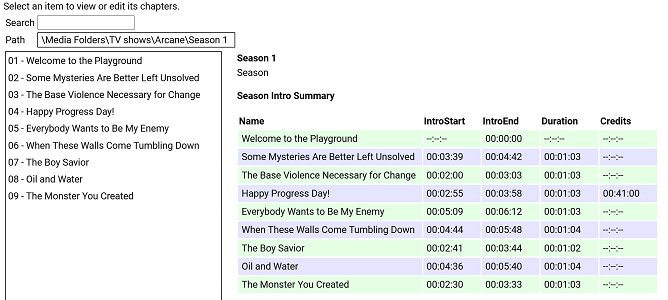
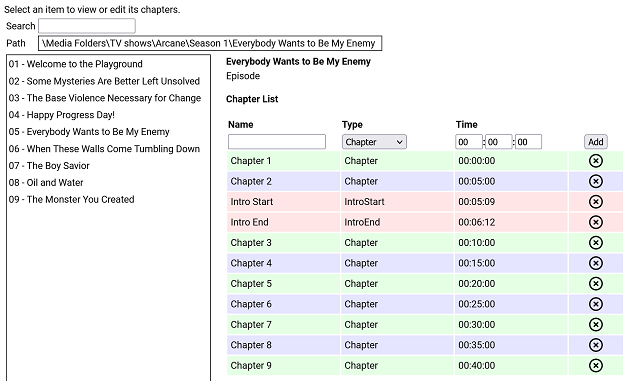
I have put together a simple chapter viewer and editor plugin. The plugin is now in the plugin catalogue. As always, here is the source: https://github.com/faush01/ChapterApi/tree/main/ChapterApi It is very simple and allows you to view chapters for an item (Movie, Season or Episode), remove chapters and add them. It supports all the different chapter marker types. It also has a season Intro summary page, select a season to see if it has intros detected for each episode. Note: All chapters are wiped and reset when you do a metadata refresh on an item. If you spend any time setting up or editing your chapters, keep this in mind. There is no current way of locking chapters. Chapter List Season Intro summary Intro Detection (CTRL-F for Intros) I have added a new way of detecting intros based on theme audio, this is using a very different approach than the core approach, it is using some of the ideas I posted over there: https://emby.media/community/index.php?/topic/107878-audio-fringerprinting-chromaprint-segment-detection/ With this approach, you need the Into Chromaprint info, this is a simple audio fingerprint of the theme song/music/audio. The plugin looks for this and can create chapters based on the results of the search. So where do you get the Chromaprint Intro info file, you can create one yourself for a series, season or episode by adding chapter info for one episode and then extracting that as a Chromaprint Info file. The new icons on the season summary page lets you extract the info file, if you just want to check you have the chapter offsets correct you can extract the audio of the chapter to play back and confirm it. A Chormaprint info file looks like this: { "series":"Game of Thrones", "season":2, "tvdb":"121361", "imdb":"tt0944947", "tmdb":"1399", "duration":107, "extract":10, "cp_data":"ThXy/E4hsdxOIZDdziWA3c9lgNnd/YDI3NyAyNyYwMzcuFHc1L0V3dS1F1/E8xJexOISXsfyMl72UzZe5lM13uZlNN/m7FDddvyT3Hack9xWjJDdR52Q3USWkN0EkvHfFJJz3zT2d98s53ffJO1n/yR8Z/4lTCf+Hgwn/k40N/pOJHH63iBR+/4xUfnuEdP47hXDeH1XgXgcd4B4DP/AeAzf0FkM/VBZDO0QWTzkEFkt9BN7bdASet3RUnqP0UJaj9dFe57WRH2u/kR977pEfO++RXw/vlb8D5Ze/Q+GfvcNgn32TdI99m/iPfbvYjj37jUZ/+4FX73uBN+9fhSfvV40vf1eELT9XjCU3V4hlN1fIZfcfzHW3C0FU9w9DRPYHTkTWA0pElgMLVNYBDVBWARRQBgUcUEYNHFRGCR3ARhk7gAY5e4BGdd+AxqGU0IahkHCCo5AwwreUMEKblDACipwwAsrbIMIGemCCAjKgggIipIYCI7QGBiWUBg4kjAbGIIxGvmDEhqrsQFequAAXq4gAF6uIABevjBDTq8Qwk2vEYLM/wKCxA8Og8QPHpDEH36QxDfe8MQ213HEFtUxxAfFdsTX0XbEt/H2xKPzdcSS0zXAgsI3wYLCJ8KSwyXCprXlwqakpcLnrLTC5ay0wlW09MMFsDXDBZE1wwXTJ8FV0ibB5eJm0e1v9lOta/dTrXn1Up0ZdVKNGXdSjwV1Up8BdFLvEGRS7yBgUusgYFLvIPAS72XwEt1d8wLF2fIDxNlyA8TbcgJ0/3ECZK9wAmSncQJEvyJCBZ4iQweOJwE3iiEAJpphACa74xE2qaMTNryjEia8oBInrGASJ6wgM0W4IjHFmCIwxIgmMJTIJjC0SCcwpVw3MeVtNTHnb3QxY270MXJWtTECRrEwAtKhMALjs3QS47N0I+XxdCPv0Hwh+1B8EfsRfAH7EnwB6xJ9EO9Tf3D1U37wxcN+8cXDfpXFQX6V90F/l+ZAfbfuQX337kN959dDf+dVwH7vVcB+//XQds3103fN91J1Tf5SfV3OUn0vz3N9L93wfy/00H4/5NB+H+RQfg/0En4P9BZ+P0U2f29Hdn/vRvd/nxL3dZ4S9XWOMvV0nzL1fJ8iVVyeIlVcvgLzXO4G8VxvFrFcPy6wXA0ukFgNKpAYDWqQCAz+0AgM11AIHPdRCDXzEQg18wMIVdMCCPfHAgm39wMKsuNBCpLzQwqCUUMKkkFBCqZQwAqmIMAJ5myBCGZogggH+YIIBdmCCASP0ggEh1AINIMwCSSzEAoksxEKZKcTSuWnAUqjYwBKkjEASpIwAU6yEMPOphCCz+YQgs1WAYLFFgWRxTZ1kIUn/dCFN8UwhRfHN4QPxzaEHeZ2xF3m1sTd5pXE3fbUxP1GFMT1RjXExQc2xMUXNkTXNRdEZyXVRGct1EQzLdREAz1VRANVNkQDQTYEA8FnAFPBbwDy8e0BoqHvAaKtbwOzuW8Ck4lvApOJZQKTjWUCkZFlArGxZQKhoWVCoaF0QqGldALhrXACxflzAcTbMgDE2yMA9P8lEOTtIRDk5WFR5fVjUXXfZ1FXjmVRFo5gUBaOYFA2nmBRNq3hUybso1Im7KNSJ/yhUmVc8FLVWHNShBgyE4QZMhCECyYQlA4nELQCZxDlM+cQZSOlEDUjpBAXIqQAFxLkABZO5AQWWuEEFtqmBAb6pgwG6rcMF+6wCBfnUAgF0xcLBcMXCjTTBRrl4QQbpeEEG6XlRBmt/UUZv/1FGZd/RRuOf0cbzlVHGV5VRxkuRMEbL1TBGz9lwRofdcMaD/XDGh3Twxp100Aa5fFAGuXhABmlsUEYrbFDGKe/wxinv8Bct7rAXIa+Q1yGn0Jcx5VCXNeF0l1nhfFfJYXwXzWn8F4Vo/NeBfNyXgfzMl4XUTJeJ0ExX2YcMFzmOFBctinRXIYpw1yGL8NdjhfCXY4Dw1+vA9Nf50HRX2Xhkd014bBdNaGwXTSl8F00n/BdFJ9xWRTtcls1bTJaNTUyWjURMlv1ARJb9QNTWbVTQFi1Y0BYteFAWLXhQFj39UNYV7XCWUadwllGmdJbRtnTW1bZ01pW3VNaXtVRWl7QVV5/QFde/0F2X/9Tdl/3ZnZdpiZU3aYmVN2mZ8TfpuHE3+bwgd/WsILXVoSS1zeFkJc3hZCXNYfQhhfXV4YX0TaHF3E2hSYRMoRmYXecZmXXnOZt15z3XZWUx93UlMffVcXF31fFRY82x1WPftV1/3/VZe181WX1dNUx8XXVEdF21AHBftRBQX7U0BN91OAnfNSgL33QoWt/1aFb/9aTS//Wg0v30oLF5VLCwORS86DkUmOgZFJl4GRSZfQ1cnX8NXIk/DZzNH12cVVpdnBVL3xw/y98cO8vfHHvHn9z7w5fU/9O3VNfztxTXc6UU02+lNMNr5XTDa230xettdNnrbXTZ53d02fLH9Imyx7SZkk+0nY5PtJXLH/SxyTvUscg71LXEH9R1wM+VNcCNlRXAnZUTRJ1VB029BQdavQcPOrwHDzq8Bwc6lAcDO8RGQz1EhsM0RYZHUEXGS1AVRgtZVQYb2XXGG/n1xnO8scbztLHGs7Sxxqew8EbrpVBWa+9QFnvqUBY/7lBWc+9Q1vNlUZbTdFGWg3BV1s9wFZZLdB3WS1hdVgv53dYL+bXWR521ltOUtdaztLFWt/CwFvv1cBb79zA2e/8wNnf/MPZzvzD3c7wQ9/O0EPf3sFT33/BVt1391bd9W/23fVp99/1OXXflT913pUzE96FE1Pe3wNTXu8T0V4vM9BeKyOQXzkjkF85dtBfKUbQXyhXUF84N1B/GCUQewh1ET8JXBM92dwDPbnYQTSZ2EA0iZhANImMRDCJhEUxmYDHM7nQ1jL54dYy6ePWMuuj1nLvo3dy54d0c+WPdHHVjVRxhY1Xc4WPVnPVz1Zz519Xc2YvV3NmL3ZzJiVncSYkY3cuFOF3PkDxdw5QsH8P4PB/DeDQPwz1UzkMrRI5DO0SORztAjk8/QE5PVVBON1TQziPU0IYj1LCGI8Cwxi9AkBYrCZAWKwmwVjcP8JYzF+CSExNg0kNRZBPDdWUT17XtU/+t/VN7pf0TK6XdEyut1VFnvVWx47xUsaG0VLGh0FTVrcBUVbvMVBWbSNQVikj8VYpI/FWKDfwUzge8FMYHnBTCFcwVwjXMVcI1TFXCIVwV9mFYXW5jXF1mZ1zdJi9c3SIvXF1mLRwd7iQMHb4sDP2eLAy9jigMvYsoTL2JeMm9yZiZvQmMmb0Igbv9CIN7PwiCOz8Yhjs/MI4/v2CPP5fghT+XoIRf16GE3delhJ3X7cy912vIrVc7SaUWG0ukEhpaoBIGGqASAjqgEhN/tFITddSSF1DM0hdQzNM/UFxTO9lU0znbdNM9m3ST4Zl0k6GwVJOhsETTpaBEU7ns1BO56PQT2WjwE0lp8BNJK/QTRT/Uk0E9xJNBdcSTRVDE0hlUVBIZWVQSHVt0UhVfdFJ1X3VSdd3VUvXU1dL19NWS9fDd0v3wXdLd+XVSTft1Ek3rVRJN7lXWVe9Fl1G3RdfRsUxX9bFM16mUVNetjFTXrYxU162MUFepjHBXuchgV7lIYFePTGRXz0TkF8sU5BdKFfQGSjfUBkY31AZGP8TGxjtExsZbQEZWfVDGZnVRxiZlUcYmZ1FHbi/RB24v0RfuK9Ed5y3R3ack0Z2nJJGcryy1nK14t5y5/L/cubWfXLmxmxy5sds8ubFbPNW1W3zRtVv8QbVbXEW/W1wFnltcDZ5ZXEmeGdxJmhmdzZs5lYWcOZWBtDiXgfQ814FkHMeBbBSGgWkAhsMrAIZTLwCGdzdAhndzUYZvVUHGb0RBRmfEwUY3xNFGP8yRVh9ModYLRaHWD0GhVg9NpRMXW6UTE3ulEzPntVMzofXTZ6F1U+uldVOrpVVTv7BVU7+0XdO/mFyTv5hc15vMXFeaTNxXigj0V44I9FeODZBXigWQF44FkBeGBdAHwhFUB8IwREdGYAQPXmAMD3ZhTQ9m4V0PbuPd327nnJ9m75yfZmuU3+ZrhF+uLc3/rixNv7o8Tb+6OE2/mkhdvZtIXbXLyF+1DYxftQ2Af/UJgy91HYYrcTWKK3ExiivxIY5r8SGT6XFhsPkx7bC5Me28vTHpuN1xebjNcTm8xDMZ+cQzFXvEEwV71BNBfVTTQRxVk8EUVZPFEF2TxRFd09VXfdNfXn1T+1t1E//ZVVOz3FXTk/BU05/wVBfL5HQXy+l0F8trdBfPanBXg25Q14Nt0JeDZICXk3CAl/dQgZc7QYHXK0vRVSvK8RUrivFVJ4vh9WONcfXhgDH1rYAwda+ENFGniDTQr4hkEOuFZBDrh2QQ68tsEKtZbBCvOXjQtjxYULYsSBD+LEgU1ixIFMYsyFTGbIjVRmyI3U5siF1ObZjdTi+Y3QY/mJ0GF5ifBhfY3wYTWN8WA1jfFgFY3lZRXF7GXX1ehvh93ob4fd6", "cp_data_length":3372, "cp_data_md5":"DDF936E4FD29A02CDA178EBFF37AD2E8" } It's just a JSON file with some info and the Chromaprint data. This can then be used in the Intro Detection tab to create a job against a series/season/episode list. Once complete, you can import the job results into your items. This is a semi auto way of detecting chapters for series that are having issues, because you are supply a good well-known chromaprint of the audio you want to target your results are much more predictable. Sharing intro theme cp data The sharded intro theme cp data is now hosted on GitHub https://github.com/faush01/ThemeCpData To use the hosted data in auto detection in the ChapterApi plugin, you can use the following URL in the "Intro Data External Url" on the options tab of the plugin: https://github.com/faush01/ThemeCpData/archive/refs/heads/main.zip Add the URL, hit download intro data, hit reload intro data and the intro cp data will be loaded for all the series you have that there is cp data for in the shared repository. If you want to add more the to the shared repo, clone it, add your new into cp json items and do a pull request to have your new items merged in and available to others.
 1 point
 -
Tried it, worked. Then I went back to my internal emby server, which now works. Weird. Oh well. Thanks for the help, whatever you did seemed to un-stick it.1 point
-
Yeah, as Luke noted, reinstalling isn't going to help with a permission issue, so you'll need to address that, first That said, if Emby itself is still not working after reinstalling, try the following: Shut down Emby Server via App Central in the ADM. Reboot. Uninstall Emby Server via App Central in the ADM. Reboot. Reinstall. The rebooting is necessary as sometimes the start/stop and uninstall scripts can hang, especially when apps are not in a good working state. If, at this point, Emby still doesn't run, your only recourse is to manually remove it, which will require shell (SSH) access: turn off Emby Server via App Central in ADM remove Emby Server via App Central in ADM run the following command from the terminal: sudo rm -R "/volume1/.@plugins/AppCentral/emby-server" run the following command from the terminal: sudo /usr/builtin/sbin/userdel emby (this is critical) Just to be sure, reboot. Reinstall Emby Server from App Central. Access it via port 8096 with your server's IP address (same address you use to access ADM).1 point
-
I'd happily test it out, would a premium key help in associating with my particular install, can you even bind it in that method? Anyway, I'll happily test it out if I can - I will try to look for a scheduler for a library update until said time arrives.1 point
-
I always change the ports every month, even after this started to happen, i changed the port again on friday. and yes, I use https1 point
-
TVDB does not have ratings. IMDB covers TV series as well as movies. Request is the ability to use IMDB as a metadata source for TV series.1 point
-
You can obviously create one but we can’t put it in the catalog.1 point
-
Cool, then just keep in mind that it's dependent of your preferred meta-providers order, i.e. if all meta-fetchers enabled as in: and both TMDB retrurning their rating and OMDB returning IMDB rating, you'll get TMDB rating, not IMDB rating under Community Rating. Maybe you'd want to move OMDB one place up, so availability basically goes IMDB>TMDB and not vice-versa.1 point
-
Not sure if something can done with this, but IMDB does offer their data sets for free for non-commercial/personal use: https://developer.imdb.com/non-commercial-datasets/1 point
-
Here's some links where you can see the cost of IMDB data and why that's very unlikely to be implemented in foreseeable future: https://aws.amazon.com/marketplace/seller-profile?id=0af153a3-339f-48c2-8b42-3b9fa26d3367 https://aws.amazon.com/marketplace/pp/prodview-yeuyizioqmfsy#offers AWS Marketplace: IMDb Essential Metadata for Movies/TV/OTT (API) (amazon.com)1 point
-
Pretty much that. Your server is running on port 8096 and per the compose your container is using host network mode.1 point
-
Unless you use some 3rd-party/external solution - no other way than what you have currently enabled.1 point
-
I did but I refreshed after adding OMDB and it has ratings now. Thanks.1 point
-
That particular show as in your example still has no IMDB ratings entered as it's quite recently aired. Do you have any other rating-less shows?1 point
-
thanks a lot for the update (and the swift reply)1 point
-
Hi. Yes we need to update the installer and that will resolve this. We’ll have that done sometime this week.1 point
-
OMDB meta-provider enabled in your library settings.1 point
-
Not sure what kind of presentation you're after, you might explore Reports plugin export function and see whether it suits your needs.1 point
-
Thanks for that, when looking for device.txt (which is in; programdata\data) file I saw a connect.txt file. Deleted the device.txt and it didn't work, shutdown the server, deleted both the connect.txt file and the device.txt, started the server and connected to Emby Connect. Cheers!1 point
-
I really got myself into a pickle [see (*)]. So, I started over, with the 4.8 Beta this time. And made sure neither the Emby Server nor the PC it is on would need to be restarted for a few days before I started creating my Music Libraries. And all is now golden. Thank you Luke and bekfield for the participation. But, in reference to what I noted as an enhancement request: It was pointed out Emby already did that. I'm not finding it be the case. In the case of the Libraries where they are configured as "Perfectly organized as artist\album ...", the folder.jpg/folder.png/etc. files -- present in the directory an artist without artwork comes from -- is not used in the Album Artist / Artist views when an image for that Artist cannot be pulled down from one of the services. In every case below where the artist image is missing the album he/she comes from (usually, just one album) has album art, and not art that was downloaded but from my own folder.jpg or folder.png file. (*) Stupidly thought that if I cleared the metadata and cache directory contents, removed the libraries, then recreated them, I'm get the artist images on those scans. Not only did that not work as I hoped I ended up losing all artist images I had, as well as all album images too. I.e., I had nothing, only my folder.jpg/.png files displayed in Folder view. I knew that was a risk. The DB file contents are a black-box and no management of the contents are available to us. But I had hoped the DB would 'self adjust' and purge entries with no live file on the HD. But lesson learned, it doesn't. I'll never do that again. LOL
 1 point
 -
If you set audio and video to copy only, then remuxing is very close to the exact same file size and it only takes a few seconds to happen. It's an easy thing to try and sometimes fixes file playback issues.1 point
-
Ok, I'm not seeing anything going on and it's still grayed out. Usually, I hear my HDs when it's caching also.1 point
-
Usually, this is disabled while artwork cache is in progress. I'll check...1 point
-
Well for dynamic nodes that's not supported, but for synced nodes it works. It uses the same mechanism than the Kodi default nodes. Please doublecheck.1 point
-
Hi, I think we should end it here it kinda works now. no clue how and why. but it works1 point
-
I agree the removed tags on the Emby.Releases GitHub make it more difficult to maintain the packages for the distro repos. This morning I added a little cron job that runs my AUR upload script for the emby-server-beta package every hour. This should at least result in the package being more up-to-date than before, instead of relying my human interaction of executing the script.1 point
-
For me its working in last beta1 point
-
The first post was in 2019 and people keep asking for it every few months. There's nothing more to come, is there? I would also be very happy for a sleep timer in the (iOS) app Yours sincerely,1 point
-
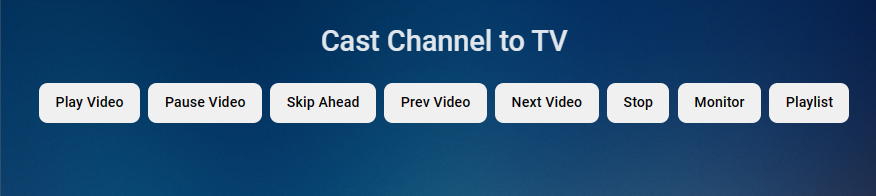
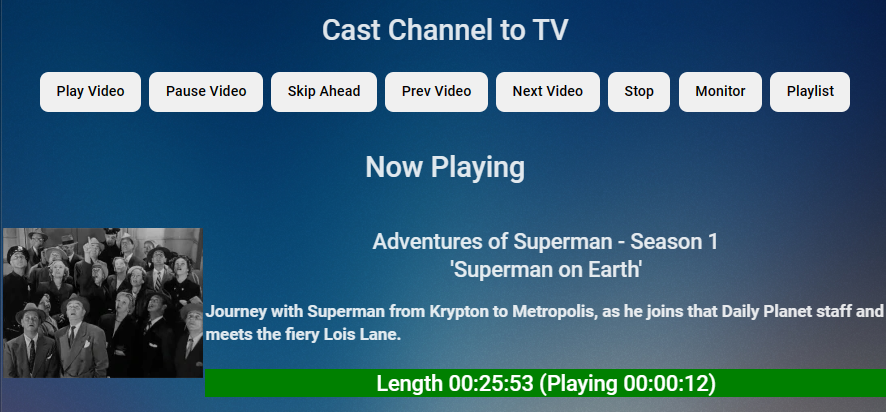
I added "Cast to TV" to the "Playlist" screen. You can now play the playlist on any Emby client on your network. Click "Cast to TV" then select from the drop down list the Client you wish to cast to. Then click "Play Video" to start the video playing. After the movie starts you can monitor its progress by clicking the "monitor' button

 1 point
 -
The Forum admins should be able to help you with that... I'm really missing this plugin in the beta server... more to the point, my wife misses it...1 point
-
Embyionic is just my personal label for the Emby Server. Other then that, i havent made customiziations.
 1 point
 -
Ouch, should we alert all linux users that they can't use collections? No, collections work just fine. What I would suggest is focus less on the contents of the server data folder and focus more on creating collections using the user interface. Are you able to manually create a collection using the user interface? let's start with that.1 point
-
@TZTZoroThanks for the help. I keep learning from your CSS. Vic1 point
-
Logging details from the active Emby sessions can help track server load, identify stability issues and let you better manage your server. The following instructions can help set up session logging and display in a Grafana dashboard. https://github.com/faush01/EmbySessionLogging Short Description: The logging script (python) logs the active sessions inclusing transcoding info once every 60 seconds into a SQlite file DB that can then be used as a data source in a Grafana Dashboard.1 point
-
Good day, I just wish to all the Emby team as well you are Emby members a long happy life. As well, I hope the second generation whom will replace us one day, to be dedicated to this project as we did. My best to you all. Closing the thread.1 point
-
surely u will win forum badge or something for most morbid topic of all time1 point
-
@FancyNerd92 that would be nice, now you can put in commercials That would be fun1 point
-
Given the latest events, isn't it about time the development team took this a little more seriously and stopped kicking it down the road? All internet facing systems in 2023 should have the option for MFA.1 point
-
Nothing new to report yet but stay tuned.1 point
-
I got another example why this option could be useful with both Android apps because of a limitation of Exoplayer. There are a couple extended versions of movies such as The Martian and Blackhawk Down where the Atmos track was spliced together and Exoplayer loses its position while external players like VLC do not. These two movies have been mentioned several times in the forum for having problems in several places throughout the movie and the defect is right on the disc. All you have to do is go to Amazon and look at all the comments. Until Exoplayer can deal with the problem then having an option to either always play these movies externally, or an option to select an external player on the fly would be beneficial. @Audiomixer1 point
-
To be fair there probably is many guides out there but ill give you a summary 1 - Domain Make life easier down the road by purchasing a domain name, i recommend OVH as they sell them dirt cheap. 2- VPS Choose a decent vps provider, cheapest is not always best. but if in Europe a cheap option to test if it works for you is Hetzner. 3- Choose Distro Once you have your distro selected (i recommend Debian 11 minimal) the VPS provider will give you a IP address, go back to the company you brought the domain name from and make sure you set the following records: A - xx.xx.xx.xx (where xx's = your ip address from vps A - emby.xx.xx.xx.xx (these are subdomains which if you are using docker you will need as many as you like i.e 1 for portainer manager, 1 for issue logging, 1 for other clients) Think of what you wish to use and do and create these subdomains up front as it can take a while to propagate through the dns servers 3 - Update the server Using as SSH client (terminal on mac is built in Powershell on windows works also), log in with the Uname and Password that was issued to you when setting up the vps. ssh username@xx.xx.xx.xx Then Run sudo apt update && apt upgrade Confirm Yes. Now if the vps is located in a different timezone to you you can adjust the default timezone, the format is Area/Location, so fo UK you would type: timedatectl set-timezone Europe/London Now things i like to make sure are installed as default before i do anything include: Nano - Easy file editor Zip - obvious unzip - obvious wget - obtain items from http links curl - similar to above vnstat - monitor BW usage in real time ufw - uncomplicated firewall fail2ban - Intrusion prevention system This command will get you going sudo apt install nano wget curl zip unzip vnstat ufw fail2ban 4 - Get docker Installed (debian 11) This is the easy bit they have separate guides for Debian and Ubuntu so as i use Debian the commands here will work if you choose Debian 11. If you choose Ubuntu do not select version above 20.04 (the 21v wont work with there ubuntu instruction unless you hack it up abit) Copy this whole block first into terminal and press enter, if asked a question answer yes (y) sudo apt-get install \ apt-transport-https \ ca-certificates \ curl \ gnupg \ lsb-release Then curl -fsSL https://download.docker.com/linux/debian/gpg | sudo gpg --dearmor -o /usr/share/keyrings/docker-archive-keyring.gpg Then copy this whole block and paste and press enter echo \ "deb [arch=$(dpkg --print-architecture) signed-by=/usr/share/keyrings/docker-archive-keyring.gpg] https://download.docker.com/linux/debian \ $(lsb_release -cs) stable" | sudo tee /etc/apt/sources.list.d/docker.list > /dev/null Then update sudo apt-get update And finally run the install sudo apt-get install docker-ce docker-ce-cli containerd.io Okay so so far you have docker running now lets add an easy webui to manage the docker front end. I use Portainer as it is simple to use, to do this you will be visiting a site called Docker Hub, this is a good central point to find dockers that interest you and each docker usually has a setup guide, can seem daunting at first but after you have messed about with it its easy Now there are various ways of creating a docker, i am old school so the following is the way i like to do it, however many will say Docker Compose is a better way, both work so learn which ever you want So lets get portainer setup first time, below is an example i use however once i have setup SWAG Docker, i will recreate this first docker Copy and paste this into your terminal ssh session docker run -d \ --name=portainer \ --hostname=Portainer \ -e TZ=Europe/London \ --restart=always \ -p 9000:9000 \ -e PUID=0 \ -e PGID=0 \ -v /var/run/docker.sock:/var/run/docker.sock \ -v portainer_data:/data \ portainer/portainer-ce:latest --name - This is the name of the docker and how it is referred to by the system but more importantly behind a proxy server for SSl TZ - Timezone set this to your preferred location -v - These are mounted volumes, the second one is where you persistant datais kept, so you can destroy and redeploy the container and your existing data is retained otherwise you would have to start setup of that container all again PUID/PGID - this is the user applied to the docker = 0 is root user, and some dockers wont start correctly if set like this as a security measure, if you have a different username in your main server you can find these details by typing - id xxxxxxx where xxxxxx is your username i.e admin/ubuntu/johndoe, normally if it is the first username the values will be 1000/1000 -p 9000:9000 this is called a port map. The first value is the port a person will type in the address bar, the second value relates to the port thats open in the portainer container itself, logic behind this is that you may have many dockers where the container port is 443. This way you could say make the first value 8443, 7443,6443 etc. This is only relevant if you choose not to get free ssl as the proxy will handle most of the traffic The last line tells Docker which container to pull You should get a success message so time to see if it worked, so visit http://yourdomain.com:9000 As you have no SSL certs yet note the link is http and we add port 9000 you should be presented with portainer login page Add a new admin account and password and click next Select Attach local environment (not exact wording but usually the left most box) to connect portainer to your local docker environment If all has gone well you will see the following: Click on that big box with the docker logo to access your main config page Then click on the Containers section This page is where you manage all you containers, you can start stop delete or change settings Anyways to make things easier we will now make a quick network change 5 - Docker Networks In the left hand menu click Networks Click Add Network Enter a name for network i.e - My-Network Driver = Bridge Subnet = 172.20.0.0/16 Gateway = 172.20.0.1 Scroll to bottom and click add network The reason for this is working with proxy's like Swag is a lot easier where you have all containers within a unique network, it reduces the amount of work later on, Swag will just direct traffic to the docker name and port and comes with pre-configured setups to go. Okay so lets move portainer to the new network, so go back to the main container page (menu in left hand side) above and do the following: Click on the blue portainer link next to the green running icon Scroll too bottom Click join a network Select your network name you created in step 5 Select Join network Wait a few seconds and it will appear underneath in both your network and bridge network Now click Leave Network next to BRIDGE Step 6 - Emby and Swag Okay so lets install Emby docker Visit docker hub again and type EMBY in the search box, there are many versions including EMBY's own version. Now i will be honest here i tend to stick to Linuxserver.io containers as they are rock solid, updated frequently and just never had an issues with them, i will use them as number 1 choice for a container and then if they do not have one i work down the list Now below is a base config but you will need to change to suit your hardware Full details are available here for configuration options - linuxserver/emby - Docker Image | Docker Hub As an example heres mine (im running on AMD EPYC so there is no hardware passthrough config for IGPU (intel) or GPU but added the igpu flag back in docker run -d \ --name=emby \ --net=my-network \ --ip=172.20.0.4 \ -e PUID=1000 \ -e PGID=1000 \ -e TZ=Europe/London \ -p 8096:8096 \ -p 8920:8920 \ -v emby_data:/config \ -v /Mount:/Rclone \ --device /dev/dri:/dev/dri \ --restart unless-stopped \ ghcr.io/linuxserver/emby:version-4.6.7.0 Name - Obvious leave as is net = enter your network name you created in previous step ip= set a fix ip, just a tidy ocd thing this would follow the network you set up above with just the last section changing for each docker you create ID = as above tz = as above Ports 8096 and 8920 are the ports required by emby emby_data - persistant data storage (real location via ssh is /var/lib/docker/volumes/emby-data/_data) v /Mount - This is where you store your media on the server and /Rclone is how it will appear in Emby when browsing for folders to add. Now if you are storing your media on the server in lets say /home/myusername/media you would change the first part to /home/myusername/media: Now if you are storing your media remotely, say on Google Drive or One rive, you will need to install something like RCLONE and follow their guides (pretty simple to be fair but beyond the scope of this quick start guide) --device - this is the passthrough of igpu in this example, they give you options for gpus in the link i posted above, this can be removed if your vps is running AMD non igpu cpu etc Paste the block into ssh terminal and you should get success. If you refresh your portainer CONTAINER page it should now show Emby as Started if all went well. So visit yourdomainname.com:8096 and hopefully you will now have Emby setup page showing. 7 - Security So far everything is running unsecured so heres a rough guide to securing the two containers, remember those subdomains you created at the beginning? Good because we need them now So in this example you created these subdomains - manage.yourdomain.com and emby.yourdomain.com Lets add a simple to use Proxy/Nginx/SSL container by Linuxserver.io - linuxserver/swag - Docker Image | Docker Hub Now first off to avoid the LETSENCRYPT issue where the expired cert has nuked the app on certain TV's and devices we are going to use ZEROSSL which is also free for ACME ssl request So first signup for an account at ZeroSSL IT's free and quick to create an account docker run -d \ --name=swag \ --cap-add=NET_ADMIN \ --net=my-network \ --ip=172.20.0.5 \ -e VALIDATION=http \ -e PUID=1000 \ -e PGID=1000 \ -e TZ=Europe/London \ -e URL=yourdomain.com \ -e CERTPROVIDER=zerossl \ -e SUBDOMAINS=manage,emby \ -e EMAIL='zerosslaccount@whoever.com' \ -e ONLY_SUBDOMAINS=true \ -p 443:443 \ -v swag_data:/data \ -v /var/lib/docker/volumes/swag_data:/config \ -v /var/lib/docker/volumes/emby_data/_data/logs:/config/log/emby:ro \ -v /var/log:/config/log/server:ro \ --restart unless-stopped \ linuxserver/swag:version-1.27.0 Key points to note: Net - Change to the network you created Ip - give it a fixed IP as above thats not in use already (last section) URl = is your main domain name you created in step 1 Certprovider = Makes sure the docker uses ZeroSSL not Letsencrypt Validation http = this is how it will obtain the certs, at the moment you should have no firewall running so http will be fine. DNS is an option but that requires setting up API's so for now stay with http Subdomains = add all the subdomains you created in step one, seperated by a comma and without the main part of the domainname Email = The email you used to signup and login to ZEROSSL Only SUBDomains = If you are only going to use the subdomains set to true if you want the main domain included then set to false Now the volumes are as before, the 3rd volume is used for fail2ban within this container as when setup it will monitor emby logs for bruteforce login attacks, the fourth volume i added in as i have Authelia also protecting my site and those logs are stored in the main servers log file, you can leave this for now or delete Copy the above block once you have modified it with your details and paste again into SSH Terminal / Powershell and press enter If all goes well you should see no errors So go back to PORTAINER container page and refresh the page, the SWAG docker should now appear and be running if you click the first icon to the righ (piece of paper) you can see what logs are being written live. What you are looking for here is success notice and the last line is SERVER READY If you have any errors then you need to check that your sub and domain names are correct, your zerossl email is correct etc If you have made an error then you can just tick the box next to SWAG and click remove (do not click remove persistant volumes in next window) And follow the steps above again 8 - Success - Lets set up Swag to secure your sites Okay so your swag setup correctly and obtained the certs now a few tweaks to make Once again visit the container page but this time click on the fourth icon >_ Click connect This opens a ssh connection to inside the docker. Now lets get to the place we need to do all the work cd /config/nginx/proxy-confs Press Enter ls will list all the preset configs done for major apps, we are interested in 2 at this point - Portainer and Emby, at the moment they all show as sample as this means they are not active so lets create an active version, copy 1 line at a time and press enter after each one cp emby.subdomain.conf.sample emby.subdomain.conf cp portainer.subdomain.conf.sample portainer.subdomain.conf Remember the network you created above for simplicity down the line? Well this is the reason why, we only need to edit one word in each file for a basic setup This process is the same for all files nano emby.subdomain.conf The file will open so look for the following: server { listen 443 ssl; listen [::]:443 ssl; server_name emby.*; Now the only piece you need to change is the bit before the full stop. Above it is set to emby. If you called your subdomain part as emby, there is nothing to change here. But lets say you wanted the link to your emby instance to be media.yourdomain.com you would change that block as follows: server { listen 443 ssl; listen [::]:443 ssl; server_name media.*; Once you have checked and changed the domain name press the following to save CTRL o - This writes the file CTRL x - exits the editor Do the same for Portainer - follow the steps above and change the name to match your subdomain so in our example change section portainer.*; to manage.*; Now if you have done this correct: Click CONTAINER in left hand menu click the select box next to swag and click restart If the container restarted fine now we can check if it worked so we will test with PORTAINER First Open a new tab in your browser and enter manage.yourdomain.com the page should load without a port number and show it's secured with SSL. 9 - Success - Emby ssl Tweaks Now Emby wont quite be setup right for emby connect so we need to make a change this is explained in the SWAG config file you edited in the above step Makes the changes as explained above in Emby and then you should be able to visit emby.yourdomain.com and receive the ssl cert and in dashboard WAN name and port should show as emby.yourdomain.com:443 10- Tidy Up Now you have ssl setup and proxy is working, we need to make a cpl of changes to the existing dockers. If we no longer need the insecure public ports published then lets get rid of them Go back to Containers main page in portainer LH menu Do one at a time, so select the box to the left of portainer. Click remove DO NOT tick remove persistant volumes Portainer page will now throw an error as obviously it does not exist, copy the same text below into your main SSH terminal (with your ammendments obviously) docker run -d \ --name=portainer \ --hostname=Portainer \ -e TZ=Europe/London \ --restart=always \ -e PUID=0 \ -e PGID=0 \ -v /var/run/docker.sock:/var/run/docker.sock \ -v portainer_data:/data \ portainer/portainer-ce:latest We have only removed the -P 9000:9000 line as it's no longer needed as we are accessing via the proxy on port 443 You will notice when you copy this and hit enter in terminal it will be near instant as the image is already downloaded Go back to our browser and type - manage.yourdomain.com and you should be greated with the secure portainer page Repeat this for the EMBY container and this time copy and paste the following (with your ammendments obviously) docker run -d \ --name=emby \ --net=my-network \ --ip=172.20.0.4 \ -e PUID=1000 \ -e PGID=1000 \ -e TZ=Europe/London \ -v emby_data:/config \ -v /Mount:/Rclone \ --device /dev/dri:/dev/dri \ --restart unless-stopped \ ghcr.io/linuxserver/emby:version-4.6.7.0 Emby can only be accessed via SSL now In future if ya add more dockers you can go straight to leaving the ports out of the setup process if you have done the following Created a subdomain at your domain name provider Edited the relevant proxy-conf as per above with the subdomain updated restarted swag YOU DO NOT HAVE TO DO ANYTHING TO THE SWAG DOCKER - no need to redo this container 2022 Update If you remove the ports for emby as mentioned above, and seem to suffer some buffering issues, add the ports back in, some clients even though they were connected via ssl and proxy had horrendous buffering issues until these ports were reopened, don't ask me why as i don't understand the logic myself, but re-opening the ports the buffering instantly vanished) Obviously if you have applied firewall tweaks below then make sure the ports are reopened in UFW 11 - Firewalls & Fail2ban In your main SSH Terminal at a minimum turn the firewall on. If all your dockers run through SWAG on port 443 then you only need to add a cpl of ports to the IN firewall So you can follow these steps, press enter after each line sudo ufw default deny incoming sudo ufw default allow outgoing sudo ufw allow in 22/tcp sudo ufw allow in 80/tcp sudo ufw allow in 443/tcp sudo ufw enable confirm yes as you may be interrupted Now, technically you could get away with port 22/tcp only which is your ssh port (i would change it from default but thats a different guide you can follow) Reason i say that is as it stands Docker kind of bypasses your firewall when you publish a port (hence why we removed the direct access), now you can adjust UFW which i would do once you have a better idea of the system by following this guide here - ufw-docker/README.md at master · chaifeng/ufw-docker · GitHub as this secures the server a little bit more However as you are not running web servers on your main server as they are in docker then no harm will come, but you can test with just port 22 as you should have no issues, if the Swag docker has an issue renewing the certs then add the 80 and 443 ports as a test Now you can add any other docker you want to build up your arsenal of tools to maximise the use of the server For info, this may not be the best way, but thats the great thing with Linux there are many ways to achieve the same thing, and i have deployed docker setups like this time and time again without any issues each time improving security and performance. Ultimately just try it because its bloody good fun and can become quite addictive and enjoyable, and if it goes wrong, then just roll back, delete or reinstall your vps

 1 point