Leaderboard


Popular Content
Showing content with the highest reputation on 11/07/21 in all areas
-
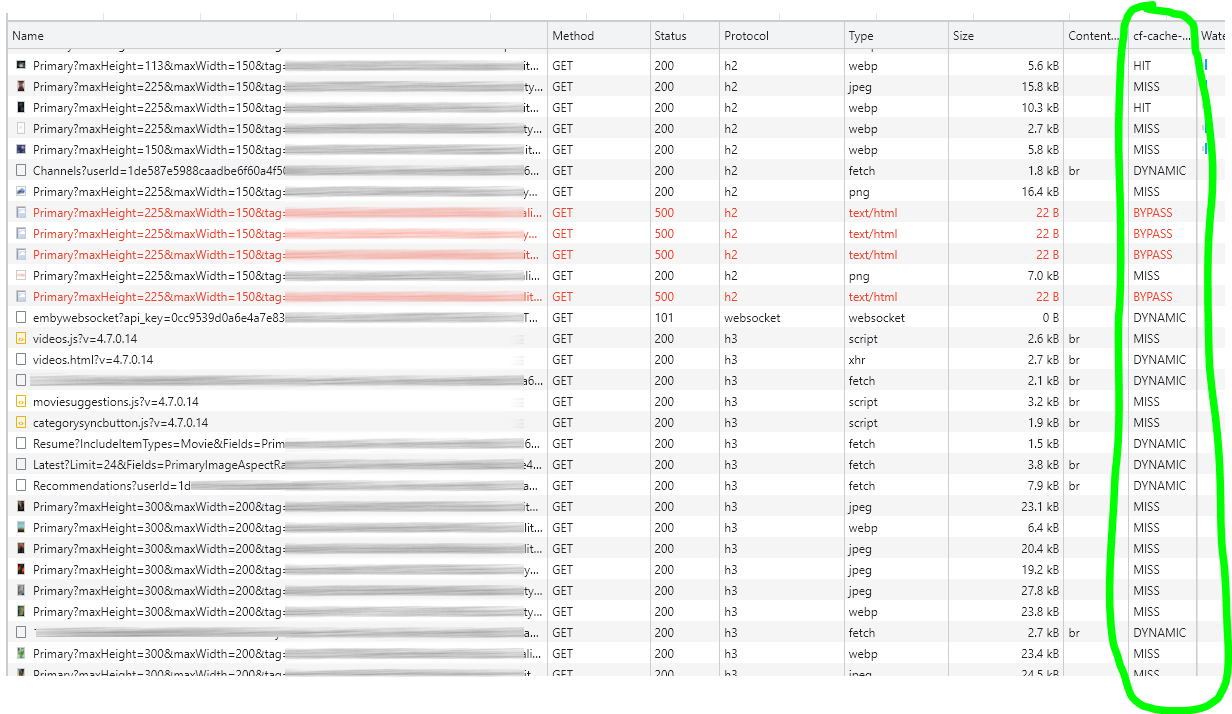
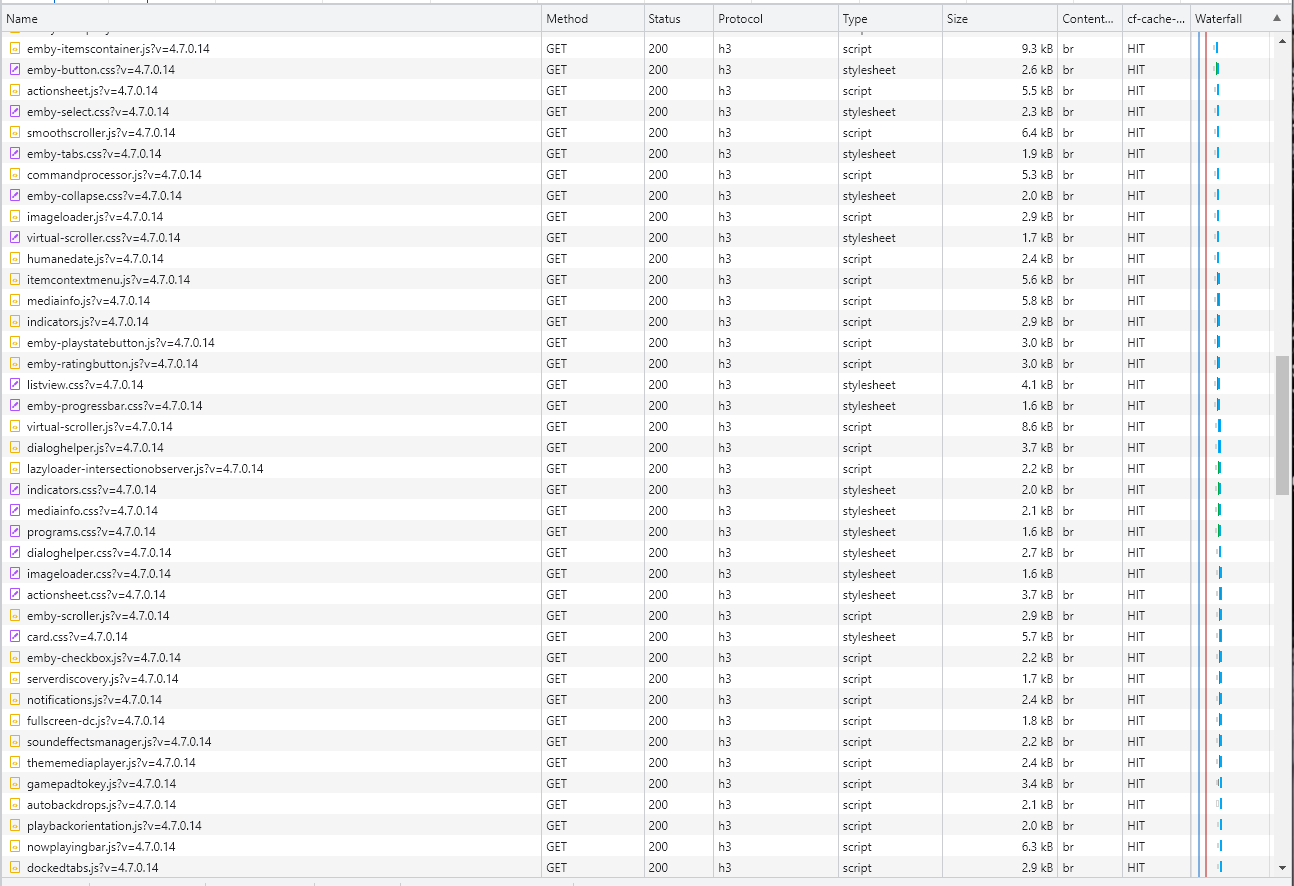
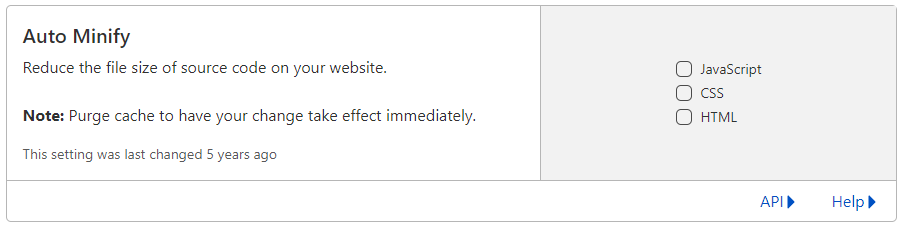
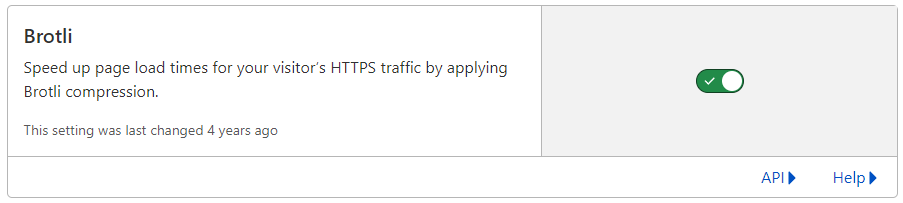
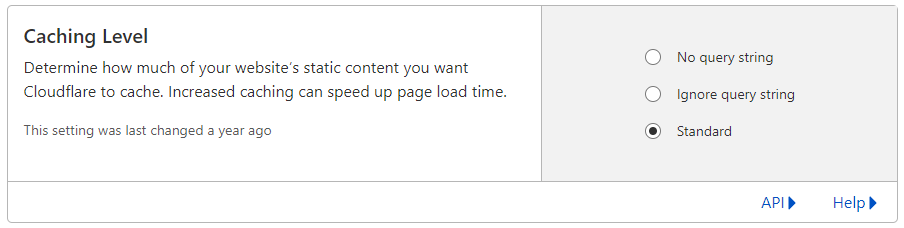
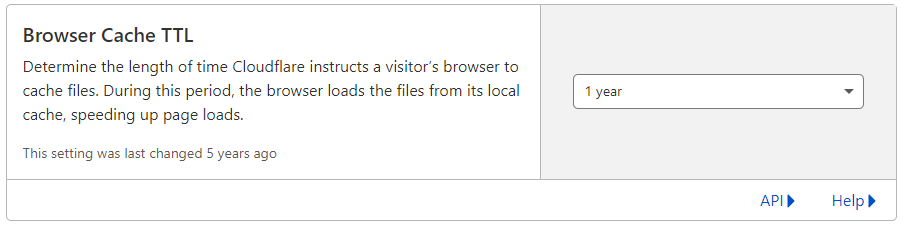
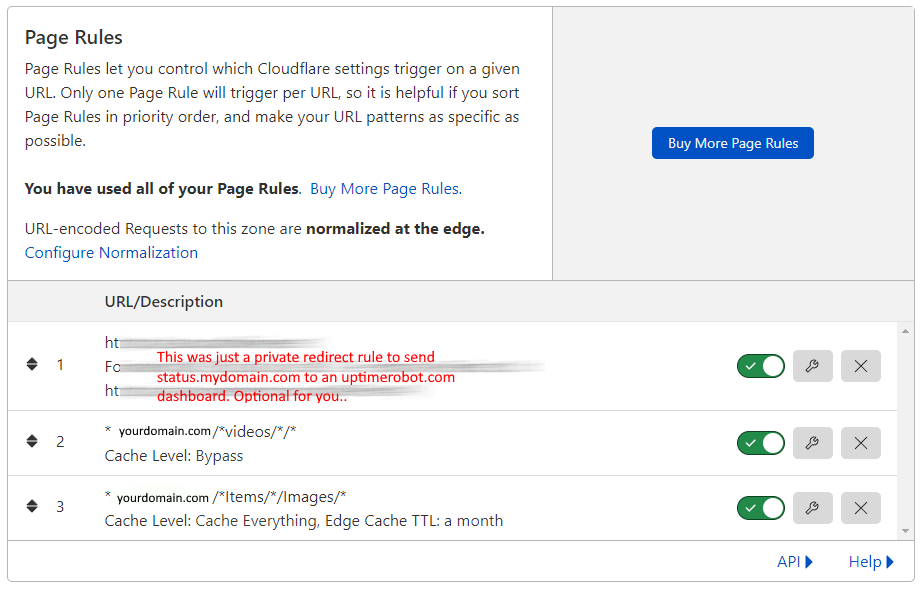
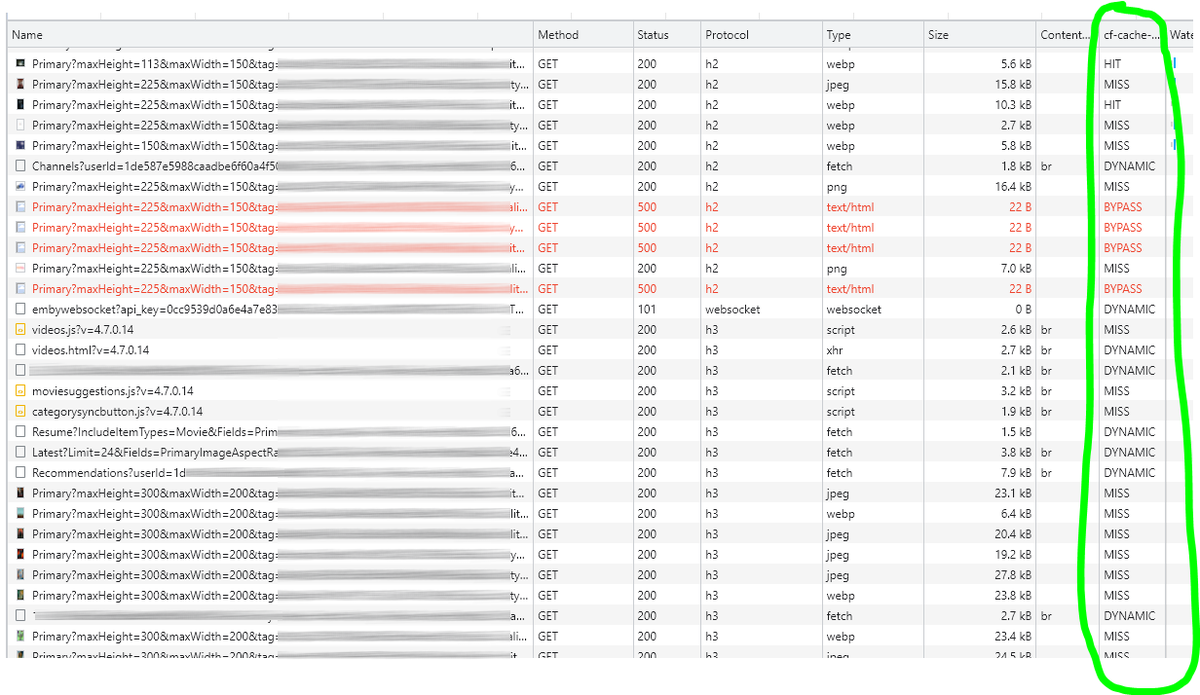
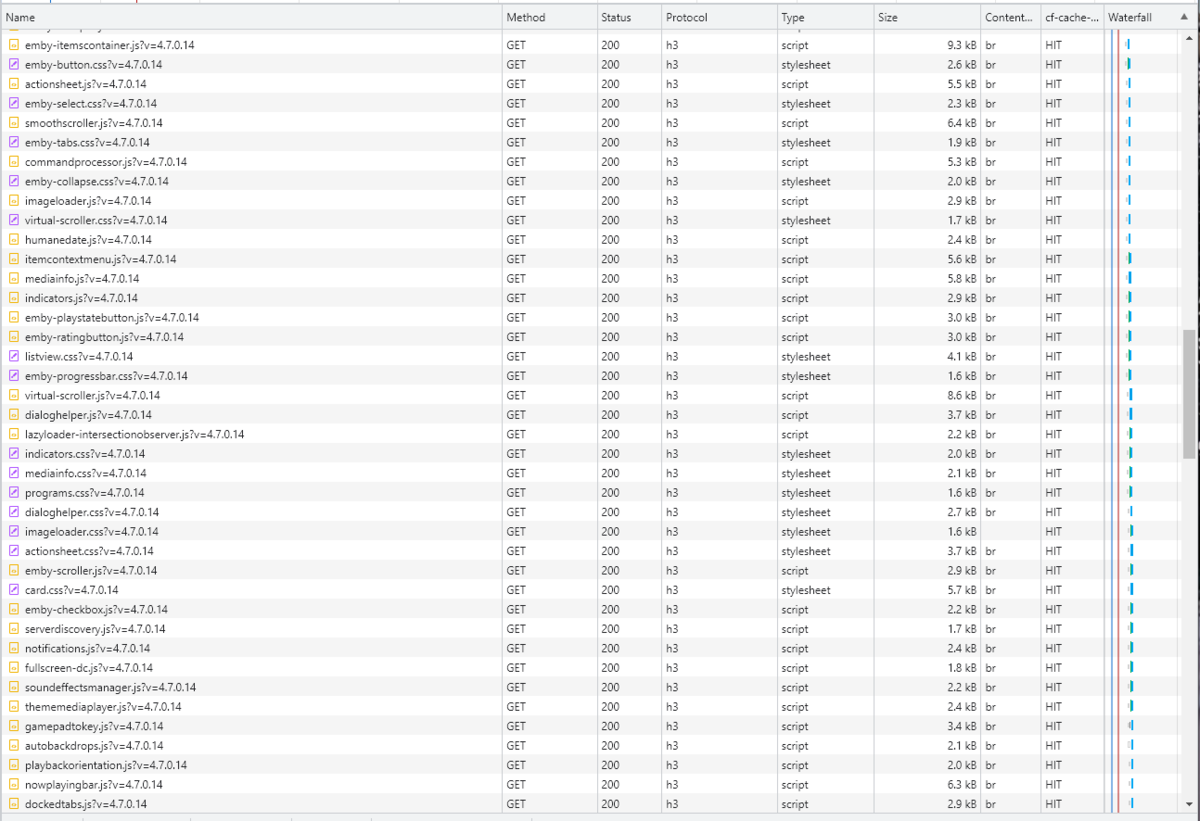
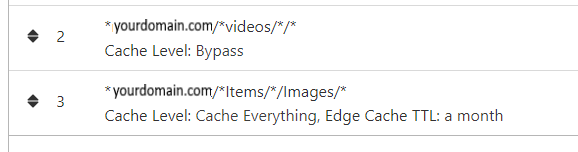
Cloudflare and emby Config Version 1.0.0 Last Update 02-25-2022 Update by Pir8Radio ** UPDATE: I AM HEARING OF EMBY USERS GETTING VIDEO FILES BLOCKED WHEN USING CLOUDFLARE (FREE TIER). IF THIS IS THE CASE, I NO LONGER RECOMMEND USING CLOUDFLARE. Even with the cache bypass rules, your video still passes through their system and is technically against their TOS. Use CloudFlare at your own risk if you choose to continue. I'll update if I get more info. Please post in this thread if you find you have video loading/playing/downloading issues while using cloudflare or have received an email from them about this. MESSAGE FROM CLOUDFLARE: Free, Pro, and Business Plans serving videos or a disproportionate amount of non-HTML content can be in violation of Section 2.8 of the Self-Serve Subscription Agreement (TOS). This will turn into a full Cloudflare how-to. Others are welcome to edit this or PM me with suggestions.. However right now I'm just going to post some recommended settings for people who already have Cloudflare setup. There are a few cloudflare settings that break emby, some break it in obvious ways, some only certain apps in certain situations.. These are the settings I found that work well as of today. I'll try to maintain this post and update the header info should new features come out, or the community discovers better settings than these. As of today, these are the settings available to us in Cloudflare FREE account: First disable the two main things that will break emby, go to the "Speed" tab then "Optimization" sub-tab. DISABLE Auto Minify and Rocket Loader! (screen shots are in the recommended state) Other options on this settings page are optional to enable, I suggest enabling Brotli compression. It's a good thing. Now head over to the "Caching" tab and select the "Configuration" sub-tab. Set your Caching settings as shown below. THIS IS OPTIONAL: Other settings in this settings tab are optional to whatever you like.. I have "Always Online" enabled, its kind of a neat feature that caches as much of your emby server as it can in case your server is down, users will at least see an emby splash screen, that's usually about it.. but its something... kind of useless otherwise.. Handy if you have other websites, it will totally cache normal html websites and users can continue to use your cached site when you have a web server outage. Next head over to the "Rules" tab. Create these two rules: Rule #2 here we will bypass caching 99% of all video. Caching the video will actually slow down the client experience. It screws with the chunks and often times has to fully cache 1 chunk before cloudflare sends it to the client, causing playback delays. Rule #3 here will cache all images on the edge servers for 30 days. We need this rule, because cloudflare only caches known file urls, like picture.jpg or poster.png emby serves up webp images with NO EXTENSION so cloudflare doesn't know to cache these items. But 99% of emby images come from the /items/XXXXXX/images directory so we will just force cache everything that comes from this URL, it should be only images. Keep in mind when you enable this it can take some time to build up cache.. emby serves up different sized images based on browser screen size, apps, etc.. so if you load a page that is minimized to a small window on your desktop emby will serve smaller sized images, if you make your browser full screen, now emby will serve up larger images and those images may load slow the first few times until they get cached too. Go below this screenshot and I'll show you how to check if caching is working. Check to see if Cloudflare Caching is working Well, how do you know Cloudflare is doing its thang'? Use a browser like chrome, or the new Microsoft edge (which is just a rebranded chrome). Open the browser, right click in the browser window and go down to "Inspect" (there is an F key for this too I forget what it is, I should add that here lol). Once the dev window pops up adjust it so you have a good view on the right, click the "Network" tab, hit the reload button on whatever page you are on so some info populates on the right dev screen. You should see something similar to this: Right click on the table header (Name, Method, Status, Protocol) anywhere, just right click the "Name" one. Go down to "Response Headers" then "Manage Header Columns". A little window will pop up hit "Add custom header..." and then add this header: cf-cache-status Now select the little sub tab that says "all" now surf your way to your emby server, and you should see something like the below screenshot. Hit is well..... a hit! this image came from cloudflare and was never requested from your emby server, saving you from sending this image to the client, saving time and bandwidth. MISS is also kind of obvious, it was a miss, either due to never being cached yet (first time Cloudflare has seen this image or document) if you hit refresh a few times, cloudflare will then cache it and it will turn to HIT. BYPASS I'm actually not sure why my server is returning server 500 errors below, this image is being called for by emby clients but the server has no image to serve, but usually you should only see BYPASS on playing video's if your rules above are correct. Or in my case, a server error will not be cached. DYNAMIC this is also a NO HIT response.. this is usually due to Cloudflare knowing this resource changes a lot and doesn't want to cache it so your clients don't get served stale data, or its a video, websocket, or some other format Cloudfare's great automated intelligence deems it should not be cached. That is the basics that will save you a lot of headache and blaming emby for things not working.. There are lots of cool options to enable outside of these basic settings above, ask questions here, send ideas that maybe I have missed that work great for you.. I just wanted to throw this up due to a lot more of you guys using Cloudflare. In the end you should start to see more "HIT" responses... and a noticeably faster loading time for the clients, less bandwidth usage for your emby server, and everyone is happy.. Well..... within reason....


 3 points
 -
Being on LAN does not preclude by default that content will not be transcoded, as that depends on client capabilities and format the actual media is in, amongst others. Anyway, some details would be needed, see:2 points
-
Yea, that article has been around for a long time. It's got a touch of "Bazinga!" in it. LOL I'm not going to try and update it but just replace it in the next couple of days.2 points
-
Hi, This has been talked about a lot on the Apple TV forums, but there is no formal request for it. So I do it here, please add support for MKV HEVC HDR playback using Apple TV (without tone mapping). I don't care what technique you use. Either adding HLS fPM4 support to the server or improving the MPV player. I anticipate that I am not satisfied with you saying that Apple TV does not support that, since most players on the market support it. Thanks1 point
-
NGINX and emby Config Version 1.0.4 Last Update 1-1-2024 Update by Pir8Radio Why Use NGINX reverse proxy ahead of my application servers like emby? With NGINX or any reverse proxy ahead of an application server you have more control over your setup. You can do things the application servers were not built to handle, have better control over your security and logging, replace lines of code without editing the application server code, better control of caching, etc, etc.... One of the main reasons is so that you don't have to open a new port on your firewall for every application server you host, all you really need to open is 80 & 443 and the internet can reach all of your different servers through one entrance. Will NGINX work on my OS? Most likely, you can find various versions of NGINX for most OS's and they come in different flavors, with options baked in, or just the bare NGINX that you need to compile. See below for download links to get you started. Will NGINX break things on emby? Absolutely if you don't configure it correctly! I HIGHLY suggest when choosing a scheme to setup your domain URL you choose SUB-DOMAIN and NOT sub-directory, more below. Also if you come to the emby forum with things not working, or issues you have and you use a Reverse Proxy, PLEASE make sure that is one of the first things you mention in your forum post. ESPECIALLY if emby works on one platform or client, but not another. So many times people complain "but it works on chrome, so I didn't think it was the reverse proxy". Mention you have a Reverse Proxy please. If the reverse proxy is setup correctly it should be totally transparent to the user and the application server (emby). I'm not going to go into how to purchase and setup a domain name. Lots of how-to's on that out there. Once you have a domain name and its pointed to your IP address, you can go to that domain name and hit your server then continue on.... Sub-Domain vs Sub-Directory: Lets say your domain name is: domain.com there are two main ways you can direct traffic from the internet to your backend application servers like emby. One is sub-directory, something like domain.com/emby or domain.com/other-server This is doable in nginx, but there are some catches and you need to know how your reverse proxy and application server work in detail.. This often breaks different features in emby and other application servers.. To keep with our "Totally Transparent" goal sub-directory doesn't work well, it requires a lot of rewriting and work-arounds to make it work smoothly, if you choose sub-directory you will run into issues you will need to address. The other option is Sub-Domain, this is the cleanest, most transparent, easiest to setup and maintain, it's also what I highly suggest you setup. A sub-domain looks like: emby.domain.com or other-server.domain.com The below config is based on Sub-Domain I will include a sub-directory example as well. NGINX Downloads: Official nginx downloads(LINUX): nginx.org Official nginx downloads(Windows): nginx.org WINDOWS users I suggest this version: nginx-win.ecsds.eu download links are at the bottom of the page. This Windows version has lots of cool features compiled into it already, and is optimized for windows. They keep up with updates, its a FREE (for non-commercial) third party build that I highly recommend. Additional Links: Content Security Policy info (CSP) (For Advanced Users): A CSP WILL break your server if you don't know what you are doing, I suggest reading up, lots of googleing, and understand what a CSP's function is and is not prior to venturing into this area Example NGINX Reverse Proxy Config: 3-29-2020 - ADDED A LINE FOR CLOUDFLARE USERS SO THAT THE X-REAL-IP HEADER IS CORRECTED. THIS ONLY EFFECTS Cloudflare USERS. 4-11-2020 (V1.0.1) - MOVED proxy_buffering off; FROM LOCATION BLOCK TO SERVER BLOCK 12-18-2020 (V1.0.2) - ADDED 301 SERVER SECTION TO FORCE ALL TRAFFIC TO SSL. 9-23-2021 no nginx config change, but cloudflare changed how they cache video files, so emby users that use Cloudflare now need to add a rule like below to make sure video is seekable and playable. 8-18-2022 - added a line for photo sync to cover large uploads of videos and images. (client_max_body_size 1000M;) 1-1-2024 - changed http2 setting per @weblesuggestion in this thread post # 1309363. ** The below "Page Rules" are only needed for Cloudflare CDN users, otherwise ignore. worker_processes auto; error_log logs/error.log; events { worker_connections 8192; } http { include mime.types; default_type application/octet-stream; server_names_hash_bucket_size 64; server_tokens off; ## The below will create a separate log file for your emby server which includes ## userId's and other emby specific info, handy for external log viewers. ## Cloudflare users will want to swap $remote_addr in first line below to $http_CF_Connecting_IP ## to log the real client IP address log_format emby '$remote_addr - $remote_user [$time_local] "$request" ' '$status $body_bytes_sent "$http_referer" ' '"$http_user_agent" "$http_x_forwarded_for" $request_time $server_port "$http_x_emby_authorization"'; log_format default '$remote_addr - $remote_user [$time_local] "$request" ' '$status $body_bytes_sent "$http_referer" ' '"$http_user_agent" "$http_x_forwarded_for" $request_time $server_port'; sendfile off; ## Sendfile not used in a proxy environment. gzip on; ## Compresses the content to the client, speeds up client browsing. gzip_disable "msie6"; gzip_comp_level 6; gzip_min_length 1100; gzip_buffers 16 8k; gzip_proxied any; gzip_types text/plain text/css text/js text/xml text/javascript application/javascript application/x-javascript application/json application/xml application/rss+xml image/svg+xml; proxy_connect_timeout 1h; proxy_send_timeout 1h; proxy_read_timeout 1h; tcp_nodelay on; ## Sends data as fast as it can not buffering large chunks, saves about 200ms per request. ## The below will force all nginx traffic to SSL, make sure all other server blocks only listen on 443 server { listen 80 default_server; server_name _; return 301 https://$host$request_uri; } ## Start of actual server blocks server { listen [::]:443 ssl; ## Listens on port 443 IPv6 ssl enabled listen 443 ssl; ## Listens on port 443 IPv4 ssl enabled http2 on; ## Enables HTTP2 proxy_buffering off; ## Sends data as fast as it can not buffering large chunks. server_name emby.domainname.com; ## enter your service name and domain name here example emby.domainname.com access_log logs/emby.log emby; ## Creates a log file with this name and the log info above. ## SSL SETTINGS ## ssl_session_timeout 30m; ssl_protocols TLSv1.2 TLSv1.1 TLSv1; ssl_certificate ssl/pub.pem; ## Location of your public PEM file. ssl_certificate_key ssl/pvt.pem; ## Location of your private PEM file. ssl_session_cache shared:SSL:10m; location ^~ /swagger { ## Disables access to swagger interface return 404; } location / { proxy_pass http://127.0.0.1:8096; ## Enter the IP and port of the backend emby server here. client_max_body_size 1000M; ## Allows for mobile device large photo uploads. proxy_hide_header X-Powered-By; ## Hides nginx server version from bad guys. proxy_set_header Range $http_range; ## Allows specific chunks of a file to be requested. proxy_set_header If-Range $http_if_range; ## Allows specific chunks of a file to be requested. proxy_set_header X-Real-IP $remote_addr; ## Passes the real client IP to the backend server. #proxy_set_header X-Real-IP $http_CF_Connecting_IP; ## if you use cloudflare un-comment this line and comment out above line. proxy_set_header Host $host; ## Passes the requested domain name to the backend server. proxy_set_header X-Forwarded-For $proxy_add_x_forwarded_for; ## Adds forwarded IP to the list of IPs that were forwarded to the backend server. ## ADDITIONAL SECURITY SETTINGS ## ## Optional settings to improve security ## ## add these after you have completed your testing and ssl setup ## ## NOTICE: For the Strict-Transport-Security setting below, I would recommend ramping up to this value ## ## See https://hstspreload.org/ read through the "Deployment Recommendations" section first! ## add_header 'Referrer-Policy' 'origin-when-cross-origin'; add_header Strict-Transport-Security "max-age=15552000; preload" always; add_header X-Frame-Options "SAMEORIGIN" always; add_header X-Content-Type-Options "nosniff" always; add_header X-XSS-Protection "1; mode=block" always; ## WEBSOCKET SETTINGS ## Used to pass two way real time info to and from emby and the client. proxy_http_version 1.1; proxy_set_header Upgrade $http_upgrade; proxy_set_header Connection $http_connection; } } }

 1 point
 -
We developing a dashboard (web) to watch movies or series together. Our proof of concept was successful and works as we wanted. Proof of concept: We have tested the proof of concept and are now continuing to expand the platform, which is of course linked to Emby. Tested functionality and implemented; Connect users with external dashboard (connect uid's) Link devices to user Make groups / invite other users Sync video with each other or group Resync in group Groupchat Possible ideas Discord connection (chat, sync, profile pictures) Discord auto voicechannel (only users who are in the group) Share this dashboard with the community Dashboard: Join room (select device): Active group session with chat: Will be updated!1 point
-
Bonjour, Pour celles et ceux qui ont un serveur Emby sous Ubuntu et veulent sécuriser leur connexion grâce à un reverse proxy, voici la démarche à suivre. Même si un reverse proxy est un serveur indépendant, servant à sécuriser les serveur web des requêtes malveillantes, l'avantage de le créer sur votre serveur Emby vous permettra de laisser ouvert en entrée, sur votre pare-feu, uniquement les port 80 et 443. Le port 8096 pourra rester fermé. De plus, les communications entre vos client et votre serveur seront encryptées. Installation d'Apache Apache est le serveur Web le plus utilisé au monde. il doit être installé au préalable pour permettre faire fonctionner le reverse proxy. Pour se faire, vous devez l'installer en tant qu'utilisateur non-root. On commence par mettre à jour les paquets : sudo apt update Puis on installe Apache sudo apt install apache2 À la fin du processus d’installation, Ubuntu démarre Apache. Le serveur Web doit déjà être opérationnel. Vérifiez auprès du système d’init pour vous assurer que le service est en cours d’exécution en tapant : sudo systemctl status apache2 Vous devez obtenir un résultat semblant à : Afin d'éviter d'utiliser le fichier de configuration par défaut d'Apache, nous allons en créer un nouveau : sudo nano /etc/apache2/sites-available/emby.conf Recopier dans le fichier emby.conf, les lignes suivantes : <VirtualHost *:80> ServerName mon.domain.com ServerAdmin youremail@address.com RewriteEngine on RewriteCond %{SERVER_NAME} =mon.domain.com RewriteRule ^ https://%{SERVER_NAME}%{REQUEST_URI} [END,QSA,R=permanent] </VirtualHost> Remplacer mon.domain.com par le nom de votre domaine (qui peut être aussi de type NoIp - Exemple : monserveuremby.ddns.net) Remplacer youremail@adress.com par votre adresse mail (qui peut être aussi webmaster@localhost) Enregistrez et fermez le fichier lorsque vous avez terminé. Activons le fichier avec l’outil: a2ensite sudo a2ensite emby.conf Désactiver le site par défaut défini dans :000-default.conf sudo a2dissite 000-default.conf Ensuite, testons les erreurs de configuration: sudo apache2ctl configtest Vous devriez recevoir la sortie suivante : Redémarrez Apache pour implémenter vos modifications : sudo systemctl restart apache2 Installation du certificat de sécurité (Let's Encrypt) Afin d'obtenir un certificat SSL avec Let’s Encrypt, nous devrons d’abord installer le logiciel Certbot sur votre serveur. Nous utiliserons les référentiels de paquets Ubuntu par défaut pour cela. Une seule commande suffit : sudo apt install certbot python3-certbot-apache Vous serez invité à confirmer l’installation. Certbot est maintenant installé sur votre serveur. Obtention d’un certificat SSL Certbot fournit une variété de façons d’obtenir des certificats SSL via des plugins. Le plugin Apache se chargera de reconfigurer Apache et de recharger la configuration chaque fois que nécessaire. Pour utiliser ce plugin, tapez ce qui suit : sudo certbot --apache Ce script vous invitera à répondre à une série de questions afin de configurer votre certificat SSL. Tout d’abord, il vous demandera une adresse e-mail valide. Cet e-mail sera utilisé pour les notifications de renouvellement et les avis de sécurité : Après avoir fourni une adresse e-mail valide, appuyez sur pour passer à l’étape suivante. Vous serez ensuite invité à confirmer si vous acceptez les conditions d’utilisation de Let’s Encrypt. Vous pouvez confirmer en appuyant sur la touche A et confirmer en appuyant sur la touche ENTER Ensuite, il vous sera demandé si vous souhaitez partager votre courrier électronique avec l’Electronic Frontier Foundation pour recevoir des nouvelles et d’autres informations. Si vous ne souhaitez pas vous abonner à leur contenu, tapez N et confirmer en appuyant sur la touche ENTER L’étape suivante vous invitera à informer Certbot des domaines pour lesquels vous souhaitez activer HTTPS. Les noms de domaine répertoriés sont automatiquement obtenus à partir de votre configuration d’hôte virtuel Apache, c’est pourquoi il est important de vous assurer que vous avez les paramètres corrects et configurés dans votre hôte virtuel. Si vous souhaitez activer HTTPS pour tous les noms de domaine répertoriés (recommandé), vous pouvez laisser l’invite vide et cliquer pour continuer. Vous verrez une sortie comme celle-ci : Ensuite, vous serez invité à sélectionner si vous souhaitez ou non que le trafic HTTP soit redirigé vers HTTPS. En pratique, cela signifie que lorsque quelqu’un visite votre site Web via des canaux non cryptés (HTTP), il sera automatiquement redirigé vers l’adresse HTTPS de votre site Web. Choisissez 2 pour activer la redirection HTTP vers HTTPS Après cette étape, la configuration de Certbot est terminée et les remarques finales sur votre nouveau certificat, où localiser les fichiers générés et comment tester votre configuration à l’aide d’un outil externe qui analyse l’authenticité de votre certificat seront affichées : Vérification du renouvellement automatique de Certbot Les certificats de Let’s Encrypt ne sont valides que pendant quatre-vingt-dix jours. Il s’agit d’encourager les utilisateurs à automatiser leur processus de renouvellement de certificat, ainsi que de s’assurer que les certificats mal utilisés ou les clés volées expireront le plus tôt possible. Le paquet que nous avons installé prend en charge les renouvellements en incluant un script de renouvellement à , qui est géré par un service appelé . Ce script s’exécute deux fois par jour et renouvelle automatiquement tout certificat dans les trente jours suivant son expiration. Pour vérifier l’état de ce service et vous assurer qu’il est actif et en cours d’exécution, tapez la commande suivante : sudo systemctl status certbot.timer Vous obtiendrez une sortie similaire à celle-ci : Activation des modules Apache nécessaires pour le reverse proxy Apache a de nombreux modules fournis avec lui qui sont disponibles mais pas activés dans une nouvelle installation. Tout d’abord, nous devrons activer ceux que nous utiliserons dans ce didacticiel. Les modules dont nous avons besoin sont lui-même et plusieurs de ses modules complémentaires, qui étendent ses fonctionnalités pour prendre en charge différents protocoles réseau. Plus précisément, nous utiliserons :mod_proxy mod_proxy, le module proxy principal Apache module pour la redirection des connexions; il permet à Apache d’agir comme une passerelle vers les serveurs d’applications sous-jacents. mod_proxy_http, qui ajoute la prise en charge de la transmission par proxy des connexions HTTP. Pour activer ces deux modules, exécutez successivement les commandes suivantes. sudo a2enmod proxy sudo a2enmod proxy_http Pour mettre ces modifications en œuvre, redémarrez Apache. sudo systemctl restart apache2 Configuration du reverse proxy pour Emby La dernière étape consiste à configurer le reverse proxy pour emby. Pour cela, éditer avec nano, le fichier qui se trouve dans /etc/apache2/sites-available et devrait s'appeler (dans notre tuto) emby-le-ssl.conf sudo nano /etc/apache2/sites-available/emby-le-ssl.conf et modifiez le comme suit : <IfModule mod_ssl.c> <VirtualHost *:443> ServerName mon.domain.com ServerAdmin youremail@address.com <proxy *> AddDefaultCharset off Order Allow,Deny Allow from all </proxy> ProxyRequests Off ProxyPreserveHost On ProxyPass "/embywebsocket" "ws://127.0.0.1:8096/embywebsocket" ProxyPassReverse "/embywebsocket" "ws://127.0.0.1:8096/embywebsocket" ProxyPass "/" "http://127.0.0.1:8096/" ProxyPassReverse "/" "http://127.0.0.1:8096/" SSLCertificateFile /etc/letsencrypt/live/mon.domain.com/fullchain.pem SSLCertificateKeyFile /etc/letsencrypt/live/mon.domain.com/privkey.pem Include /etc/letsencrypt/options-ssl-apache.conf </VirtualHost> </IfModule> Remplacer mon.domain.com par le nom de votre domaine (qui peut être aussi de type NoIp - Exemple : monserveuremby.ddns.net) Remplacer youremail@adress.com par votre adresse mail (qui peut être aussi webmaster@localhost) Pour mettre ces modifications en œuvre, redémarrez Apache. sudo systemctl restart apache2 Tester votre configuration et configurer un client Emby Il vous suffit de taper mon.domain.com dans la barre de votre navigateur sans rajouter 8096. Pour configurer un client Emby (Android, Smart TV, etc.) il vous suffit juste de rentrer l'url en https de votre votre serveur (ex : https://mon.domain.com) et de laisser le champ port vide.1 point
-
Yes, all good, thanks for asking. Even my Sonos system is working after re-enabling NTLMv1 on the NAS! To digress, Sonos really needs to lose the dependency on SMBv1 and NTLMv1!1 point
-
I remember that the Emby server auto-discovery didn't find any Emby server, I had to type all manually my Kodi @IP is 192....1.20, on the same local network as my NAS, which is ...1.11 after that... I don't remember (i tried so many things this afternoon)... & now my TV is not available anymore as my wife is watching TV EDIT : as my TV was "free", i tried again to type manually the emby server in the Emby server auto-discovery window --> this time, it found my "diskstation" NAS name, it asked me to select the server, and then I had to choose between my 2 users !!! so i logged with the main user - the password was accepted ! and now it is syncing !!! i don't know what happened this afternoon... i'll wait the end of the sync & will see if i can change the user without quitting kodi - which is the purpose of this thread since the beginning... regards !!!1 point
-
It doesn't work fine, if it would we wouldn't want an update. If you watch high bitrate media, the app will crash and restart. Not what you want in the middle of your movie. Guess there's a memory leak somewhere since the TV runs out of RAM, closes all applications and then I have to restart Emby. Plus a lot of annoyances, like not remembering the audio track selected across multiple TV episodes.1 point
-
Sure, you can use different versions on your devices. As you mentioned, the 6.x version requires a Kodi DB rebuild (on each device), yes. So you cannot easily switch back and forth without a full resync. Probably you should take a (full) Kodi backup.1 point
-
Hi and welcome. How often do you really pause? You can take advantage of the fast channel tuning with direct play and then, when you really need to pause, the app will prompt you to switch to seek mode when you hit the pause button. By "go to a show" do you mean tune to that channel? If so, then you can hit the "play" button on your remote to immediately tune to the focused channel. Not sure how long-pressing and then navigating a menu is reducing any clicks to get to those other options but the long-press is a possibility for the future.1 point
-
Yes, even in Chrome, as today I face that, I am checking the issue to find the problem then solve the issue, thanks.1 point
-
That's for sure.1 point
-
That happens in any mobile browser occasionally (I've had it happen on both Chrome and Opera), mostly on intermittent mobile connection. If you're lucky, backing up and re-entering the thread will have previously typed text remembered/synced/restored, if not, get in the habit of Select all-Copy any content you type - I surely did.1 point
-
You can put "Live TV" as topmost Home Screen section, that'll put Guide a click or two away. Adfitionally, you can also opt for "Live TV" mode in App Settings>Startup tab.1 point
-
Hold (long-click) Back button.1 point
-
That second one sure looks like a capital "O" and not a "zero"...1 point
-
Thanks for the clue. I will get on it. I hope to start back doing some work on this project next week. Again I appreciate the help. Vic1 point
-
Hi Sorry for late reply. I have been away for work. Ok , I tried 6.1.7 and seems stable enough to use on daily basis, except that I have to restart kodi for it to pick up changes to the library. Probably is that problem that you mentioned on your last post. Later I will try 6.1.8. Thank you1 point
-
What about giving the user the option to decide what he wants to have down there instead of you playing around with it? That would eventually be a sustainable implementation of this...1 point
-
Yes they are still searchable. So once someone is in the database it would appear they are there forever.1 point
-
Forget I asked I had figured it out, just not enabled it in the library settings ..... a duh moment!1 point
-
Sounds good! That's what I had in mind. I was thinking of sourcing a picture frame to house it in (it would need to be fairly thick). If I can't find the right frame I'll have to DIY it.. Looking forward to seeing the pictures of your build.1 point
-
But that is not true, I have removed all libraries and all type 23 item still remain in the database.1 point
-
Hi, we'll take a look at this. Thanks for reporting.1 point
-
Depends on the Transcoding HWA Advanced options you have enabled and order. But yes plugging in a monitor changes menu options just like RDP can/will change options.1 point
-
Thank you so much for Emby. I have been using My Media (not the corporate one -- if you can still find it, it's not the one I am talking about) for a decade or more, and was very happy with it, but the developer dropped it a few years ago. Finally, after years of being abandonware, the git repo shut down, and Roku also changed their forums, so even the old My Media forums were no longer viable. It was time to find a replacement. I tried another media player, much more complex than Emby (and more well known), but it was far too complex for my purposes. Then I stumbled on Emby. Perfection. Thank you so much Emby.1 point
-
My crypto account balances would disagree..1 point
-
Thanks, I knew you mentioned it or told me before but I couldn't remember. That's good news.1 point
-
Not to worry my friend. @kingy444 is going to look over the code, and add his code to the project. It'll be like Avengers Assemble, or Forming Voltron. LOL1 point
-
Yes, I believe that I have some help to maintain the plugin. So, it looks like we can finally get some of these feature requests, that have piled up, implemented. I think this, subtitles, and the naming issues mentioned here should be priority.1 point
-
@mshaik Thanks for the feedback.1 point
-
In the future it will be there! We are still working on it. Stay tuned!1 point
-
Ah yes of course - sorry, they will need Mac equivalents. Your best bet is to wait a couple of weeks - If I can get @chef onboard (he's a busy guy!) then compared to what we have been working on with Introskip - this is an extremely simple setup so it would only take a couple of days at most to get into a Plugin I would have thought. So watch this space - this hasn't been abandoned, it's just we all have limited time and are already juggling multiple emby 'projects' plus we all have day jobs! Thanks for your interest !1 point