Leaderboard


Popular Content
Showing content with the highest reputation on 11/01/21 in all areas
-
Oh man, that's so wrong, and right at the same time . LOL2 points
-
LOL, There's more support for Plex here than on Plex Forums!2 points
-
Sorry but we don't want Text on Backdrops, personally this is defect of TMDB. I would delete them off TMDB if I could. They only have one purpose saving as Thumbs.2 points
-
Hi, yes the file likely has bad data embedded, but remuxing it into a new one will generally resolve it. Please note, this is not just about the displayed runtime. Doing this will help the file play more reliably as well. Please let us know if this helps. Thanks.2 points
-
When transcoding or direct streaming it currently throttles but it doesn't cleanup during playback so you can have a situation where your using lots of space. Can we have a custom setting to remove the transcoded parts minus 5 minutes of current playback? This would help it large libraries where there are multiple transcodes going on.1 point
-
I would like to use the Alexa Skill with my Emby server, unfortunately this is still not available in German. Do you know when it can be used? https://www.amazon.com/-/de/dp/B07F8VC9F9/ref=cm_cr_arp_d_pb_opt?ie=UTF81 point
-
It seems to me that Emby has progressively removed features over the years. I discovered recently that I can no longer view my movies by Studio (this seems to be a recent change). Viewing by Actor was removed quite some time ago (https://emby.media/community/index.php?/topic/26944-missing-a-menu-option/). Can these features please be re-implemented? And can y'all PLEASE put in the changelog when a feature has been disabled or removed so that the end user can determine if upgrading will remove functionality previously depended on? Thx!1 point
-
Bonjour, Pour celles et ceux qui ont un serveur Emby sous Ubuntu et veulent sécuriser leur connexion grâce à un reverse proxy, voici la démarche à suivre. Même si un reverse proxy est un serveur indépendant, servant à sécuriser les serveur web des requêtes malveillantes, l'avantage de le créer sur votre serveur Emby vous permettra de laisser ouvert en entrée, sur votre pare-feu, uniquement les port 80 et 443. Le port 8096 pourra rester fermé. De plus, les communications entre vos client et votre serveur seront encryptées. Installation d'Apache Apache est le serveur Web le plus utilisé au monde. il doit être installé au préalable pour permettre faire fonctionner le reverse proxy. Pour se faire, vous devez l'installer en tant qu'utilisateur non-root. On commence par mettre à jour les paquets : sudo apt update Puis on installe Apache sudo apt install apache2 À la fin du processus d’installation, Ubuntu démarre Apache. Le serveur Web doit déjà être opérationnel. Vérifiez auprès du système d’init pour vous assurer que le service est en cours d’exécution en tapant : sudo systemctl status apache2 Vous devez obtenir un résultat semblant à : Afin d'éviter d'utiliser le fichier de configuration par défaut d'Apache, nous allons en créer un nouveau : sudo nano /etc/apache2/sites-available/emby.conf Recopier dans le fichier emby.conf, les lignes suivantes : <VirtualHost *:80> ServerName mon.domain.com ServerAdmin youremail@address.com RewriteEngine on RewriteCond %{SERVER_NAME} =mon.domain.com RewriteRule ^ https://%{SERVER_NAME}%{REQUEST_URI} [END,QSA,R=permanent] </VirtualHost> Remplacer mon.domain.com par le nom de votre domaine (qui peut être aussi de type NoIp - Exemple : monserveuremby.ddns.net) Remplacer youremail@adress.com par votre adresse mail (qui peut être aussi webmaster@localhost) Enregistrez et fermez le fichier lorsque vous avez terminé. Activons le fichier avec l’outil: a2ensite sudo a2ensite emby.conf Désactiver le site par défaut défini dans :000-default.conf sudo a2dissite 000-default.conf Ensuite, testons les erreurs de configuration: sudo apache2ctl configtest Vous devriez recevoir la sortie suivante : Redémarrez Apache pour implémenter vos modifications : sudo systemctl restart apache2 Installation du certificat de sécurité (Let's Encrypt) Afin d'obtenir un certificat SSL avec Let’s Encrypt, nous devrons d’abord installer le logiciel Certbot sur votre serveur. Nous utiliserons les référentiels de paquets Ubuntu par défaut pour cela. Une seule commande suffit : sudo apt install certbot python3-certbot-apache Vous serez invité à confirmer l’installation. Certbot est maintenant installé sur votre serveur. Obtention d’un certificat SSL Certbot fournit une variété de façons d’obtenir des certificats SSL via des plugins. Le plugin Apache se chargera de reconfigurer Apache et de recharger la configuration chaque fois que nécessaire. Pour utiliser ce plugin, tapez ce qui suit : sudo certbot --apache Ce script vous invitera à répondre à une série de questions afin de configurer votre certificat SSL. Tout d’abord, il vous demandera une adresse e-mail valide. Cet e-mail sera utilisé pour les notifications de renouvellement et les avis de sécurité : Après avoir fourni une adresse e-mail valide, appuyez sur pour passer à l’étape suivante. Vous serez ensuite invité à confirmer si vous acceptez les conditions d’utilisation de Let’s Encrypt. Vous pouvez confirmer en appuyant sur la touche A et confirmer en appuyant sur la touche ENTER Ensuite, il vous sera demandé si vous souhaitez partager votre courrier électronique avec l’Electronic Frontier Foundation pour recevoir des nouvelles et d’autres informations. Si vous ne souhaitez pas vous abonner à leur contenu, tapez N et confirmer en appuyant sur la touche ENTER L’étape suivante vous invitera à informer Certbot des domaines pour lesquels vous souhaitez activer HTTPS. Les noms de domaine répertoriés sont automatiquement obtenus à partir de votre configuration d’hôte virtuel Apache, c’est pourquoi il est important de vous assurer que vous avez les paramètres corrects et configurés dans votre hôte virtuel. Si vous souhaitez activer HTTPS pour tous les noms de domaine répertoriés (recommandé), vous pouvez laisser l’invite vide et cliquer pour continuer. Vous verrez une sortie comme celle-ci : Ensuite, vous serez invité à sélectionner si vous souhaitez ou non que le trafic HTTP soit redirigé vers HTTPS. En pratique, cela signifie que lorsque quelqu’un visite votre site Web via des canaux non cryptés (HTTP), il sera automatiquement redirigé vers l’adresse HTTPS de votre site Web. Choisissez 2 pour activer la redirection HTTP vers HTTPS Après cette étape, la configuration de Certbot est terminée et les remarques finales sur votre nouveau certificat, où localiser les fichiers générés et comment tester votre configuration à l’aide d’un outil externe qui analyse l’authenticité de votre certificat seront affichées : Vérification du renouvellement automatique de Certbot Les certificats de Let’s Encrypt ne sont valides que pendant quatre-vingt-dix jours. Il s’agit d’encourager les utilisateurs à automatiser leur processus de renouvellement de certificat, ainsi que de s’assurer que les certificats mal utilisés ou les clés volées expireront le plus tôt possible. Le paquet que nous avons installé prend en charge les renouvellements en incluant un script de renouvellement à , qui est géré par un service appelé . Ce script s’exécute deux fois par jour et renouvelle automatiquement tout certificat dans les trente jours suivant son expiration. Pour vérifier l’état de ce service et vous assurer qu’il est actif et en cours d’exécution, tapez la commande suivante : sudo systemctl status certbot.timer Vous obtiendrez une sortie similaire à celle-ci : Activation des modules Apache nécessaires pour le reverse proxy Apache a de nombreux modules fournis avec lui qui sont disponibles mais pas activés dans une nouvelle installation. Tout d’abord, nous devrons activer ceux que nous utiliserons dans ce didacticiel. Les modules dont nous avons besoin sont lui-même et plusieurs de ses modules complémentaires, qui étendent ses fonctionnalités pour prendre en charge différents protocoles réseau. Plus précisément, nous utiliserons :mod_proxy mod_proxy, le module proxy principal Apache module pour la redirection des connexions; il permet à Apache d’agir comme une passerelle vers les serveurs d’applications sous-jacents. mod_proxy_http, qui ajoute la prise en charge de la transmission par proxy des connexions HTTP. Pour activer ces deux modules, exécutez successivement les commandes suivantes. sudo a2enmod proxy sudo a2enmod proxy_http Pour mettre ces modifications en œuvre, redémarrez Apache. sudo systemctl restart apache2 Configuration du reverse proxy pour Emby La dernière étape consiste à configurer le reverse proxy pour emby. Pour cela, éditer avec nano, le fichier qui se trouve dans /etc/apache2/sites-available et devrait s'appeler (dans notre tuto) emby-le-ssl.conf sudo nano /etc/apache2/sites-available/emby-le-ssl.conf et modifiez le comme suit : <IfModule mod_ssl.c> <VirtualHost *:443> ServerName mon.domain.com ServerAdmin youremail@address.com <proxy *> AddDefaultCharset off Order Allow,Deny Allow from all </proxy> ProxyRequests Off ProxyPreserveHost On ProxyPass "/embywebsocket" "ws://127.0.0.1:8096/embywebsocket" ProxyPassReverse "/embywebsocket" "ws://127.0.0.1:8096/embywebsocket" ProxyPass "/" "http://127.0.0.1:8096/" ProxyPassReverse "/" "http://127.0.0.1:8096/" SSLCertificateFile /etc/letsencrypt/live/mon.domain.com/fullchain.pem SSLCertificateKeyFile /etc/letsencrypt/live/mon.domain.com/privkey.pem Include /etc/letsencrypt/options-ssl-apache.conf </VirtualHost> </IfModule> Remplacer mon.domain.com par le nom de votre domaine (qui peut être aussi de type NoIp - Exemple : monserveuremby.ddns.net) Remplacer youremail@adress.com par votre adresse mail (qui peut être aussi webmaster@localhost) Pour mettre ces modifications en œuvre, redémarrez Apache. sudo systemctl restart apache2 Tester votre configuration et configurer un client Emby Il vous suffit de taper mon.domain.com dans la barre de votre navigateur sans rajouter 8096. Pour configurer un client Emby (Android, Smart TV, etc.) il vous suffit juste de rentrer l'url en https de votre votre serveur (ex : https://mon.domain.com) et de laisser le champ port vide.1 point
-
You have to rename every occurence of the new "John Bishop" in the Cast & Crew metadata of every episode, show or movie to something like "John Bishop 2". Then you have to identify "John Bishop 2" with either the tmdb or imdb id. After that you can rename the person "John Bishop 2" (not the cast) back to "John Bishop". The cast names will be adjusted automatically by Emby.1 point
-
Damn. TWO verys?? I mean it's not like Vegas with your parents, right? It can't be that bad.1 point
-
Unfortunately, no. The screen saver stuff is all handled by Android and there isn't anything in our logging to give us any clues.1 point
-
1 point
-
I'd take another look at that one file's NFO really closely as the collection could still be there written a different way. You could also just try and remove it from the collection to see if that works as well. It sounds like you're almost home free now.1 point
-
For proper groups and tags implementation, I could tell you where to look at1 point
-
Lol believe me, you don't, here was my comment upon engaging in such endeavour :1 point
-
Well, I've been trying to get core support there... Depends on the usage case, it would still be viable to search/filter for a single (or multiple) term there, with all items with either being listed - unfortunately any combo ain't feasible atm.1 point
-
Are you trying to push @chef over the edge ?! Primary function - output goal Emby does not currently list any of the more specialist Codec details for the more discerning emby user - ie Dolby Vision, HDR10+, Dolby Atmos, DTS X etc etc. The limitation is what ffmpeg/probe can use. The information is readily available with open source utilities - such as mediainfocli - it's just a matter of getting it into emby. 2. Where/how this info is preferred to be used The only current option to use this info is in Tag's - as we cannot change the core emby codec information for the reasons Eric have given above. 3. Benefits for users Tag's can be filtered/sorted and searched - so while it's not perfect and ideally should be displayed alonside the main codecs, it's significantly better than not having the info at all. If I wanted all my 'Dolby Vision' films with 'DTS:X' as an example - then I could easily filter by those two items and get a filtered list. 4. server/client/user? integration - which one(s) & why (use cases) I believe all the clients can already utilise tag's now - so it could be used without any further Client development.1 point
-
.. you and your TMM.. haha. Getting the HDR (and HD Audio in my example) codec data out your collection, really is not an issue - it's a 1 line 'script' using mediainfocli .. FOR /F "delims=" %%x in ('dir /a-s /b /s "M:\Films 4k\*.m??"') DO (mediainfocli --Output=file://hdr.txt "%%x" >> output.txt ) hdr.txt is just a template file .. you can grab whatever fields you like from MediaInfo .. General;"""%CompleteName%""" Video;,V#%StreamKindID%,%HDR_Format%,%HDR_Format_Profile%,%HDR_Format_Level%,%HDR_Format_Settings% Audio;,A#%StreamKindID%,%Format/String%,%Format_Commercial_IfAny%,%Channel(s)%,%Language% \r\n The 'hard part' is getting the results into emby tag's and matching the ItemId - although the 'Path' option in the API makes that a lot easier than I first thought as the Path should be unique. This would probably take the likes of @chef or @Cheesegeezer seconds to do, but as I have no experience of writing Emby Plugin's .. I had a quick look at Scripter-X, but that seemed to be more 'Operational' type scripts rather than changing Metadata. @VicMoore HTML is Javascript - so I got lost pretty quickly lol. If I can get some time - I'll maybe take a look at fudging something together - having emby tags of all the specialist MediaInfo info does sound enticing .. btw : All the fields you can get out of MediaInfo are listed in the attached text file .. parameters.txt1 point
-
Right, this is what I was driving at - just having display values. I've been the IT field for over 20 years, so I fully understand regarding not opening up the user confusion can of worms. As rbjtech mentioned, perhaps a plugin is the better workaround. Then OCD nuts like me can willingly deal with the duplication/discrepancies and it's not forced on the masses. Thanks for your time!1 point
-
@chef @Cheesegeezer I have cleared the cache, reloaded the page and also tried with another browser, Same problem. The server is running on the 4.7.0.15 beta on a Windows machine. The IntroSkip plugin is what is attached in your instructions for IntroSkip in the 3rd post (0.0.1.15). As per the instructions, I first ran the Audio Fingerprinting task, which took 4 hours and 19 minutes for 42 series with a total of 2587 episodes. Then the Episode Title Sequence Detection, which took 4 hours and 26 minutes. No task is running right now and I should have permissions for it. I have sent the logfile both for you via PM. All right, thanks! I'm very happy that it has come so far with this plugin since I've been following it since the beginning of this thread. Big kudos to you and everyone who worked on it!1 point
-
I assume it would be, yes, although not unachievable. As opposed to current schema where playlist is literally nuked because user moved the folder? That doesn't seem quite fair, tbh, moreso of it contains 100+ or 1000+ items, recreating those ain't exactly piece-of-cake, either time-wise or effort-wise, likely resulting in it simply being abandoned/never being recreated. Personally have no use for that feature, but I can imagine a number of users (especially on music side of things) do.1 point
-
I went ahead and got the sata II case, I made an offer and got it right at 600 shipped. While not a completly great deal, it wasn't bad compared to the norco's out there. And it comes with a (3 + 1) 1200 watt power supply set-up. It's a commercial grade case. I can use the top two 3.5" internal bays for two parity drives and the 24 bay externals will be reserved for data storage. And the motherboard nvme drive can be for caching. Planning on running unraid I think. https://www.ebay.com/itm/2340451434121 point
-
tvdb logos will be supported in a future update to our tvdb plugin. Thanks.1 point
-
HI there, yes expect more options in future updates. thanks for the feedback.1 point
-
Technically, its a bug. Consider if your two versions were a directors cut and a normal cut but at different qualities. Changing qualities while playing the directors cut should not switch you to the normal one.1 point
-
So you are saying it was totally hidden :).1 point
-
Hi. This is not supported (two libraries pointing to the same media) and will very likely start to cause issues for you.1 point
-
Hi. The limitation is the fact that we use this information to make playback decisions so it must be accurate. Therefore, we can't make it editable nor rely on simple header information that can also be edited/inaccurate. Now, you'll then likely say - then just give us some display values - but then the issue becomes what happens when the display values conflict with the ones we derive from the actual media? Now we've got not only duplicates but also possible conflicts and we spend more time troubleshooting and trying to help people understand the differences and/or why they aren't seeing what they expect.1 point
-
Quick postscript, the Fire TV 4K Max is the first FireTV device to support AV1 codec... AV1 is supposedly 30% better than x265, so ultimately my solution is going to be a 4K Max to replace the aging Gen 2 Stick (which is still awesome by the way.) As the owner of 4 Fire TV devices, 2 Apple TVs and two Chromecasts, the Fire TV is still the best of the bunch. My Fire TV Cube (First Version) works fine with all 265 files. Anyway, getting AV1 support is probably the best way to future proof any purchases as it's the codec of the future. So my plan is to get a Fire TV 4K Max at some point soon.1 point
-
Once you're done fixing this one problem file you can use the reports plugin to look for other files with extremely long runtimes to fix them as well!1 point
-
<set tmdbcolid="477962"> <name>2019</name> </set> That collection ID is for It Collection (2019) https://www.themoviedb.org/collection/477962?language=pt-EN That explains why it keeps getting added back to that collection. Did you by chance ever use Ember Media Manager? That's what that tag looks like to me. Here is what I would do to remedy this problem. Remove the bad collection if it happens be present. Download and install Notepad++ if you don't have it all ready. Do a search for the bracketed collection <set tmdbcolid="477962"> in NFO files across your movie collection like this. You will get a list of nfo files that have this NFO collection. Edit each one and remove all collection related info. After editing all files do a full library scan in Emby and see if the IT Collection appeared or not. If it does you likely missed an NFO file or two so re-edit those. Do another full library scan if needed. Do this until that collection is gone. Now add the movies back to the collection doing something like: Go to movie library, apply a filter for all movies with year 2019. Now multi-select each and every movie that appears. Click the 3 dot menu up top and add it to a Collection. Create a New Collection named 2019. Wait for it to add which may take a bit as it likely has many files to add. How do things look now for 2019? Repeat for other years as needed.
 1 point
 -
I've done this in the past, but it was a little bit like a spam bot. Example: add the whole Simpson Series... and you will receive 716 messages... but yes we can add this to a updated version of the shell script and make it optional1 point
-
@Cheesegeezer Here is my log. Thanks embyserver.txt1 point
-
To set the quality setting prior to playback, you can do this in the app's playback settings. Please let us know if this helps. Thanks.1 point
-
@jdazzle44 version selection happens prior to playback, not during, so changing the quality setting while playing will not change the media version being played. Does that help clear this up? If you set the quality setting prior to starting playback, then you should see the result that you want.1 point
-
working now thanks1 point
-
None that I can think of.1 point
-
Thanks.. I'm willing to beta test if you end up wanting someone to do it. otherwise I'll just wait for it! I really do APPRECIATE all your time and assistance! matt1 point
-
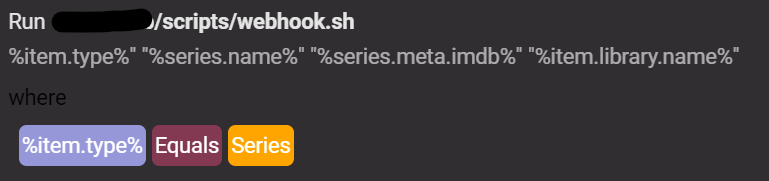
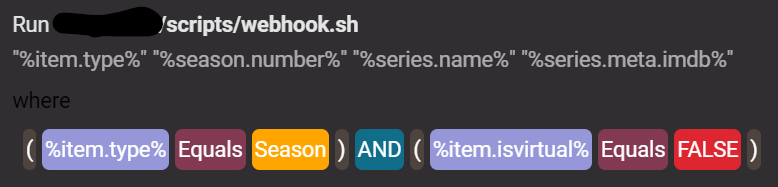
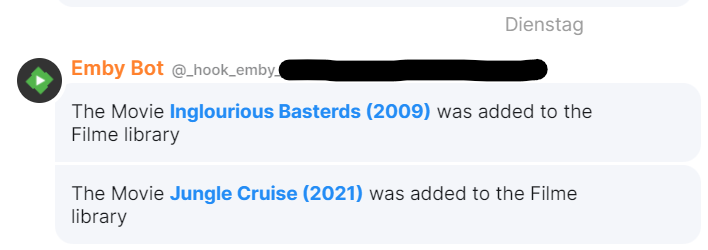
Hey guys, here is my little quick-and-drity how-to... hope it helps The idea behind the scenes is that ScripterX passes all the needed informations to the webhook. Unfortunately this does not work direct. So I write this little shell script as transmitter. First of all we need to configure ScripterX to pass the needed parameters when "OnMediaItemAddedComplete" is triggered. For movies we need Name, Year, IMDB ID and the Library. The IMDB ID is required for later link-creation and that false scraped elements without IMDB ID wouldn't sent to the webhook. for series... for seasons... note: "%item.isvirtual% Equals FALSE" prevent notifications for upcoming or missing seasons webhook.sh shell script: #!/bin/bash # Variables imdb_pattern='^tt[0-9]*$' webhook_url='https://webhook.domain.com/hook/pvp***f53' webhook() { curl -X POST "$webhook_url/emby" -H "Content-Type: application/json" -d "$1" } if [[ $1 == Movie ]] && [[ "$4" =~ $imdb_pattern ]]; then # Check if item.type is Movie and item.meta.imdb is set webhook "{\"movie\":\"$2\",\"year\":\"$3\",\"imdb\":\"$4\",\"library\":\"$5\"}" elif [[ $1 == Series ]] && [[ "$3" =~ $imdb_pattern ]]; then # Check if item.type is Series and item.meta.imdb is set webhook "{\"series\":\"$2\",\"imdb\":\"$3\",\"library\":\"$4\"}" elif [[ $1 == Season ]] && [[ "$4" =~ $imdb_pattern ]]; then # Check if item.type is Season and item.meta.imdb is set webhook "{\"season\":\"$2\",\"series\":\"$3\",\"imdb\":\"$4\"}" fi note: The if statement checks the first parameter ($1), we remember it was "%item.type%", for movie, series or season that was added to the library. The second parameter ($2) is the IMDB ID "%xxx.meta.imdb%". We remember false scraped elements without IMDB ID souldn't sent to the webhook. The IMDB ID will be checked via regex (imdb_pattern). After that, we send a different hook for movies series and seasons. I have made this separation so that the emby-plugin from the matrix-webhook-gateway can differentiate between the messages to be sent. emby.ts plugin: import { is } from 'typescript-is'; import { PluginBase, WebhookMessage } from '../../src/pluginApi/v2'; import { a, strong, fmt, } from '../../src/formatting/formatting'; type movie = { movie: string; year: string; imdb: string; library: string; }; type series = { series: string; imdb: string; library: string; }; type season = { season: string; series: string; imdb: string; }; export const format = 'emby'; export default class EmbyPlugin extends PluginBase { // This function will be executed once, on startup. async init(): Promise<void> { this.logger.info('emby plugin starting up'); } // This function will be executed every time a webhook with a matching // format is posted. It should either return a `WebhookMessage`, if the // webhook is to be executed, or `undefined`, if the webhook is to be // rejected. async transform(body: unknown): Promise<WebhookMessage | undefined> { // You can make use of 'typescript-is' to perform runtime type checks on // input data. This makes it easy to reject invalid webhooks. if (is<movie>(body)) { var link = 'https://www.imdb.com/title/' + body.imdb; var titel = body.movie + ' (' + body.year + ')'; return { // username: 'Emby Bot', text: fmt( 'The Movie ', strong(a(link,titel)), ' was added to the ', body.library, ' library', ), }; } if (is<series>(body)) { var link = 'https://www.imdb.com/title/' + body.imdb; return { // username: 'Emby Bot', text: fmt( 'The Series ', strong(a(link,body.series)), ' was added to the ', body.library, ' library', ), }; } if ((is<season>(body) { var link = 'https://www.imdb.com/title/' + body.imdb; return { // username: 'Emby Bot', text: fmt( 'Season ', body.season, ' was added to ', strong(a(link,body.series)), ), }; } else { this.logger.warn('Invalid webhook'); this.logger.warn(body); return undefined; } } } note: as you can see the plugin also differentiate between the type movie, series and seasons. Additionally we use the IMDB ID to generate a IMDB link inside the message. When all is configured right you get the messages from the bot. (and click on the blue link in the message to open the IMDB page of the movie/series) movie example: season example: series example: This doesn't work. Seems like ScripterX doesn't check series "OnMediaItemAddedComplete"... @Anthony Musgrove can you help with this behavior? Finally it would be nice to have some feedback to make emby notifications via matrix cleaner, leaner or more efficiant regards Dual-O

 1 point
 -
If you have problems, please test the websocket connection first (send msg from Emby to Kodi). If this works, it's usually still not a simple sync issue. You can test: Start Kodi, add content and it will work. I would be surprised if not. Must be something else, could be a sleep mode issue, a long term running Kodi issue, network dropped issue, Server rebooted issue, server reconnect issue... something like that. I'm almost sure a straight test will work, please check that. If not, please send me a kodi.log1 point
-
Hi. No, you just side load this app:1 point
-
Hi, that's not something you can edit as it's read by ffprobe directly. You can try and play and skip toward the end. This may trigger Emby to update the time if it learns it's different. Changes are however the file has bad header info a tool like mkvtoolnix should be able to fix this.1 point
-
There's a huge difference between the way how ffmpeg/ffprobe. work and what MediaInfo does: MediaInfo just reads some file headers to know what it is. That's really easy to do and the information is publicly available. It's not decoding, it's just like reading how things are labelled. But when ffmpeg adds support for a codec, it actually implements support for this - like for example for HDR10+: When it gets implemented in ffmpeg, it will be able to actually decode the HDR frame data and make it available for processing in filters (most importantly: tone mapping) or re-encoding. These things are at least partially being worked on (at the side of ffmpeg). Right in the current week there were some new submissions, so this is really "live". It will take some time until there will be something useful and reliable, but once it will have come to that point, we'll surely deliver that. PS: don't get crazy for Dolby Vision. This is a very general term for a multitude of formats/profiles. If this would be more frequently used in the future, I can already promise that we'll all have a lot of fun with it..1 point
-
Thanks, I definitely will try TrueNAS again, once it matures, I've been using Debian since Sarge days, so looking forward to it. Glad they finally came over to Linux, and of course, they chose the right distro1 point
-
I stumbled on to this thread somehow, read it all and enjoyed the write up. thanks. I used to use the same Fractal design case with a low powered Intel J1900 Celeron integrated on to an ITX motherboard and 6 x 3TB hard drives. I used FreeNas as the operating system and ran Emby in a jail. It did well for a few years but I needed more storage and better transcoding so upgraded. Now I run Truenas 12 core for my storage because I love ZFS as a file system, but I've offloaded the apps I was running in FreeNAS jails to docker containers, as a docker host I use a little mini PC with an Intel Celeron J4125 CPU with Ubuntu server as OS. I hope that you try TrueNAS scale again in the future once it's mature and report back here and let us know how it works out for you.1 point
-
So if the update isn't done for tomorrow, Emby will stop receiving information from tvdb until it is updated, correct? Is there an idea of what the process will be after the update? I need to purchase a key from tvdb?1 point
-
For those running the Emby Server stable release, now you can install directly from Synology Package Center: This is the easiest possible method of installation. Please note the Synology Package Center version of Emby Server may sometimes run a little behind due to the Synology review process. For this reason we'll still be making downloads available on our website for manual installation: https://emby.media/download View the full article1 point
-
I can revisit this. I think it should be for raspberry pi. But, I'll create a web page that requests the currently playing item for a session and will display it, in portrait, in a kiosk browser window. We'll show a default image if the page loads and nothing is playing in the session. My development computer has been in pieces for several weeks, but I'll take a look as soon as is possible.1 point
-
One thing would be nice is to have fast forward and rewind in slow motion like Dish has for live TV and movies.1 point
-
Hello, I've noticed that shows that I add recently no longer download the thumb or logo. Additionally if I search for them in the image editor no search results come back. However, If I go to TVDB, I can see that they have both available. The only thing that downloads is the primary image and the backdrop. I seem to remember a setting where I could check which images would download such as thumbs, logos, and banners, but I can't find it. Can anyone point me in the right direction?1 point