Leaderboard


Popular Content
Showing content with the highest reputation on 09/29/21 in all areas
-
Another new version available: 6.0.10 build 89 (ex9) Delta changelog: - music sync (kodi 18) - mediathek fixes - progress update fix - clean code3 points
-
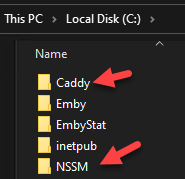
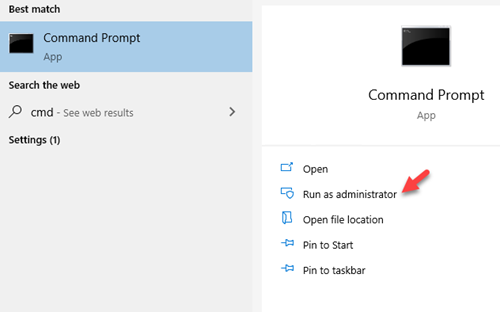
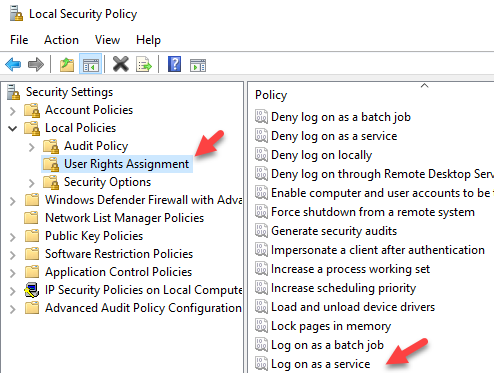
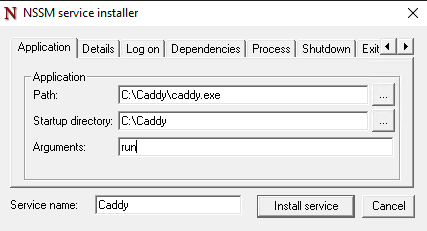
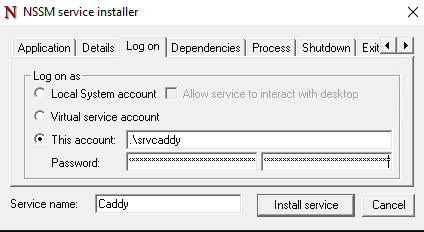
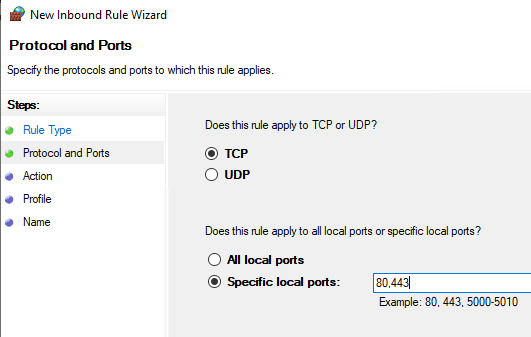
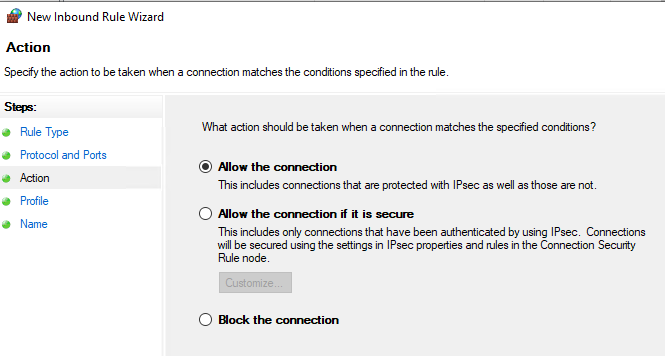
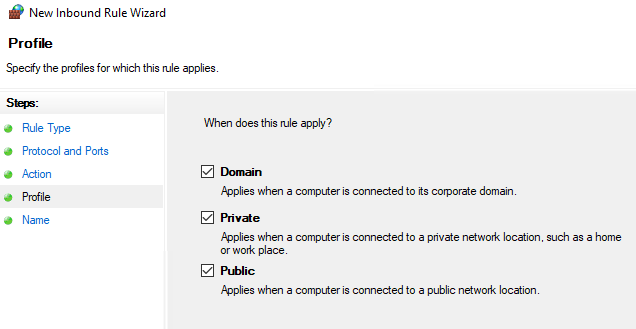
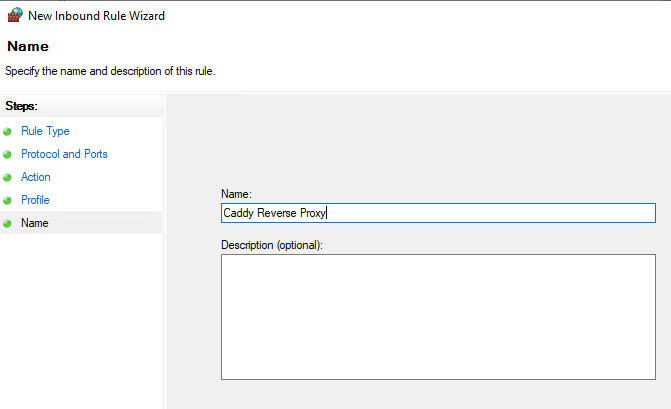
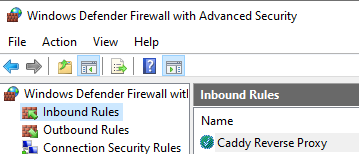
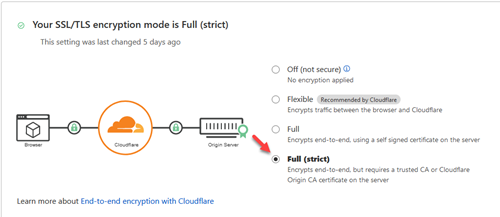
It took me a while to get Caddy v2 setup and working by itself. Then there were some struggles with getting it to work with Cloudflare. I thought I would share a guide to assist those who want to go that route. Prerequisites: Have your own domain Have the DNS of your domain setup with Cloudflare Have your Cloudflare API key/token "For this checkout my other article on setting up DNS updates via API" Have your Emby server set with a static internal IP Step 1: Download Caddy Visit https://caddyserver.com/download to download your binary. You will need to add a couple plugins for this to work. You will want to select 'caddy-dns/cloudflare' and 'kirsch33/realip' Review at the top that it shows "Extra features = 2' and select 'Download' Step 2: Download NSSM from https://nssm.cc/download "We will use this to run Caddy as a service" Step 3: Create folders for NSSM and Caddy on the root of the C:\ drive Step 4: Rename the caddy binary to just caddy.exe and put it in C:\Caddy\. Extract NSSM so you just have the nssm.exe and put that in your NSSM folder. Step 5: Create your caddyfile The caddyfile has no extension. You can open this with your favorite text editor. I use Notepad++. Below is the a sample caddyfile. The first email is the email address that you want to use to receive notifications if there are issues with the cert Adjust your domain to what you are using for Emby. Either 'domain.com', 'login.domain.com' or 'emby.domain.com' etc. The second email address is your email address for your Cloudflare account This also sets up logging for the reverse proxy which is really handy I choose to use the actual IP address of the server instead of localhost. Either will work. { email email@gmail.com } yourdomain.com { tls email@gmail.com { dns cloudflare 'Your Cloudflare API Key No Quotes' } log { output file C:\caddy\logs\emby_access.log { roll true # Rotate logs, enabled by default roll_size_mb 10 # Set max size X MB roll_gzip true # Whether to compress rolled files roll_local_time true # Use localhost time roll_keep 3 # Keep at most X log files roll_keep_days 7 # Keep log files for X days } } encode gzip reverse_proxy http://10.0.0.5:8096 { header_up X-Real-IP {remote_host} } } If you wanted to run any of the arr's as subsites to your main reverse proxy you can add the following to your caddyfile If you are running it on the same box instead of using the full domain name you would just use http://yourip:port You need to login to each of the arr applications and setup the base URL Login go to settings/general/base url Add the correct subsite. So for Radarr you would add /movies save and restart. { email email@gmail.com } yourdomain.com { tls email@gmail.com { dns cloudflare 'Your Cloudflare API Key No Quotes' } log { output file C:\caddy\logs\emby_access.log { roll true # Rotate logs, enabled by default roll_size_mb 10 # Set max size X MB roll_gzip true # Whether to compress rolled files roll_local_time true # Use localhost time roll_keep 3 # Keep at most X log files roll_keep_days 7 # Keep log files for X days } } encode gzip reverse_proxy http://10.0.0.5:8096 { header_up X-Real-IP {remote_host} } reverse_proxy /movies/* https://radarr.domain.com { header_up Host {upstream_hostport} header_up X-Forwarded-Host {host} } redir /movies /movies/ reverse_proxy /tv/* https://sonarr.domain.com { header_up Host {upstream_hostport} header_up X-Forwarded-Host {host} } redir /tv /tv/ reverse_proxy /music/* https://lidarr.domain.com { header_up Host {upstream_hostport} header_up X-Forwarded-Host {host} } redir /music /music/ reverse_proxy /audiobooks/* https://readarr.domain.com { header_up Host {upstream_hostport} header_up X-Forwarded-Host {host} } redir /audiobooks /audiobooks/ } Step 6: Create a user for caddy to run as and set password. You will need this password later down when we setup the service. I'm going to use srvcaddy. Step 7: Allow srvcaddy user to run as service You want to open up Local Security Policy Go to 'Local Policies/User Rights Assignment/Log on as a service' and add our new user srvcaddy Step 8: Add your domain under Emby network settings Login go to settings/network/external domain and add your domain name Step 9 : Launch cmd prompt as administrator Step 10: Install Caddy as a service We will need to type cd "C:\NSSM" in cmd prompt. Then you will need to type nssm install Caddy We will want to edit Log on to our service account Then select 'Install service' Now you can open up services and start caddy The first time this runs it will take a few minutes to generate your certificate on the computer. Step 11: Adjust firewall rules You now only want the local computer to talk on Emby's port 8096. All other devices you will want to have it connect via ports 80,443. Open up windows firewall Make sure all of Emby's rules are disabled Create a new rule Step 12: Create a port forward in your router/firewall from external port 443 to your server port 443. Do to the differences in every router/firewall you will need to refer to manual or Google on this step. For even more security you can lock down only Cloudflare's IP addresses to be able to route to your server. Since we are updating the cert via API you only need port 443 open to Cloudflare. No need for port 80 to be open external. Step 13: Create a DNS entry in your router/firewall for your server. Again do to to many differences you will need to consult your device's manual or google on how to accomplish this. You will want to create an internal record that takes your domain name for your Emby server and points it to the local IP. This way you can take advantage of local login with pin. Step 14: Set Cloudflare's SSL/TLS Encryption Login to Cloudflare, select your domain, and go to SSL/TLS You want to set this to Full/Strict That's it... you should now have a fully encrypted connection to your Emby server internal and external. You will now be connecting to your server via port 443 instead of 8096. Hope this helps anyone struggling with setting this up.


 2 points
 -
I've published an update to the USB build. Please try that and see if it helps. Thanks.2 points
-
We can reproduce the issue and see the it's asking to be transcoded. Now it's just a matter of Luke finding the issue.2 points
-
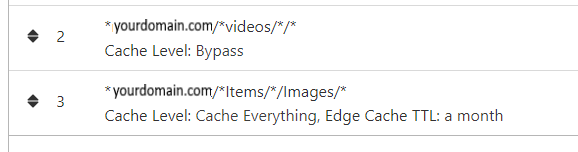
NGINX and emby Config Version 1.0.4 Last Update 1-1-2024 Update by Pir8Radio Why Use NGINX reverse proxy ahead of my application servers like emby? With NGINX or any reverse proxy ahead of an application server you have more control over your setup. You can do things the application servers were not built to handle, have better control over your security and logging, replace lines of code without editing the application server code, better control of caching, etc, etc.... One of the main reasons is so that you don't have to open a new port on your firewall for every application server you host, all you really need to open is 80 & 443 and the internet can reach all of your different servers through one entrance. Will NGINX work on my OS? Most likely, you can find various versions of NGINX for most OS's and they come in different flavors, with options baked in, or just the bare NGINX that you need to compile. See below for download links to get you started. Will NGINX break things on emby? Absolutely if you don't configure it correctly! I HIGHLY suggest when choosing a scheme to setup your domain URL you choose SUB-DOMAIN and NOT sub-directory, more below. Also if you come to the emby forum with things not working, or issues you have and you use a Reverse Proxy, PLEASE make sure that is one of the first things you mention in your forum post. ESPECIALLY if emby works on one platform or client, but not another. So many times people complain "but it works on chrome, so I didn't think it was the reverse proxy". Mention you have a Reverse Proxy please. If the reverse proxy is setup correctly it should be totally transparent to the user and the application server (emby). I'm not going to go into how to purchase and setup a domain name. Lots of how-to's on that out there. Once you have a domain name and its pointed to your IP address, you can go to that domain name and hit your server then continue on.... Sub-Domain vs Sub-Directory: Lets say your domain name is: domain.com there are two main ways you can direct traffic from the internet to your backend application servers like emby. One is sub-directory, something like domain.com/emby or domain.com/other-server This is doable in nginx, but there are some catches and you need to know how your reverse proxy and application server work in detail.. This often breaks different features in emby and other application servers.. To keep with our "Totally Transparent" goal sub-directory doesn't work well, it requires a lot of rewriting and work-arounds to make it work smoothly, if you choose sub-directory you will run into issues you will need to address. The other option is Sub-Domain, this is the cleanest, most transparent, easiest to setup and maintain, it's also what I highly suggest you setup. A sub-domain looks like: emby.domain.com or other-server.domain.com The below config is based on Sub-Domain I will include a sub-directory example as well. NGINX Downloads: Official nginx downloads(LINUX): nginx.org Official nginx downloads(Windows): nginx.org WINDOWS users I suggest this version: nginx-win.ecsds.eu download links are at the bottom of the page. This Windows version has lots of cool features compiled into it already, and is optimized for windows. They keep up with updates, its a FREE (for non-commercial) third party build that I highly recommend. Additional Links: Content Security Policy info (CSP) (For Advanced Users): A CSP WILL break your server if you don't know what you are doing, I suggest reading up, lots of googleing, and understand what a CSP's function is and is not prior to venturing into this area Example NGINX Reverse Proxy Config: 3-29-2020 - ADDED A LINE FOR CLOUDFLARE USERS SO THAT THE X-REAL-IP HEADER IS CORRECTED. THIS ONLY EFFECTS Cloudflare USERS. 4-11-2020 (V1.0.1) - MOVED proxy_buffering off; FROM LOCATION BLOCK TO SERVER BLOCK 12-18-2020 (V1.0.2) - ADDED 301 SERVER SECTION TO FORCE ALL TRAFFIC TO SSL. 9-23-2021 no nginx config change, but cloudflare changed how they cache video files, so emby users that use Cloudflare now need to add a rule like below to make sure video is seekable and playable. 8-18-2022 - added a line for photo sync to cover large uploads of videos and images. (client_max_body_size 1000M;) 1-1-2024 - changed http2 setting per @weblesuggestion in this thread post # 1309363. ** The below "Page Rules" are only needed for Cloudflare CDN users, otherwise ignore. worker_processes auto; error_log logs/error.log; events { worker_connections 8192; } http { include mime.types; default_type application/octet-stream; server_names_hash_bucket_size 64; server_tokens off; ## The below will create a separate log file for your emby server which includes ## userId's and other emby specific info, handy for external log viewers. ## Cloudflare users will want to swap $remote_addr in first line below to $http_CF_Connecting_IP ## to log the real client IP address log_format emby '$remote_addr - $remote_user [$time_local] "$request" ' '$status $body_bytes_sent "$http_referer" ' '"$http_user_agent" "$http_x_forwarded_for" $request_time $server_port "$http_x_emby_authorization"'; log_format default '$remote_addr - $remote_user [$time_local] "$request" ' '$status $body_bytes_sent "$http_referer" ' '"$http_user_agent" "$http_x_forwarded_for" $request_time $server_port'; sendfile off; ## Sendfile not used in a proxy environment. gzip on; ## Compresses the content to the client, speeds up client browsing. gzip_disable "msie6"; gzip_comp_level 6; gzip_min_length 1100; gzip_buffers 16 8k; gzip_proxied any; gzip_types text/plain text/css text/js text/xml text/javascript application/javascript application/x-javascript application/json application/xml application/rss+xml image/svg+xml; proxy_connect_timeout 1h; proxy_send_timeout 1h; proxy_read_timeout 1h; tcp_nodelay on; ## Sends data as fast as it can not buffering large chunks, saves about 200ms per request. ## The below will force all nginx traffic to SSL, make sure all other server blocks only listen on 443 server { listen 80 default_server; server_name _; return 301 https://$host$request_uri; } ## Start of actual server blocks server { listen [::]:443 ssl; ## Listens on port 443 IPv6 ssl enabled listen 443 ssl; ## Listens on port 443 IPv4 ssl enabled http2 on; ## Enables HTTP2 proxy_buffering off; ## Sends data as fast as it can not buffering large chunks. server_name emby.domainname.com; ## enter your service name and domain name here example emby.domainname.com access_log logs/emby.log emby; ## Creates a log file with this name and the log info above. ## SSL SETTINGS ## ssl_session_timeout 30m; ssl_protocols TLSv1.2 TLSv1.1 TLSv1; ssl_certificate ssl/pub.pem; ## Location of your public PEM file. ssl_certificate_key ssl/pvt.pem; ## Location of your private PEM file. ssl_session_cache shared:SSL:10m; location ^~ /swagger { ## Disables access to swagger interface return 404; } location / { proxy_pass http://127.0.0.1:8096; ## Enter the IP and port of the backend emby server here. client_max_body_size 1000M; ## Allows for mobile device large photo uploads. proxy_hide_header X-Powered-By; ## Hides nginx server version from bad guys. proxy_set_header Range $http_range; ## Allows specific chunks of a file to be requested. proxy_set_header If-Range $http_if_range; ## Allows specific chunks of a file to be requested. proxy_set_header X-Real-IP $remote_addr; ## Passes the real client IP to the backend server. #proxy_set_header X-Real-IP $http_CF_Connecting_IP; ## if you use cloudflare un-comment this line and comment out above line. proxy_set_header Host $host; ## Passes the requested domain name to the backend server. proxy_set_header X-Forwarded-For $proxy_add_x_forwarded_for; ## Adds forwarded IP to the list of IPs that were forwarded to the backend server. ## ADDITIONAL SECURITY SETTINGS ## ## Optional settings to improve security ## ## add these after you have completed your testing and ssl setup ## ## NOTICE: For the Strict-Transport-Security setting below, I would recommend ramping up to this value ## ## See https://hstspreload.org/ read through the "Deployment Recommendations" section first! ## add_header 'Referrer-Policy' 'origin-when-cross-origin'; add_header Strict-Transport-Security "max-age=15552000; preload" always; add_header X-Frame-Options "SAMEORIGIN" always; add_header X-Content-Type-Options "nosniff" always; add_header X-XSS-Protection "1; mode=block" always; ## WEBSOCKET SETTINGS ## Used to pass two way real time info to and from emby and the client. proxy_http_version 1.1; proxy_set_header Upgrade $http_upgrade; proxy_set_header Connection $http_connection; } } }

 1 point
 -
Hi, I would like to have an option to choose H265 instead of H264 in the Transcode option. It will be smaller for all bad bandwidth (2~5Mbit ADSL), but will have a great quality. Mobile phone can benefit of it greatly too with the 4G and the limitation of download.1 point
-
I'd like to request that the Playlist library have a displayed category and, "widget" on the homescreen in the similar fashion that movies, TV shows, music are shown. I create topical/seasonal playlists that I'd like my family members to see displayed from the homescreen with "recently added" carousel style. Currently, to the best of my knowledge, playlists are only accessible via their shortcut in the, "My Media" section. Thanks for your consideration!1 point
-
I think whatever you have implemented in 6.0.10-build 81 (ex8) might have fixed the issue. My first test was successful after the shield was asleep for 8-9 hours. Bonus points for the movie being the first movie in the library from a collection, and the collection coming over automatically. I had seen some issues there as well until a box collection sync was run. I will test more, but marked your comment as the solution. Thanks you.1 point
-
Hit me up when you're ready.1 point
-
I have another dll. I will.post after work.1 point
-
I think I found the problem, but I'll perform additional tests...1 point
-
Pour ton problème, tu as la possibilité de télécharger le .spk de Emby sur ton PC et de l'ouvrir avec 7-Zip, le .spk est une archive gtar. tu ouvres l'archives, tu vas dans le dossier \conf et tu modifies le fichier privilege. { "defaults": { "run-as": "package" }, "username": "emby", "groupname": "emby", "join-groupname": "videodriver" } Tu remplaces emby par le user que tu veux 'toto' par exemple et idem pour groupname. Tu remets le fichier dans l'archive et tu sauvegardes. ensuite tu installes ton paquet et il va passer. l'user sera toto et non plus emby, c'est tout. Dans mon cas j'ai eu un problème avec le port 8096, DSM me disait à l'install qu'il était déjà utilisé par un autre service, installation impossible Ne pouvant trouver lequel et pourquoi (bug de désinstallation), j'ai édité le fichier INFO de l'archive et j'ai remplacé 8096 par 8095. Le paquet s'est installé et j'accedais à Emby avec le port http 8095 (qui ne me sert qu'à l'install puisque je définis l'accès en HTTPS obligatoire avec un reverse Proxy sur le port 8920) package="EmbyServer" version="4.7.0.12-3001" maintainer="Emby LLC" maintainer_url="https://emby.media" distributor="Emby LLC" distributor_url="https://emby.media" arch="x86_64" adminprotocol="http" adminurl="/web/index.html" adminport="8096" dsmuidir="ui" dsmappname="media.emby.EmbyServer" os_min_ver="7.0-40000" beta="yes" description="Emby Server is a personal media server with apps on just about every device" displayname="Emby Server" extractsize="512996" toolkit_version="40955" create_time="20210926-00:49:50"1 point
-
Yes, I know what you mean. Actually here is Kodi in charge, but maybe I can push Kodi doing so. btw @all I found another bug in the latest version when removing items (actually folders). It's really an edge case, anyway will be fixed in next beta.1 point
-
No because after a library repair they do show up.1 point
-
So that didn't take very long... I upgraded my internet to 400/20 Mbit a couple weeks ago and had to disable all the packet inspection on my USG to get the speeds. It was fun while it lasted. So I hit the interwebs to see if I could find a deal on a UDM Pro only to find that they are out of stock everywhere. Looks like a new line of products in imminent, but that doesn't help me right now. So the question is do I try to spin up a VM with PFSense or Sophos XG and maybe build a 1U server to house it permanently? Or do I wait for the new Ubiquity kit? I'm assuming that I could continue to operate my wireless network using the unifi controller docker that I have running now sans USG. Things I learned today.... listen to the Emby community when they tell you spend some more money up front. Even if you get a really good deal on a USG.1 point
-
I uploaded the latest version as beta with one minor additional fix: delta changelog: - multiserver music issue I'll leave it in the git repo for a few days. If there is nothing seriously wrong, I'll push it in the Kodi (beta) repo as well.1 point
-
What is Spanish called? In Latin American countries, the Spanish language is simply called español (Spanish) as that is from where the language was brought. In Spain, however, the Spanish language is called castellano (Castilian), which refers the Castile province in central Spain where the language is said to have originated. Spaniards do not call the language español because there are other languages like Catalan (or Valencian), Galician and Basque which are spoken in Spain that would also be considered Spanish languages (lenguas españolas). The Evolution of Spanish The idea of “continental lag” was first coined by the linguist Albert Marckwardt to describe that the language which is brought to a new place changes less than the language from where it originated. This could explain why the words and phrases people use in Latin America are different – the language didn’t have time to “catch up” to its mother country (Spain). The influence of the people or countries around those speaking the language affects the vocabulary and the way of speaking as well. There are, for example, words borrowed from English because of a country’s proximity to the United States or the UK. Words like bistec, champú, cóctel are words that are commonly used in both Spain and Latin America. Before the Spanish arrived in South America, there were hundreds of different native languages it’s possible that many of these words were incorporated to the Spanish language of each particular country. Differences in Pronunciation The greatest difference one might hear between the Spanish spoken in Spain and the Spanish in Latin America is the pronunciation of the Z and C (before I or E). In Latin America, these two letters are pronounced as S, while in Spain you would hear a TH sound. For this reason, someone from Barcelona would pronounce the name of their hometown as Barthelona. Here’s an example: la taza es azul In Spain, it would sound like: la ta[th]a es a[th]ul In Latin America, you would hear: la ta[s]a es a[s]ul In some parts of Argentina and Uruguay, the double LL and Y sounds are pronounced like an english SH, while other Spanish speakers would pronounce it as a Y sound. Example: está lloviendo en la playa In Argentina, you would hear: está [sh]oviendo en la pla[sh]a Everywhere else: está [y]oviendo en la pla[y]a Besides the differences in specific letter sounds, there are also differences in the general way people speak. Some say that Argentinians have a “sing-song” accent, Colombian Spanish is the most neutral sounding, or that some countries drop an S at the end or in the middle of words. The more you are exposed to different accents, the easier they become to understand. Learn more Differences in Vocabulary Another one of the differences between Spanish in Latin American and Spain is the different words used for the same objects. You might be used to hearing a certain word for something and then be caught off guard while on vacation in Chile, for example, when you hear an avocado called palta when everywhere else it’s called aguacate. Or in Mexico, the call a swimming pool alberca, wheras everyone else calls it piscina. Here are some more examples: a pen is called bolígrafo or boli in Spain and a pluma or lapicera in Latin America a peach is melocotón in Spain and durazno in Latin America a car is coche in Spain and carro or auto in Latin America a cell phone in Spain is móvil and celular in Latin America the verb to drive is conducir in Spain and manejar in Latin America Ustedes vs Vosotros Spain is the only Spanish-speaking country where the pronoun vosotros and vosotras is used, giving Spaniards an extra ending to memorize for each tense. This is one of the key differences between the two languages. Vosotros is the plural form of the second person (you) and is used in a casual manner. In Spain, when addressing your group of friends you would use vosotros. Ustedes would be used only if you wanted to show formality. In Latin America, since vosotros doesn’t exist, they simply use ustedes in both formal and informal situations. Vos vs Tú Similar to Spain using vosotros, there is one pronoun used in Argentina, Paraguay and Uraguay – vos. Vos is used instead of tú. Past Tense The way that Spaniards and Latin Americans talk about the past includes differences as well. In Spain, it is common to talk about a completed action using the present perfect tense: Hoy he ido al trabajo (I have gone to work today). In Latin America, it is more common to use the simple past: Hoy fui al trabajo (I went to work today).1 point
-
That seems to have sorted it. Thanks very much. Kevin1 point
-
What is the reason for having localhost (127.0.0.1) in the first field? That IP address has a specific purpose and is neither a network or a subnet.1 point
-
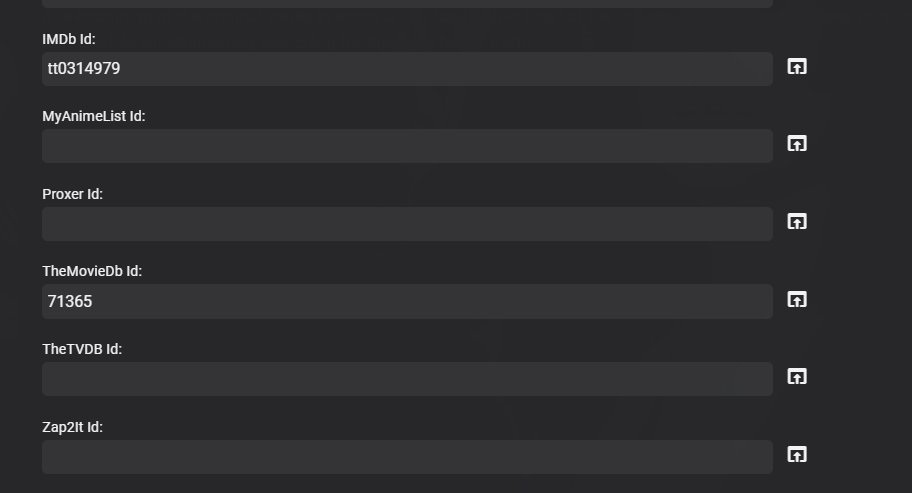
Will have to look into it more but just replicated. Logs shows different info but TVDB metadata is not recorded . So there might be something going on with TVDB right now as they are getting ready to close all legacy api access. Yes a v4 plugin is being worked on. Adding TVDB id to Series and refresh/replace corrected the issue. I see that it actually download the wrong series from TVDB but lucky did not linked it to this series It got Battlestar Galactica (2022) https://www.thetvdb.com/api/B89CE93890E9419B/series/380208/all/en.zip
 1 point
 -
Well, it shouldn't, according to your settings, as TVDB lists them as Specials on both Aired and DVD order, and API v3 is still live. https://thetvdb.com/series/battlestar-galactica-2003/seasons/official/0 https://thetvdb.com/series/battlestar-galactica-2003/seasons/dvd/0 Unless Emby is swapping those meta-scrapers behind-the-scenes and redirecting, which I highly doubt, without some formal announcement. Edit: Try disabling TMDB meta-scraper there and Refresh Metadata>Replace all, see what gives.1 point
-
Yes a plugin update is currently being done, but yes it is to close to the cutoff, as the plugin is basically a rewrite for the new api. But with what the new api offers I would expect plugin updates for months.1 point
-
As long as you have the .db file - it doesn't really matter as that also contains all the titlesequence data as well. As long as your core system stays the same it can just be restored and you will pick up where you left off. You cannot use it on another system though, as the links to your media items will all be unique (it uses the ItemID). Unless the Introskip tasks are actually running, then this should have no impact on the rest of the system, so that is a bit of a mystery.1 point
-
Also everything mentioned here, Media Playback Issues1 point
-
That is likely not as much related to those files being mkvs but to encoding - AVC mkvs would require remuxing only (container swap) which requires relatively little processing power whereas HEVC-encoded mkvs will require transcoding, which might be too taxing for your server (moreso if no HW accelleration). However, without exact example, it's all guesswork only. If you could provide Media Info section for item that plays smoothly and one that does not, we might get some more insight there.1 point
-
Thanks, this also solved it for me. Thanks for the quick reaction.1 point
-
Yes you have to run a library scan for the new database to start populating existing set libraries. @cayarsCan you update the final steps in KB to include running a library scan to repopulate the libraries.1 point
-
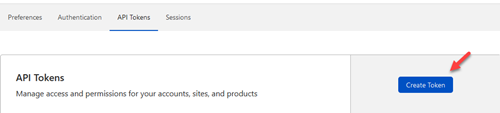
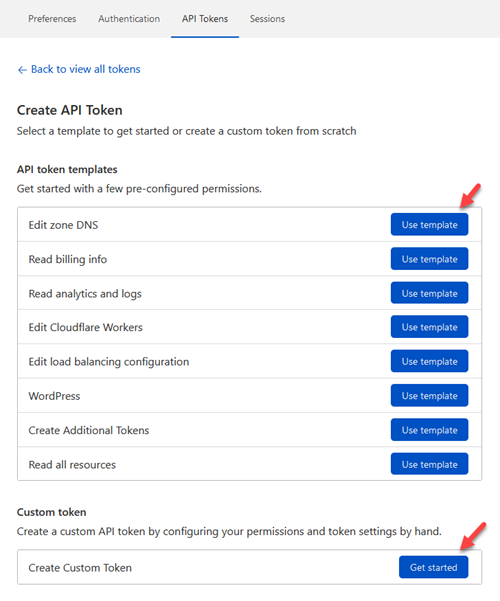
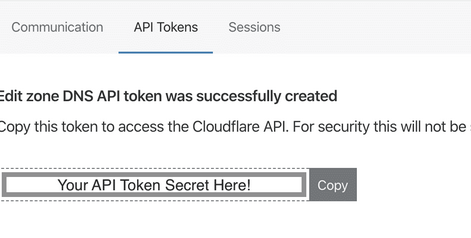
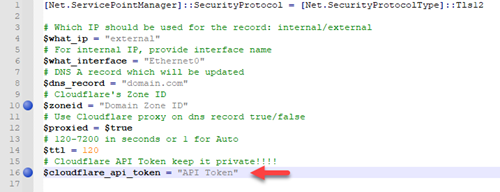
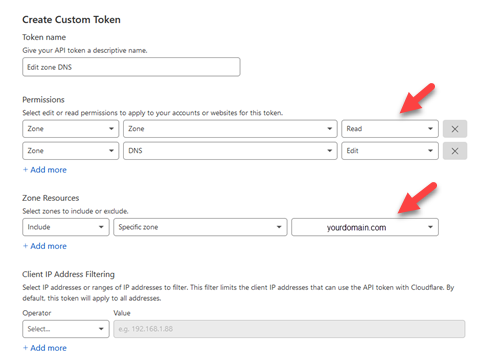
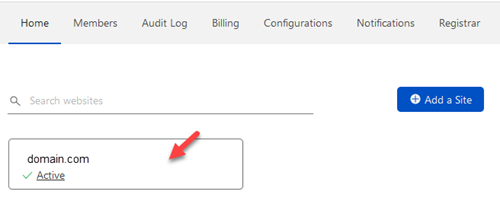
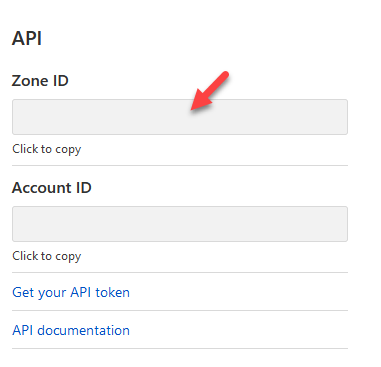
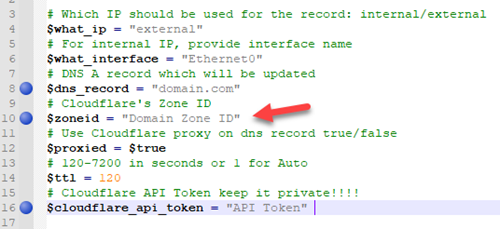
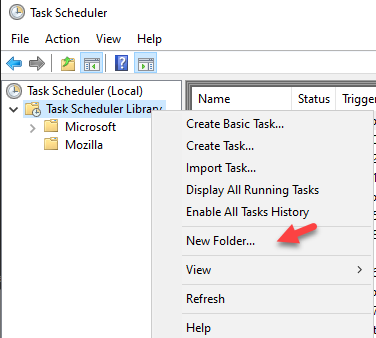
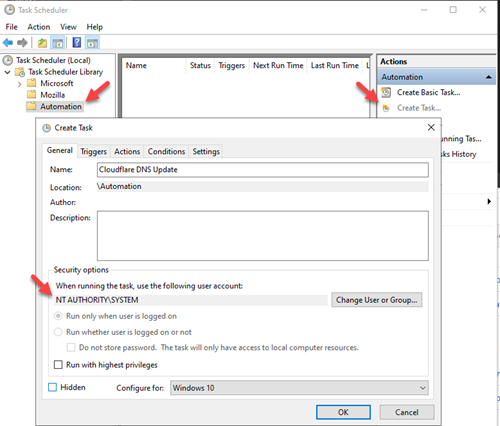
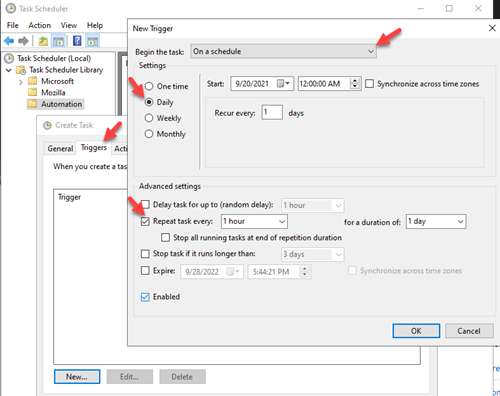
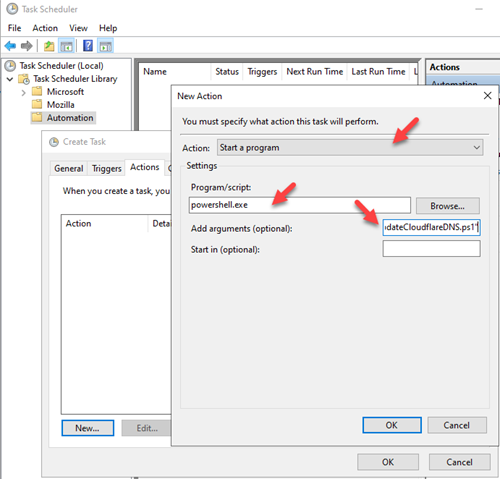
I wanted to share a PowerShell script with everyone. This can be ran as a scheduled task on a Windows box, and will update your DNS entry in Cloudflare via API. This is much better then paying for a DDNS service, and you can use your own domain. Make sure you have already purchased a domain and have your domain's DNS setup in Cloudflare. Step 1: Create a path on your hard drive for this script. For this example I'm going to use C:\Scripts. Copy the script to this path and open it with your favorite editor. I use Notepad++. Step 2: Create you Cloudflare API token https://developers.cloudflare.com/api/tokens/create To create an API for your script login to your Cloudflare account at https://dash.cloudflare.com/login. Then go to User Profile/API Tokens https://dash.cloudflare.com/profile/api-tokens. From the API Token dashboard select 'Create Token' You will want to use the 'Edit zone DNS' template or select 'Create Custom Token' Here you will want to allow Zone Read access and Zone DNS Edit rights. It will then take you to a summary page, select 'Create Token' You will now have the generated API Secret. Copy API Token into the script Copy your Zone ID Go back to the main home page of your Cloudflare dashboard and select your domain Scroll down and towards the bottom right you will find the API section. You want to copy the Zone ID Add which record you want to change. I typically update my main domain I have for emby and then all my other records are CNAME that point back to the same IP. Note: Make sure you are proxying your traffic to mask your actual IP. Step 3: Create a task in task scheduler Open task scheduler on windows. I typically create an Automation folder to keep my tasks separate from Windows and Applications. Once you have your Automation folder, select that folder and 'Create Task'. Name the task anything you like. I chose to name mine 'Cloudflare DNS Update'. Also change the user to run as 'System'. Go to the next tab and create a new 'Trigger'. I choose to run mine hourly. You now want to create an 'Action'. You want to 'Start a program'. The program is 'powershell.exe'. For the argument you want '-File "C:\Scripts\updateCloudflareDNS.ps1" That is it, the task will now execute the script to check your external IP and update your DNS record for you. Issues and updates will be logged wherever this script is. So for this example it would be in C:\Scripts\updateCloudflareDNS.log. updateCloudflareDNS.ps1

 1 point
 -
I have only my USB drive that is used for backup and it correctly shows up as "USBShare1". Like I said previously - I believe that when I was in Putty using SSH with sudo, I entered the command "mv /volume1/Emby /Volume1/Emby6" and that renamed the share. This was in lieu of doing it via control panel - shared folders. So when the backup started it could not find /Voume1/Emby as it no longer existed. Then when I rebooted the server, DSM recognized the new name and displayed it via the UI. At least that is what I think happened. Nonetheless, can you confirm is the DSM7 version of Emby even references the old Emby shared folder? Since I am on DSM7 with the compatible Emby software, I am thinking I can delete tht share as it no longer needed.1 point
-
Yes, still a problem. Cayars has been great and has helped a lot, but I had to stop the progress for some traveling. I'm back now and will be reaching out to cayars again very soon to pick up where we left off.1 point
-
Yes, v1.1.04 appears to have fixed the issue for me1 point
-
My personal view is avoid drive letters like the plague ! I have always use UNC shares with emby as it makes life so much more portable with not only library settings, but also general administration. Simply setup a share on the same machine - so d:\ becomes \\machine-name\TV-shows e:\ becomes \\machine-name\Movies use the UNC name in the library instead - and now you can map whatever you like to it without the need to change emby ever again. The bonus is now you have a share - so on another machine or the same machine if you wish - you can use \\machine-name\TV-shows and you will get access to that share (drive) remotely. To note, access on the same machine does not go through the network - so there is zero performance penalty for doing this vs using antiquated drive letters.1 point
-
Thanks, we'll look into it.1 point
-
Great, thanks !1 point
-
Are you still having an issue with this?1 point
-
New version available: 6.0.10 build 59 (ex5) Delta changelog: - add option to reload skin after plugin start -> default = true - improve music nodes abstraction - fix photos - fix homevideo updates1 point
-
Sending you a PM momentarily.1 point
-
If you deleted the collection on the new computer it should then remove the collection from the NFO file. Then if it's not in the NFO file it won't get added back. You have to be careful how you work with collections like that. If you like I could do a remote session with you and help you get back on tract with this.1 point
-
You have a few things to unwrap here so let's start with the easier ones. Using CIFS - yes, .NET Core has been throwing access errors for some on CIFS/SMB shares and recently found that the mount option "nobrl" has helped in some cases. volumes: - /OMVshared_media/configs/Emby:/config:z Don't put your Emby config path on the CIFS share. Find/create a local path on the OMV host for the config. This part isn't required though life is usually easier if a local user and group emby:emby are created to run the service. A local user with a home directory which can in turn be used for the /config location mimics the package installation of Emby on Linux. You would have to modify the UID/GID for the container and fstab then everything else should fall into place. If you have plans for other containers to access the same media with read/write permissions then consider using a common group (GID) and changing the UMASK to 002.1 point
-
It's possible for the future. Thanks.1 point