Leaderboard


Popular Content
Showing content with the highest reputation on 12/29/25 in Posts
-
Sorry i misunderstood you. Not a bad idea, i have to think of some user friendly way of implementing it. I will look into it as soon as i come up with a good way of having it work for people. Many thanks for the suggestion, for sure one i will look into!2 points
-
No broken placeholders for me - that was Jmackay82.2 points
-
Thank you so much, something even I, whom is appairently complete un-educated (lol). Can understand. Every answer you have for me is in plain English, and very understandable. I will give it a go tomorrow. Will advise.2 points
-
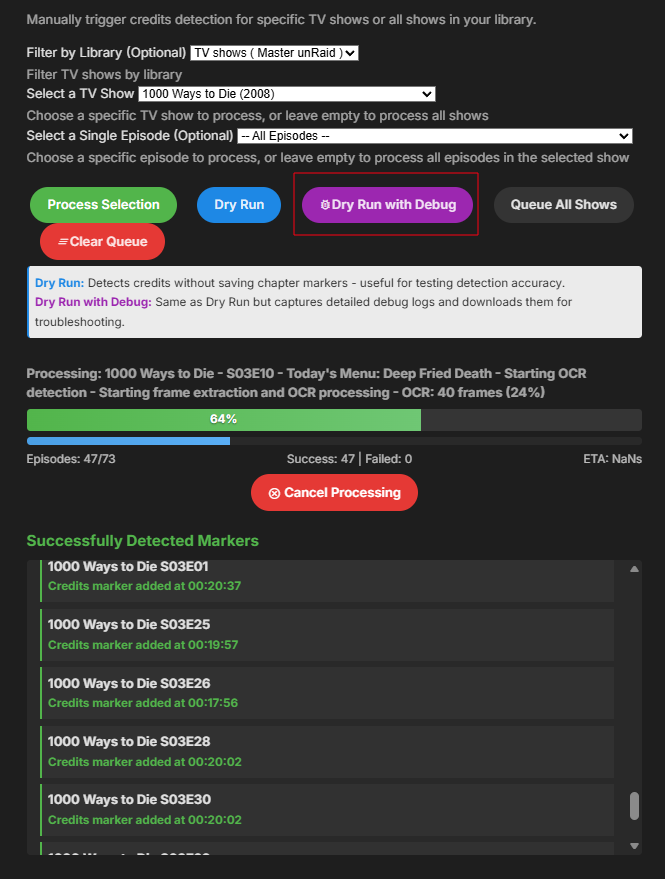
Tired of seeing end credits before Emby loads the next episode of your favorite TV show? Now you can remove that iritation! EmbyCredits detects those end credits and add a marker for Emby to use so end credits can be skipped. In the catalog under Metadata or at: https://github.com/yocksers/EmbyCredits This is either by done chroma fingerprinting and comparing the episodes or by the plugin extracting png/jpg images of the TV show, sending them to a tesseract docker container, the tesseract finds a match and reports that back to the plugin that then adds the skip to Embys database. Emby then shows a "Keep Watching | Next Episode" when it sees the marker. NOTE: Requirements: yock1/embycreditocr installed if OCR detection is wanted (recommended and most precise method). In the plugin you add the Tesseract server IP: IMPORTANT!!!!! As the plugin extracts a lot of images it needs a custom folder to do this as to not fill up Emby docker disk images so set this setting: Then add some keywords to search for (i have added a few but for more precise detection you should add some more that are fitting to your library). Choose a library or a single episode and press process. The plugin can also be set to run as a scheduled task or auto detection for when new shows or episodes have been added to Emby. Speciel thanks to friends who helped developing and @Neminemfor help with testing! If you like this plugin then please consider donating at https://buymeacoffee.com/yockser so i can sit back and relax once in a while with a nice coffee. Disclaimer: Use at your own risk! The plugin has been tested and re-tested but bugs are devious little things that can creep in unnoticed. Do with the plugin what ever you want, change the code, call it your own creation or even take money for it.. I don't care. The original will be here for free!
 1 point
 -
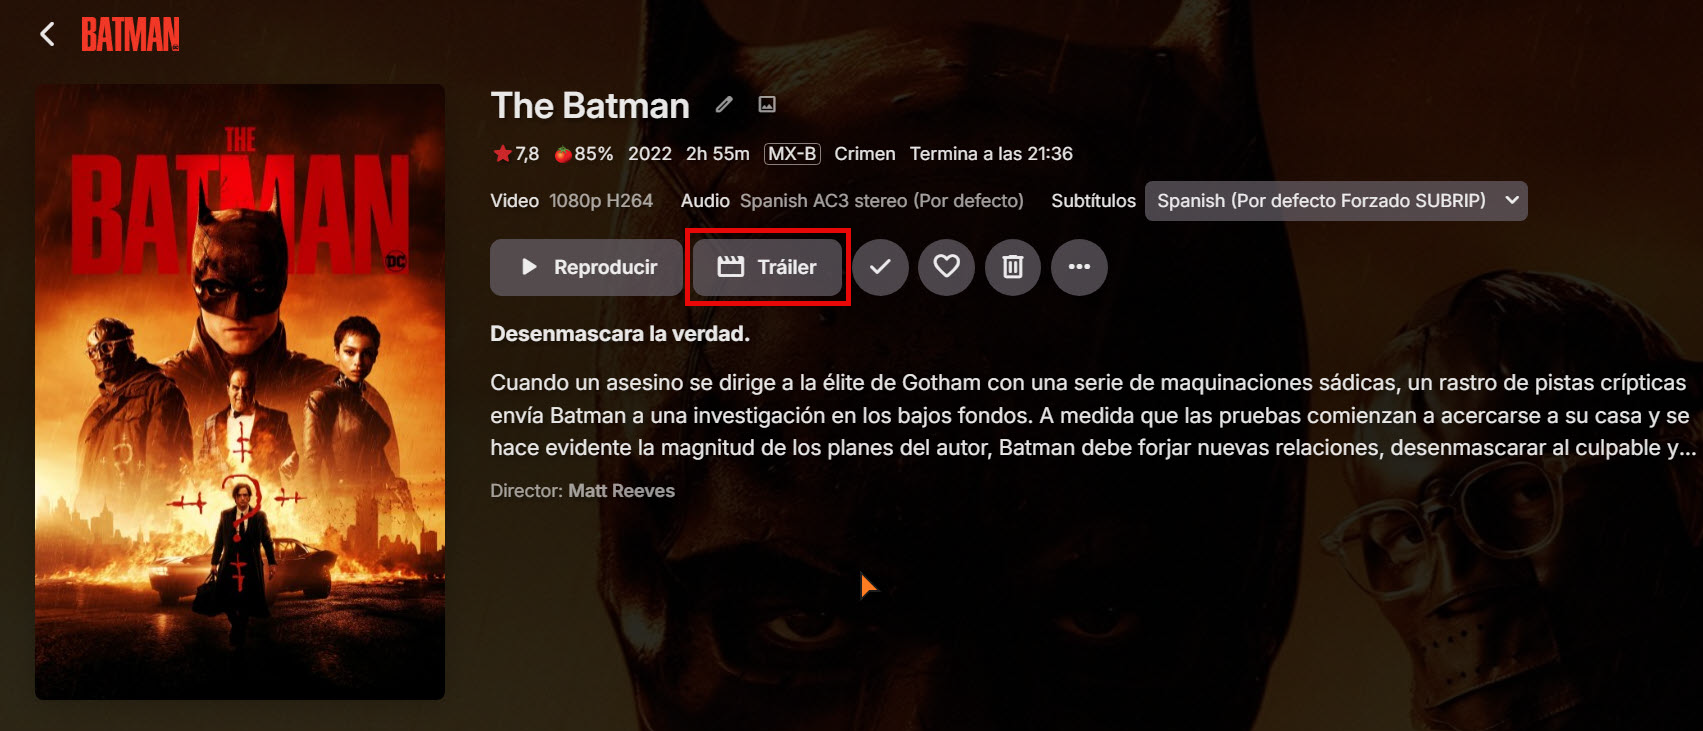
Hello, I would like to request the ability to change the default trailer link assigned when adding a movie. Often, the selected trailer is in low quality or in another language, which is not ideal. It would be great to have an option to add a custom YouTube link, such as a button or a feature labeled "Change Trailer" or something similar. This would significantly enhance the user experience. Thank you!
 1 point
 -
Hello, I tried this plugin. My library is organized with 2 NAS, and I'm using the samba protocol to reach some files. While using the plugin, I get a "file not found" error message when the file is reached with samba and seems working well when files are in a local directory. An idea why ? Thanks for the good work already done. credits-detection-debug-2025-12-29T22-59-58.log1 point
-
Yes, thanks1 point
-
Just following up on this post to confirm that, after updating my Emby Server to the latest version (4.9.1.90), shuffling music by genre appears to be working again. I can once again shuffle my music tracks by genre without locking up the server. Thanks much!1 point
-
Yes that is what I mean as well.1 point
-
Oh, maybe we are thinking the same thing. In the guide, you poke a program to get the detail window - that's where I'd expect to see it. In the guide itself would be nice also, but I understand the challenges there.1 point
-
I think on the program screen, being able to display if it's already in the library is a great idea.1 point
-
De hecho estamos numerosas personas afectadas con distintos servidores y todos con LG. En los grupos y foros de todo el mundo lo esta comentando. Y gente cambiando sus servidores a Jellyfin1 point
-
Luke el servidor tanto en android como en emby media funciona a la perfección. Solo ocurre en las tvs LG con la nueva actualización. En mi tlf funciona perfectamente1 point
-
So this is supposed to work? I will provide logs soon.1 point
-
As long as it's running through Emby Server, then disabling stream sharing will not reduce playback start time or eliminate a source of errors. The only difference would be in what happens when you try to open a second stream of the same channel.1 point
-
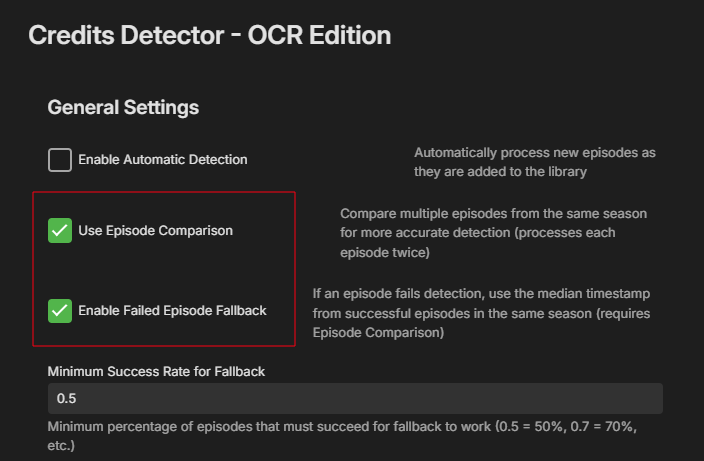
Yeah I saw that. Quite useful. But what do you think of my suggestion in my previous post ? Keeping track of failed episodes and avoid re-processing those in the future unless the user forces it by clicking on some button in the plugin. Or if a setting in the plugin has changed then one could seem it would be a good thing to try and re process old failed episodes.1 point
-
Maybe TMM can only pull in the things you want, just have to move the NFO with the file and enable metadata reader, but I don't use TMM so I'm not sure...1 point
-
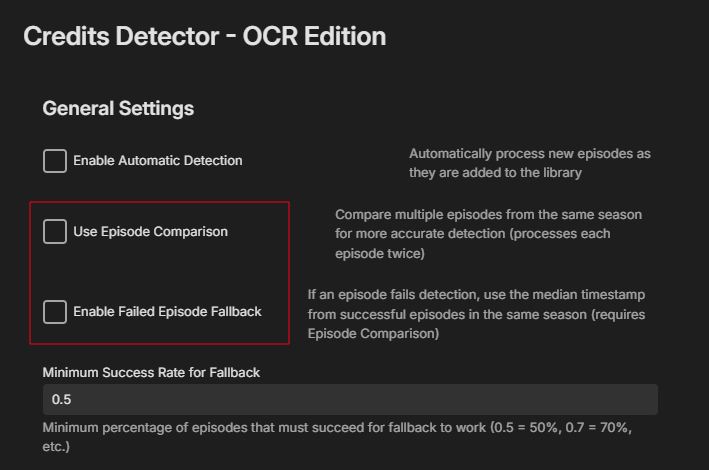
The words are case insensitive. I will add that to the description in the next version. Using srt files as you suggested sadly won't work, in many srt files the writer of the subtitles and other stuff often shows up later as you mentioned your self. The lastest version (version 1.1.5.0) of the plugin streams the images right as they are extracted instead of extracting all images and send sending them. This makes it a lot faster. Tested the whole season of Cyberpunk in under 20 seconds for me. Making it look at reverse order could work but it would most likely end up with the same result as instead of the first 2 matches (by default) it would just have to look for the last one. That could actually make it slower in some cases. As the OCR is rather precise in the detection of words, if you want it to be faster i suggest you try setting it to only look for one word, disable episode comparison and episode fallback. I use that my self and it is very fast with the detection that way. You can also press the "reset to default" button and then save, those are my recommended settings that work best for me. Best advice i can give if it fails some detections is to add some more keyboard to look for. I have added the once i could think off but i bet more could be added. Many thanks for the suggestions, i appreciate all suggestions a lot!! Edit: I forgot. If you have any problems please do as Neminem suggested and do a dry run with debugging and send the log.1 point
-
When you delete a movie or other kind of media that has that genre, that's when this is happening. Interesting as testing on my stable/beta custom images remained. Randomly choose test media and deleted and did full scan. Only currently tested on Movies.1 point
-
Here you go try moving your batman-featurette to a sub folder, As described here Movie Naming | Emby Documentation1 point
-
After that do the same thing with these enabled. And supply debugging logs.
 1 point
 -
@gibmancan you try a dry run with debug enabled. And disable these, remember to push save. After that supply debugging logs.
 1 point
 -
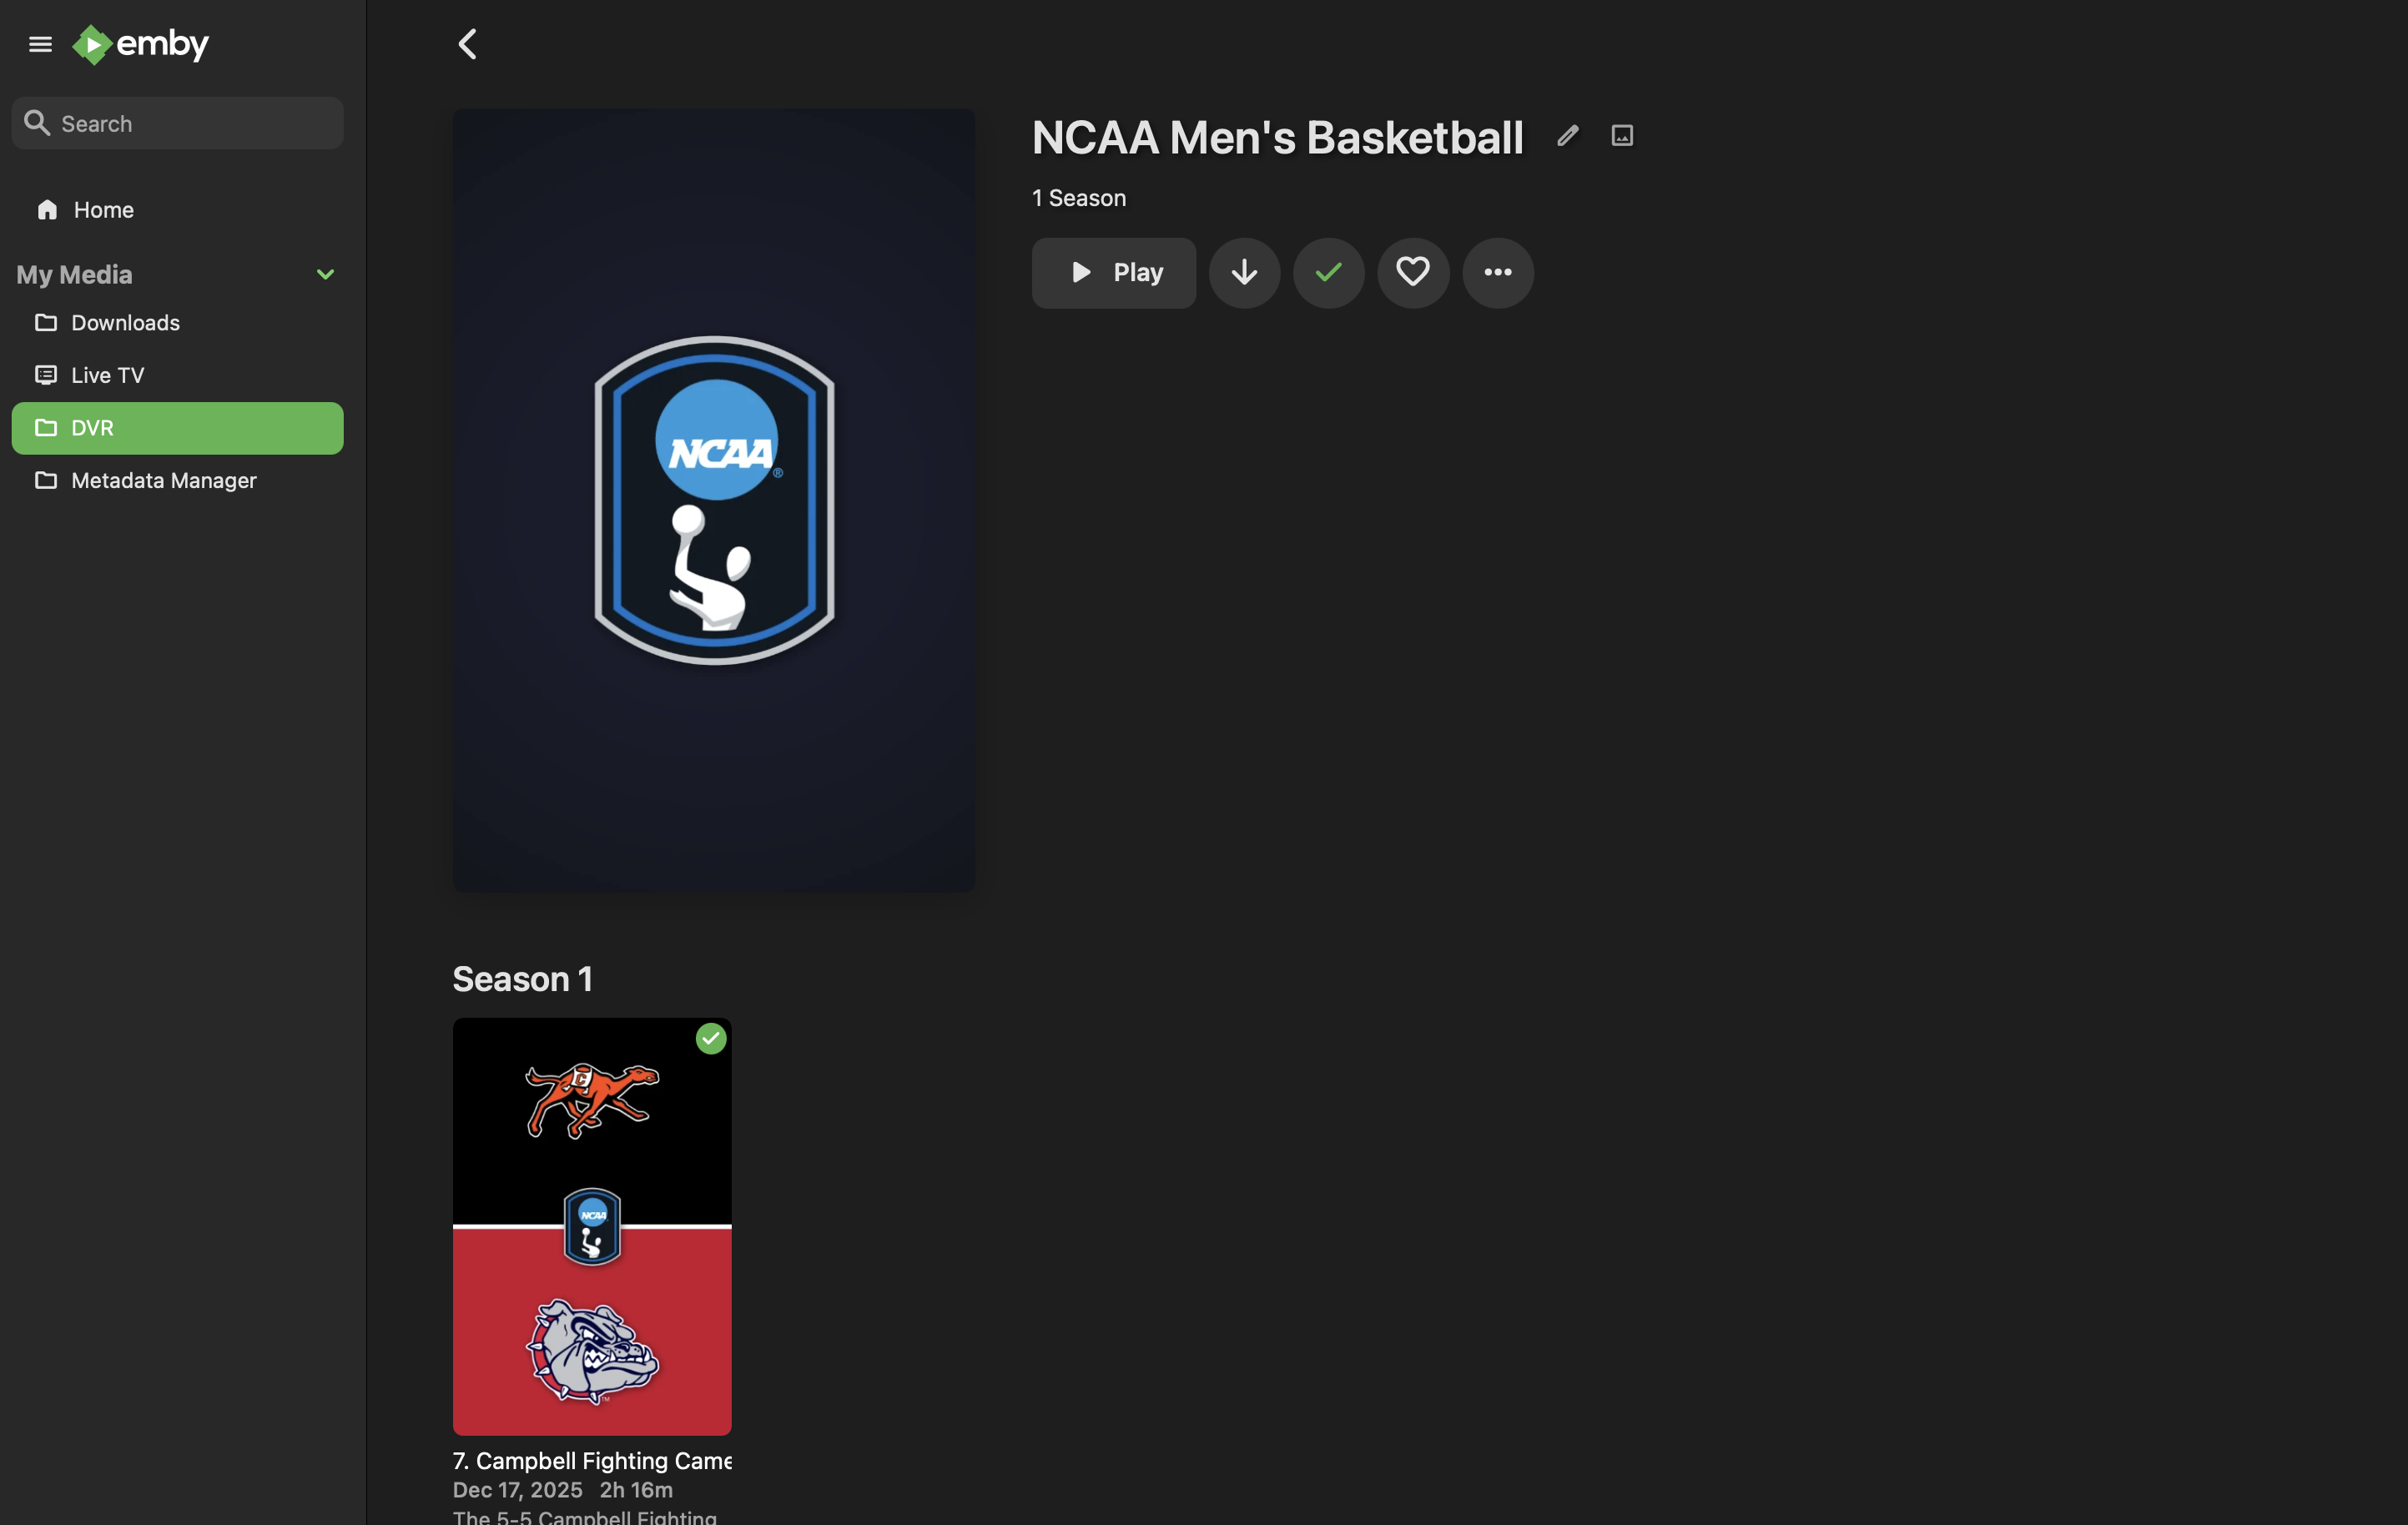
This is what shows under the "NCAA Men's Basketball". I have also uploaded my library.db file.
 1 point
 -
Well, that didn't age well.1 point
-
Hi, I set that option on with no effect on playback on Emby Roku. Thank you.1 point
-
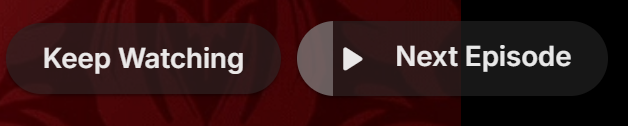
I presume that you will look at both issues, the not scrolling content on homescreen in horizontal mode and also why continue watching is showing and not Next Up. In vertical mode its fine. But we are so set in the use of Horiontal Mode.1 point
-
HI, yes we are hoping to have this resolved soon. Thanks.1 point
-
I restarted the Emby service and the soft router, and the recognition is normal now.1 point
-
When you delete a movie or other kind of media that has that genre, that's when this is happening.1 point
-
Has anyone been able to do anything about this? I haven't been able to use the app on my TV for several days. Wouldn't it be better to revert to the previous version so I can install it from the LG app store?1 point
-
Biggest so far(....) isn't Embys, its Sh0rtys banner thing that shows how good Emby can look (but doesn't).1 point
-
Thank you for the response. Looking forward to Roku client changes. As I'm the only one in the house who cares about this topic, I will just have to rely on screen-casting from my laptop when I want to watch something at a faster pace.1 point
-
Old post, but for anyone coming across it, you can just sideload the Emby Android app onto the headset. Works perfectly.1 point
-
What do I want? TVNext, finally.1 point
-
Ah, it's Dave's old plugin. Thanks.1 point
-
No bypass ? No way to downgrade ourselves ? It's not our tv we dont own shit, LG locks everything.... With Android we would be able to download an apk from the many archive on the web and install it.1 point
-
It works perfectly for me also on my LG OLED77G2 and on my friends OLED77G5. Server version on my TerraMaster F4-425 Plus NAS: 4.9.4.1 beta (Premiere). Latest WebOS 25 on both TV's. And finally, the most important thing: the subtitles finally work perfectly (both burned-in and external). P.S.: I tried it on my other, old TV (OLED65C8) and it works without any problems on WiFi.1 point
-
no I rather sit this one out, I'm sure you have enough logs for now. or I recommend to just turn on a lg tv (probably with webos 25) and test your apps before rolling it out. for me the lg apps were never a real solution (like I reported many times for example how to adjust sub delay if the box hides the complete sub???). my external player with kodi and emby for kodi works.... my other lg with the old webos 24 also works (not sure which app version, not at home).1 point
-
Yes, this should be the normal thing to do. Every normal software company will immediately roll back an update if it completly breaks the application. The amount of feedback here is proof enough that this update is bad. Emby devs charge money, operate closed source but refuse to help. If it was open source at least someone else could fix it quickly.1 point
-
Hi Luke, Here is one of the log files. Hope this will help. I would prefer that you could roll update to the previous version so LG owners be able to use the system. Thank you, Andrei embyserver-63902476800.txt1 point
-
I don't understand why you want logs from everyone, when we all write to you that after the Emby update the application no longer works on LG TV?! It's clear that this is a bad update, so please, downgrade to the previous version until you get things working. Before you put something into production, test it, please. The fact that we all have the same error means that the thing wasn't even tested before you released the update.1 point
-
"Season01" is not documented as supported - I always use "Season1"; but for all I know that might not be an issue. Putting Movies or OVAs into subfolders of an series is normal, and they should be numbered as specials (e.g. s00e01) and placed in Specials folder (or another name) - if they logically fall within the series, then the metadata should contain the position at which they will be inserted in the seasons (if TVDB doesn't do that for you, add the data manually). Do not mark the library as mixed content unless you have separate movies in their own folders at the same level as series, and have understood the stricter requirements for naming in such libraries. As I explained before, Emby will often merge different types of specials folders... I have some of the same series as you, and they just work™. Ensure that your files are consistently numbered following the chosen scheme from the first metadata provider in your list. Multiple versions of the same season won't work - either put them together so that you have alternate versions for each episode, or make two folders for the whole series with the alternate versions in one of them (and ensure that Emby is not set to combine multiple folders). My advice would be to follow the Emby TV naming guidelines precisely, and only experiment with varying them once that's working for you. Paul1 point
-
Speaking for myself, yes. But it's more than just an alternate way of making collections; nested folders allow for nested "collections" (which doesn't currently exist in Emby), which are essential for how I want to organize and present my content. And it's all built automatically, simply by placing the title in the correct folder location, so I don't need to go around adding titles to collections. It also then simplifies the view of the actual "Collection" tab, since rather than having a huge list of Collections that span franchises, studios, etc., I have a comparably simple list of about a dozen or so collections that essentially represent specific holiday-related content that cuts across my entire library. I also consider it a feature that each title lives in one place, so when I'm looking for something to watch, I don't have to pass over the same title showing up in multiple places (like is typical with Genre view). Other users understandably don't prefer this approach, since it requires all users understand the server owner's mental organization model. But my server is only for my immediate family, so this isn't a large concern for us. And as a lot of my content is big science-fiction franchises that span movies and tv, I can keep everything in a single mixed content library and not be fussy about having to make the movies show up as "specials" of the TV shows, or all of the other hoops that is typically necessary to organize these things. I can just have subfolders to separate everything and make it easy to find. Even if nested collections were to be implemented, I'd probably still want to organize things this way just for convenience. For me, the only downside is that the Movies/TV tab is a useless unorganized spew of all of my content. I never use it, and exclusively use Folder View. But ultimately it's less work to maintain Folder View than any other approach, and it's truly the view I prefer to use when doing anything in Emby.1 point
-
This has always been the case. Currently no because your server database likely has tens of thousands of actors. We have been asked by the metadata websites not to hammer them with requests for this information. That's why it was changed a long time ago to be on demand.1 point
-
Hi, I would also like to have this possibilety. Pretty many times the "default/original" trailer is not working or has a bad quality. "Not allowed in your country" also happens. My suggestion is to include the trailer url in "Edit Metadata" and also make it possible to have more than one trailer added there. All the Best Thanks for all the good job you do1 point
-
Sounds good, but for regular users, it would be much more practical if editing and changing the default trailer could be done instantly and directly within Emby.1 point
-
Hi guys, I wanted to move from plex to emby since a while for multiple reasons. I decided to make this guide first because I want to give back something to the amazing community behind UNRAID/REDDIT/EMBY and second because I couldn't find a step by step guide so I thought it would be nice to have a lot of useful information in a single place. If you just want to setup the hardware transcoding using intel quick sync video in emby on unraid go directly to STEP 8. I take also the opportunity to thank spaceinvaderone for the amazing videos he made about UNRAID, I learned a lot, and the linuxserver.io guys/gals for the amazing job they do supporting and maintaining the community images. Note: I am not affiliated with anybody nor I get paid to do this, this shows the steps I used to setup emby on unraid so to make it easier for you to do the same. Also english is not my native language so excuse me for any syntax/grammar error. Last premise before we start, if you want to add something or you think some steps needs additional informations to be clearer let me know in the comments. @Mods: I couldn't post it under "tutorial and guides" section. if you can please move it to the appropriate section, thank you. Let the fun begin... PREREQUISITES: -------------------- UNRAID 6.9-RC1 or newer UNRAID COMMUNITY APPLICATIONS (Refer to this post on how to install: https://forums.unraid.net/topic/38582-plug-in-community-applications/) EMBY v4.5 or newer EMBY PREMIERE SETUP: --------- STEP 1 - Setting up a dynamic DNS ----------------------------------------- Use your preferred dynamic dns provider to setup a custom dns tracking service. For example: "emby.hopto.org" where "emby" is the name you want and the rest is fixed depending on the dynamic dns provider. Ex.: "myembysrv.hopto.org" STEP 2 - CREATE A CUSTOM DOCKER NETWORK ---------------------------------------------------------- Inside the unraid web interface, open a terminal by clicking the terminal icon on the top right corner and type docker network create cdocknet where "cdocknet" is the name of our custom docker network. You can name it whatever you want. Press ENTER and then a long string of random characters (network id) should appear meaning the custom network was successfully created. If there is an error message make sure you correctly typed in the command otherwise search google for the error message and fix it before moving onto the next step. If everything is successful you can close the terminal window and proceed to the next step. STEP 3 - Install SWAG (Secure Web Application Gateway) ------------------------------------------------------------------- Inside the unraid web interface, go to apps then in the top right corner inside the search bar search for "swag" (without quotes) Click install and you will be redirected to the container settings. Change the following settings: Network type: -> Select Custom: cdocknet (or watherver name you assigned in step 2) HTTP: -> Change it to 8080 or another port that is not in use either in unraid or any docker you have HTTPS: -> Change it to 8443 or another port that is not in use either in unraid or any docker you have EMAIL: -> Your email address DOMAIN NAME: -> The Dynamic DNS domain name, so if we use the one I setup in the first step it is going to be hopto.org Yours can be different. Ex.: ddns.net, duckdns.org SUBDOMAINS: -> Delete the "www" and replance it with the custom name you chose in step 1, in our case emby. ONLY SUBDOMAINS: -> Set it to true (we tell swag to issue the cert. only for our subdomain as we don't own the top level domain be it hopto.org or whatever else you chose) You can leave the rest as default. Now before clicking "APPLY" open a new tab and go to your router setting and setup a port forward to unraid for the port 80 and 443. I cannot give a specific guidance here as every router setting is different. Try to search for port forwarding [your router model] in google and read how to do it. You should have a table/items like this. You need to setup 2 port forwarding, one for port 80 and one for port 443. NAME/APPLICATION NAME/SERVICE NAME: Swag80 IP ADDRESS: enter unraid ip address PUBLIC PORT: enter the default HTTP port, in this case 80 PRIVATE PORT: enter the custom port you setup for the docker, in our case 8080 PROTOCOL: TCP NAME/APPLICATION NAME/SERVICE NAME: Swag443 IP ADDRESS: enter unraid ip address PUBLIC PORT: enter the default HTTPS port, in this case 443 PRIVATE PORT: enter the custom port you setup for the docker, in our case 8443 PROTOCOL: TCP After you did so go back to unraid and click apply. Once swag is installed check the log setting to make sure everything is done without error thus a certificate is created and valid. Basically you shouldn't have any red/amber warning in the log and at the end you should see a "Server ready." message. If any red/amber shows then check the port are correctly forwarded (make sure the numbers are correct, the unraid server's ip address is correct) otherwise read what the error says and do a search to fix it. STEP 4 - Install Emby -------------------------- As before go under the apps tab in unraid to open the community applications and search for emby. You should see 3 or more emby containers, you can use the one you prefer. For our guide we use the official emby container. Click install and again you'll be redirected to the docker settings. Change the following settings: Network type: -> Select Custom: cdocknet (or watherver name you assigned in step 2; if you have multiple custom network make sure you use the same you setup in swag otherwise the reverse proxy won't work) Host path 2:* -> Path to your media folder share. Ex.: /mnt/user0/Media Then click apply and wait for the docker to be pulled. Once it's complete you can open emby web interface by clicking on the EmbyServer icon and select "WebUI". Emby asks you to setup a username and a password. Note this one will be the admin of the server so use a strong password. Don't worry about Emby connect, this is not required at this moment so you can leave it blank. If you have one feel free to enter it. Click next. You can already setup the library in this part or skip and do it later. For the purpose of this guide we skip it as it's not difficult and there is plenty of documentation on emby website on how to do that. So now you can click finish and you will have emby UI with all the libraries (if you setup any) and the possibility to access the server settings. STEP 5 - Configure SWAG proxy-conf --------------------------------------------- If you didn't change the default appdata config path in swag you will have all the config file under /mnt/user/appdata/swag. So from unraid webui set the appdata share to export with public access type. To do so just click on the appdatashare, then under SMB Security Settings set the following: Export: -> yes Security: -> Public Click apply then done. From your PC/MAC navigate to the appdata share and open the swag folder. In windows would be "This PC-> Network -> unraid_server_name -> appdata -> swag" Inside swag navigate to nginx and then open proxy-conf folder. Search and open a file named emby.subdomain.conf.sample with your preferred text editor be it notepad, notepad++, gedit or whatever. Inside this file you have to change: server_name emby.* to whatever name you setup in step 1 for the dynamic dns. Example if your dynamic dns is myembysrv.ddns.net in this line you would setup server_name myembysrv.* The other line we have to change is the set $upstream_app emby by replacing emby with the container name. If you used the official emby container and you didn't change it then you would set this up to set $upstream_app EmbyServer . You can find the container name in unraid. Now click save and rename the file by removing the ".sample" at the end. So the new file name will be "emby.subdomain.conf". Go back to unraid webui, click on the swag container icon and restart the container. (This reloads the configuration files in swag like the one we just modified) STEP 6 - Configure remote access on Emby --------------------------------------------------- Open emby webui by clicking on the emby docker icon in unraid, go to settings -> network. Tick the "Allow remote connections to this emby server" now some extra settings will appear. Scroll down till you find "Public HTTPS port number" and change it to "443" Right below you find the "External domain:" and set this to the dynamic dns we setup in step 1. In our case is "emby.hopto.org" Then scroll down a bit more till you find "Secure connection mode:" and change it to "Handled by reverse proxy" Then just below it untick the "Enable automatic port mapping" and then scroll at the end of the page and click save. Go back to unraid webui and restart emby docker. STEP 7 - Test the remote connection -------------------------------------------- Open a new tab and go to "https://emby.hopto.org", of course replace this with your custom dynamic dns entry. Ex.: "https://myembysrv.ddns.net" You should see a "Please sign in" page with emby logo asking you for a login and password. If you see a connection timeout then you did something wrong. Go back and re-read all the steps and make sure you did everything correctly. If you see an SSL cert error/browser warning that the connection is not secure then you messed up with the ports or skipped some steps. Again re-read and make sure you did everything properly. STEP 8 - Setting the HW (hardware) transcoding in Emby with intel QSV (Quick Sync Video) ---------------------------------------------------------------------------------------------------------- Requirements: Emby premiere Intel CPU that has Quick Sync Video (search your cpu at https://ark.intel.com/content/www/us/en/ark.html#@Processors) Compatible motherboards (sometimes iGPU has to be enabled in BIOS/UEFI, in some other cases you need a VGA/HDMI plugged-in to have it functional either by plugging in a monitor or by using a dummy VGA/HDMI adapter) If you meet the above requirements please read on... Open a terminal window in unraid (top right corner, click on the terminal icon inside the unraid webui) and type the following: ls /dev/dri and press ENTER If you see something like by-path/ card0 renderD128 this means that the QSV is already enabled in your unraid server and you can skip to the docker setting step otherwise read on. In the terminal window type: modprobe i915 then press ENTER (if there is any error stop and solve this before moving on. Make sure you meet all the requirements) Then type: ls /dev/dri and press ENTER. Now you should see something like this: by-path/ card0 renderD128 Now type chmod -R 777 /dev/dri to set the permission on the folder so we can access to it from the emby docker container. Once that's done close the terminal window, go over Emby docker container icon and click "Edit". This will bring the container settings up like the first time we installed it. Scroll down at the bottom and click on "+ Add another path, port, variable, label or device". A new window/popup will open. Change the following settings: Config Type -> Device Name -> /dev/dri Value -> /dev/dri Description -> Intel Quick Sync Video Then click "ADD" and the "APPLY" and after the container is pulled down again click on "DONE". Now open emby webui, go to "Settings -> Transcoding" and make sure you have "Enable hardware acceleration when available:" set to "Yes" or "Advanced". With advanced you can see the various preferred hardware encoders/decoders emby will use and tick/untick the ones you want. Scroll to the bottom and click on "Save". STEP 9 - Testing the hardware transcoding and make Intel QSV persistent across unraid server reboots ------------------------------------------------------------------------------------------------------------------------- To test if the hardware trascoding is working as intended just go to your library, open a movie and select a different quality. For example you can set it to 480p - 1Mbps and click play. If you go in your server dashboard inside emby webui settings you will see under Active devices the client name that is reproducing the movie and just below informations about wether it is being transcoded or not and which encoder/decoder is being used. For example if you see VAAPI (Video Acceleration Api) means the hardware transcoding is working using the intel QSV by accessing /dev/dri (Direct rendering infrastructure). Finally last step is to go back into unraid webui, open a terminal window and edit the go file to make sure Intel QSV is always on even if we reboot the server. To do so type: nano /boot/config/go and press ENTER Nano editor will open and you will see the content of the file. If you never modified it before it should be similar to: #!/bin/bash # Start the Management Utility /usr/local/sbin/emhttp & Just add the following lines to the bottom of the file modprobe i915 chmod -R 777 /dev/dri Your go file should look like this: #!/bin/bash # Start the Management Utility /usr/local/sbin/emhttp & modprobe i915 chmod -R 777 /dev/dri Save using the CTRL + O and then CTRL + X to exit Done! If you read it this far I thank you for the attention and I hope you found this guide useful. Finally you can enjoy your media on the sofa.1 point
-
Realted: Source of interest HD downloads are allowed: https://www.hd-trailers.net/1 point
-
I'd really like it if trailers would play in the background while flicking through the menu. I often determine what I might like to watch by watching the trailers that auto-play when using Netflix. I guess this is not a very hot request, it's been sitting for 2.5 years and only 3 comments from years ago...1 point