Leaderboard


Popular Content
Showing content with the highest reputation on 04/20/22 in Posts
-
So basically this. I have TV Shows, Movies, and Anime libraries. For anime; I'd prefer to set the default to Japanese with Subtitles. For movies, English and no subs unless forced. For TV Shows, the same. However, Emby only allows one overall setting this for this, for all libraries, instead of just one. I think it'd be a pretty nice little feature.2 points
-
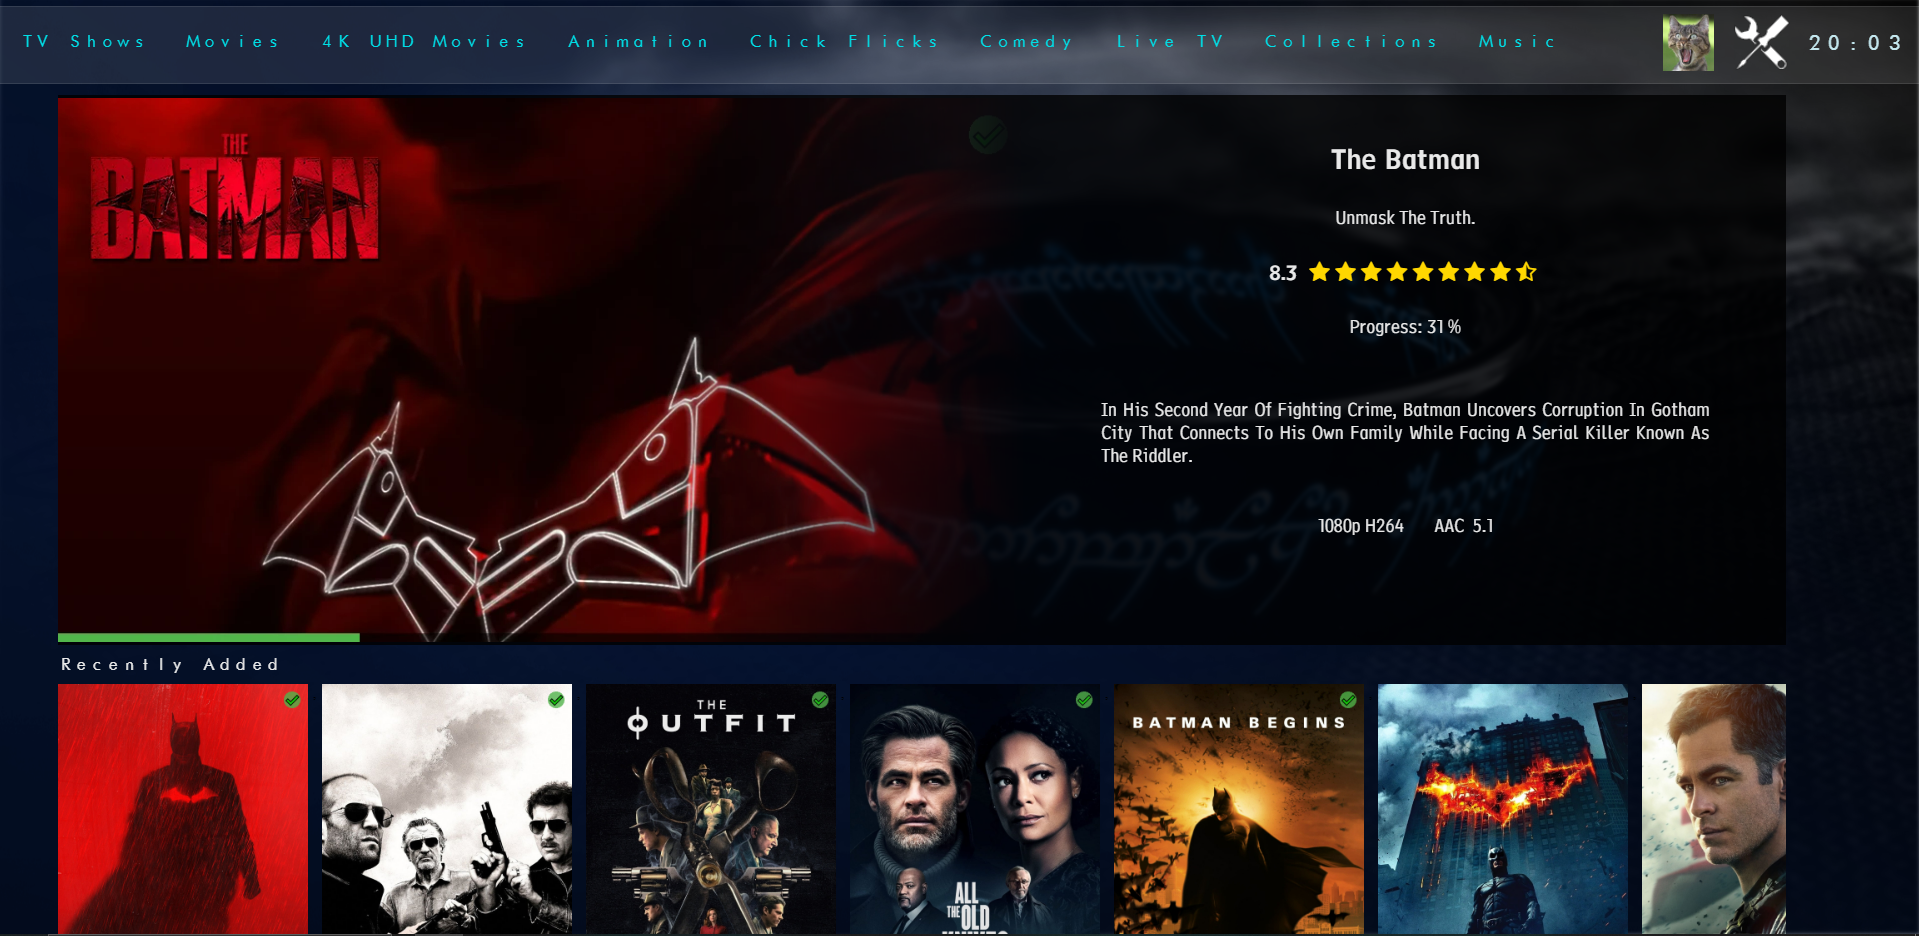
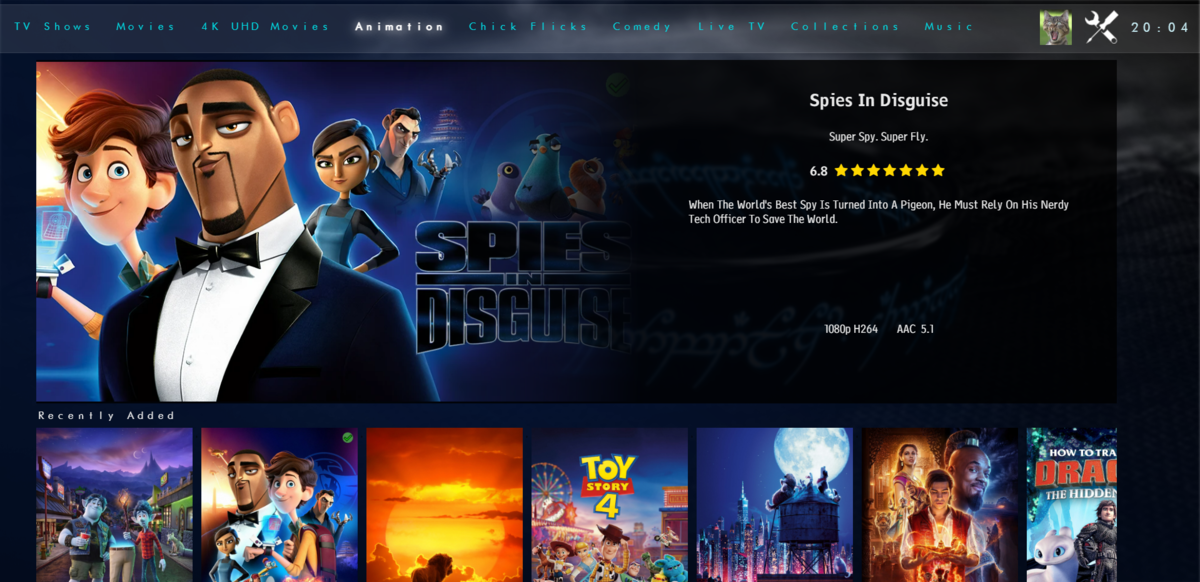
Not had much time to play but here is the new modern layout. Spotlight - chooses a random recently added item then a series of scrollers will go underneath for Recently Added Continue Watching Top Rated (this will be items over a certain community rating) Favourties Boxsets Now Playing - this will be whats showing in Cinemas/Digital Streaming Services (taken from TMDB) iHome Flat Coverflow View Coverflow View And you've seen the full details screen. Anyways... Hope you like it


 2 points
 -
Search for ".flex-grow.detailTextContainer {" and replace the whole thing with: .flex-grow.detailTextContainer { display: grid!important; overflow: visible; } Not sure what you want me to elaborate but see the attached image to see what I am referring to:
 2 points
 -
yes I know, I was there, I posted some examples of how to do it at the time. I might pick this up again at some point, it was an interesting data problem to solve.2 points
-
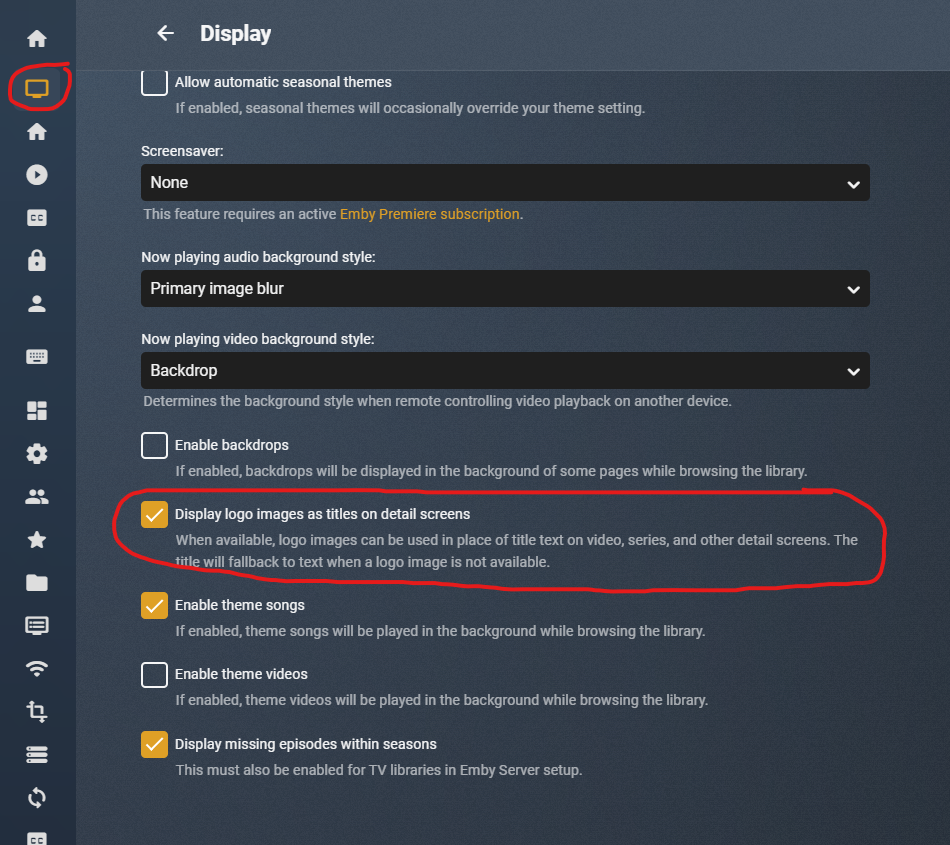
We should move this to per library options though.2 points
-
Please add these two filters to Movie filter view: - Decades - Country1 point
-
Built in Push Notifications through the app and not 3rd party applications? Is that a foreseen addition or what? Right now I added push bullet and well you have to download the app to just get the notifications. Seems counterproductive honestly at least in my eyes? I'd like to see if maybe the android app could get native notifications, I know Roku would be probably difficult and PC would be easy. Xbox probably the same but may be annoying in the sense while viewing or playing games. At least with the Android (iOS too I'm assuming) we could be notified right from our phones and be like "sweet" turning on Emby and watching a movie now.1 point
-
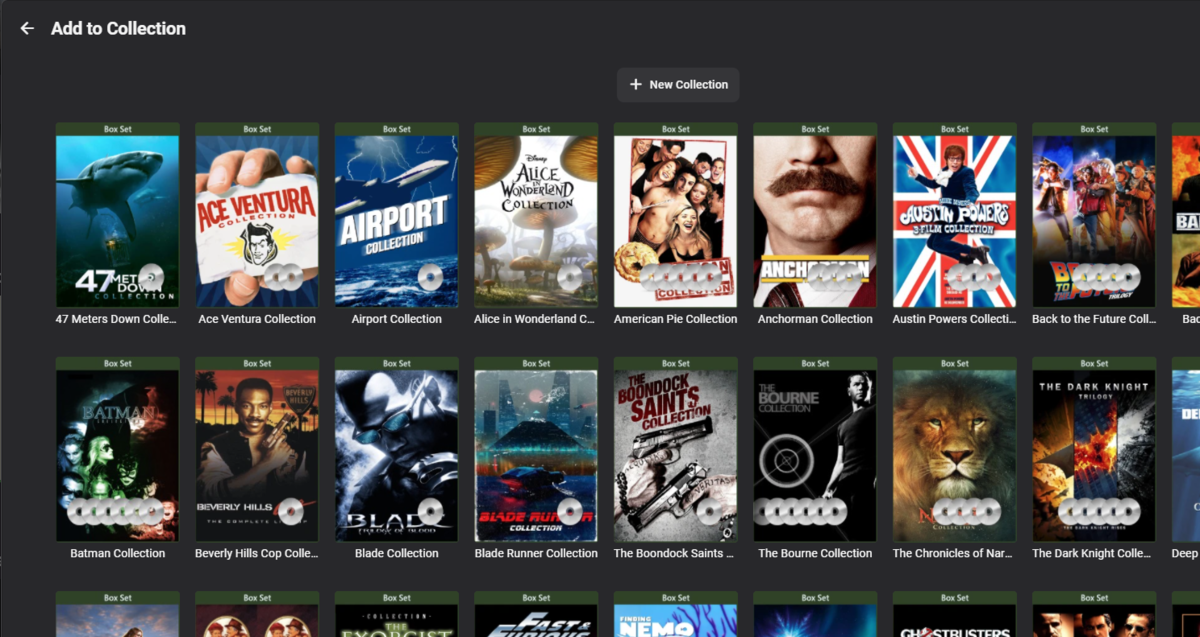
Add alpha picker to the "add to collection screen. The title pretty much says what I would like. It is slow to move through the collections to find the one to add to without it.1 point
-
One thing the streaming community hasn't done well is really create tools that allow us to simulate live TV well. I think the biggest reason that binging on Netflix (and Emby) is so popular is because you push a button and go. I'd like to see Emby create a "To Watch List" that basically allows you to sort shows into a specific order. When you watch that list, it will only play the most recent episode of each show in the list that premier inside that week. Lets pretend I made a DC TV Watch list, it would only play this weeks episode of Arrow, Flash, Legends, Supergirl and Gotham one after another. If an episode didn't premier that week, it gets skipped. Additionally, I'd like to see this system *ALSO* allow us to insert bumpers similar to Cartoon Network or Toonami. In the here and now, it would only insert bumpers between the series, but it would be nice if in the future, a system that allows some method for choosing the appropriate points between each act of an episode where bumpers could also be inserted. Bumpers would be a community thing to create, but inside the "to watch list", you'd choose what bumpers (if any) are used. Bumpers could even be surrounded by previews. Finally, another thought: while Emby already can pull Movie Trailers, it might be another cool future project if we could pull previews of related series not in the "To Watch List" and/or perhaps ones that aren't on your server that are similar to what you are watching. There's a lot of ideas in this post to digest and several should be their own project as part of this concept. Thoughts1 point
-
I'm looking for a way to select songs from my Emby Server using voice commands on a Google Home device such as the Google Home Mini or the Google Nest. I want to play the music directly on the Google Home device that issues the voice command, rather than routing it to my phone or a DLNA-compatible "player." However, there doesn't seem to be an option to simply play the selected music directly on the Google Home device's speaker. Am I overlooking something? I have successfully installed and configured the Emby for Android app and linked it to my Emby Server using Emby Connect. I can start a session by saying "Hey Google, talk to Emby Home." I can then say "Play <a song title> by <artist name>. Google finds the song on my Emby Server and asks which player I want to use. (Right now there are only two choices—my android phone or a DLNA device that I never use.) To test the feature, I selected my phone and it does play the song as expected, but not on the speaker I would like to use. (If the Emby team wants to pursue improving Emby for Google Home, you might take a look at a product called MyMedia, which is an Amazon Echo "skill." Their approach is elegant and it works flawlessly. The software "watches" and indexes local music folders on a PC to create a lightweight music server that is compatible with Alexa. I wish something similar existed for use with Google Home products.)1 point
-
In New Zealand I use Matt Huismans stuff as well, it provides iptv and a guide. Do this using Emby and either the m3u route added recently or the NextPVR plugin V4.0.0(?)1 point
-
If you don't need all the non PVR features of Emby, I suggest not buying anything right away and installing NextPVR and hooking it up to Matt Huismann's IPTV for your region, https://i.mjh.nz/au/ NextPVR arguably offers more PVR functionality then Emby and there are clients for most platforms can give you a true STB experience with a 10' interface.. You also have the choice of trying Kodi clients. NextPVR lets you move to DVB-T with the OTA EPG should you want a little bit better quality that isn't Internet bound. If those clients don't work for her or if you want a media centre or a strong web browser interface then definitely look at Emby. It is a polished product if you want to buy into their infrastructure. Deciding on you backend platform is also important it often needs to run 24/7 or have power management. Do you want a Windows PC, a NAS, or a small PC like an RPi. Martin1 point
-
Skia (image processing) throws a lot of errors on your new server. Even appear to have issues throwing Response 500 errors for the resources used for image treatment.1 point
-
In 4.6.7.0 with TVDB v3 api this is not possible at all. <GuestStars>|Avaah Blackwell|Emily Coutts|Emmanuel Kabongo|Julianne Grossman|Oded Fehr|Oliver Becker|Oyin Oladejo|Patrick Kwok-Choon|Ronnie Rowe Jr.|Sara Mitich|Sonja Sohn|Stephanie Belding|Tara Rosling|</GuestStars> In 4.7 with TVDB v4 you will get this info. { "id": 65686479, "name": "Andorian Regulator ", "peopleId": 447300, "seriesId": 328711, "episodeId": 7862365, "type": 4, "sort": 0, "isFeatured": false, "url": "", "peopleType": "Guest Star", "personName": "Riley Gilchrist" } But there does appear to still be a disconnect in TVDB v4 api. As the above appears in the Series info but not the episode.1 point
-
My understanding was this was about the add to collection screen, not the collection detail screen. i.e.
 1 point
 -
That is exactly what should happen in the Web app and Theater Store: press letter (or sequence of) on the keyboard, it'll show bottom-right and a second or two later move down to the first item in the list starting with that letter(s) ; you want to say that for you it doesn't?1 point
-
1 point
-
ok. questa sera proverò grazie!1 point
-
My music library setting does now have nothing checked except for "Enable realtime monitoring". So none of the downloaders, extractors, image fetchers, etc., just like before. Also "Save artwork into media folders" as well as "Download images in advance" is not active. When I activate debug logging and add a new album, I still see that a poster image for it gets generated: 2022-04-20 11:18:12.782 Debug SqliteItemRepository: Public GetItemLinks 2022-04-20 11:18:12.783 Debug App: Running MusicAlbumImageProvider for The Devil Put Dinosaurs Here 2022-04-20 11:18:12.858 Debug ProviderManager: Saving image to /volume1/Emby/metadata/musicalbums/The Devil Put Dinosaurs Here-musicbrainzalbum-8eda8059-301b-4183-beb1-0dd35d01835c/auto_poster.jpg How can I disable this? I don't want to have an additional jpg in the metadata folder. I don't have any additional extract plugins active (like musicbrainz). Is there any way to disable this, it is slowing down my server, up to a nearly complete halt when there is lots of data to process. I have restarted the server multiple times in the past days. I am running the latest Emby beta on Synology, if that makes any difference.1 point
-
Hi, I'm using: - Windows 10, with Kodi 19.3 and emby-next-gen 5.3.2 - LibreElec (RPi 4), with Kodi 19.4 and emby-next-gen 6.2.14 - FireTV, with Kodi 19.3 and emby-next-gen 6.2.14 - LibreElec (RPi 3), with Kodi 18.9 and emby 4.1.21 I have to apologize for this post - on the next-gen 6.2.14 machines it works again. Seem's to be a long time ago I tried it last. The Raspberry Pi4 in my Living Room has updated itself (and all addons) in the meantime. Same on the FireTV in my Bedroom. Now it's also working on my RPi3 in the bar, where I tried it last and where it didn't worked! The only machine, where it is not working is the Win10 PC with the old emby-next-gen Version (where I tried it in February at the beginnig of this Post, to verifiy the behavior I had in the bar, which one I don't using so much, therefore I forgot it to mention above). After manual updating it to Version 6.2.14, it works here too. And now I saw, that there is a new LibreElec stable version for my Raspi3 in the bar. I'll update the Pi and will install the latest emby-next-gen version there to be up-to-date again. Sorry for the inconveniences and thank you for helping! Cheers, Richy1 point
-
Ill try and get the logs soon. As for the deletion, I already done that. Thank you!1 point
-
From the KB {name} represents the video file name, without extension. Video images1 point
-
Will have to test some more later but am guessing do to not matching filename.1 point
-
Have you ticked the save artwork into media folders in library options. If not your server will pull from the default file and if one does not exists will download one. Also if you have multiple library's you must do it for all.1 point
-
Let us know how you get on. Thanks.1 point
-
Hi there, curious, what is the use case for this?1 point
-
Tags are a nice tool, but yea only 30 movies helps a lot there. I probably have over 1500. Emby should be reading the metadata for country, and then allow me to group them with that. Then let me select all within that group and tag all for the same country at once.1 point
-
Thanks for the feedback, you're welcome. PS: We're thinking about ways to make this easier for Arch/Manjaro users in the future.1 point
-
We'll have to pass that feedback onto OneSky. Thanks.1 point
-
@Luke I thought we were going to see the merged windows app soon. Can we at least get a beta to test?1 point
-
Unless you are desperate for the manual 'Skip Intro' button, then personally I think it is far too early to abandon the Plugin if it is delivering the functionality you have come to expect. Remember, currently, in Core the following are missing or have no plans to be implemented by the Core : no individual episode level editing (intro+credit) no show/season level editing no credit detection no auto-skip (intro and/or credit) no user selectable options no tagging / recalculation of chapters no performance tuning options no show exclusion options no options for showing e01 of a season no statistics / reports Also to remember - Each MANUAL edit (or Bulk Manual Change) that was performed is currently tagged in the Introskip database (Confirmed=1) - thus these entries are prime candidates for IMPORTING into the Emby Core Introskip. I'll take this offline with the Introskip team, but this does not seem like a big issue - we have the episode id and all the necessary timings - so writing/overwriting this to the 'chapters' table in the Core dB, seems trivial. There are a few questions however, on how to KEEP the edits - as we are not sure if they would get wiped with a metadata refresh for example. As @chef explained above - My understanding is some/all of the above functions will go into the Core, others will remain as a Plugin - we are just trying to understand which is which at the moment. So in summary, if you are happy with the Introskip Plugin (and there is no reason not to be..) then for the moment, I would personally keep using it - any manual edited data is safe in it's own dB with options to import it when ready.1 point
-
Hi, I agree with EFEris, a "premiere only" option is better then none and saying "working on it" is way too often used in this Forum, but without delivering results (Sorry, sounds hard, but that's how I feel about it) And Samsung is the most common TV Brand in the EU, there is no doubt about it. Maintaining is a point, but to be honest, I can not imagine, that this will get out of control, Tizen is Linux based and u got a client for US already, as a plus, just quit the support of some useless old devices like a PS3? which will be used by a max of 1 % ? And in my opinion it's a waste of energy using such a power consuming device for streaming. Anyways, we got ur point, but ignoring the biggest Brand of TV Manufacturers is not a good idea I guess. And of course we could use Roku, Fire-tv etc. but its another device, another remote etc. pp And if it's about a few euros once, everyone can make it's own decision.1 point
-
@skank Plex was gifted over $50 million so they could bribe certain companies to open up their platform for them (prior to this they had already secured over $5 million for "bribing"). That is why they have an app. But again, the plex app is a dumpster fire as media compatibility for Playstations is garbage. As @cayars says, just buy a firestick or Mi Box. As for the person saying "Thank god, I can decide how to use my hardware and I don't have to ask internet trolls for this." You actually can't as the mfg has crippled your hardware. That's like saying "I want to cook a turkey in my toaster oven". Trying to use a device for something it was never intended for, and then talking down to the people who have showed you why it's not feasible, just makes you an unmentionable, nothing more. If Emby had the money rolling in like Plex did, I'm sure they'd be at the same level. But because Plex is so large, many problems and apps are abandoned as they no longer care about fixing problems. The company grew its revenue by 40% last year, CEO Keith Valory told Protocol, and is looking to further accelerate that growth this year. Plex is now seeing 13 million monthly active users, with Valory forecasting user growth of 40% to 50% in 2022. "From a business standpoint, things have never been better," he said.1 point
-
Marquei como solução sem querer, simplesmente voltou a funcionar normalmente.1 point
-
yes, the files were still there. I have since unselected the download option for one of the movies, confirmed I wanted the download removed, and waiting a few moments. The download status changed, but the files were still present on my sd card. I manually deleted the files, redownloaded the movie, and it appears to be working now.1 point
-
If you intend ripping 4K discs, you need to check out MakeMKV forums, as there are specific drives and specific firmware to go with those drives for that kind of thing.1 point
-
You can remove it, but it keeps coming back during the update process like herpes.1 point
-
Well, i would hate this. You always can add stuff you have in your favorites to any list - and so to a "To Watch" List. I have a lot stuff in my favorites that i already saw and its stuff i can rewatch over and over again. But in my to watch list i only wanna have stuff that i never saw before but plan to see.1 point
-
(Sorry if this is a duplicate. I'm new to Emby and I couldn't find any mention about it in the search.) So today I learned . . . very much the hard way . . . that the "shutdown" option in the settings menu of the Windows Theater app doesn't mean "shutdown the app" or "shutdown the server", it means "shutdown the entire system immediately and with no further warning". To my mind this is extremely unexpected behavior. I can't think of another app that uses "shutdown" in this context. Maybe it's appropriate for something that performs system maintenance but a media player isn't the kind of thing I expect to instantly nuke my system from a simple menu command. That feature was obviously put there for some sort of reason so I'm not suggesting it be removed. It should, however, be appropriately labeled as "Shutdown System" or something such so that folks like me don't accidentally trash 45 minutes of hard work thinking that they're closing their media player and end up looking at a black screen where their new CAD drawing used to be. A simple change here would save many hard feelings in the future. Thanks.1 point
-
We're working on getting the release out as soon as we can. Thanks.1 point
-
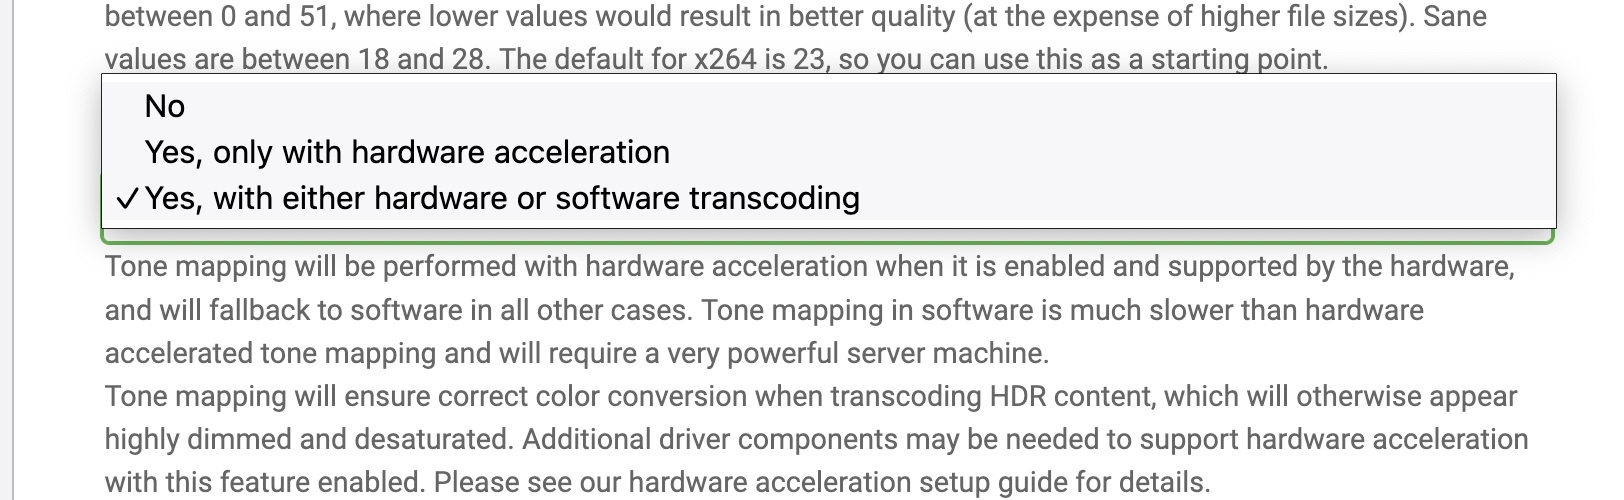
Managed to use the ffmpeg/ffprobe/ffdetect binaries included in the deb package and now seems to be working! and yes, with the correct ffmpeg version I see the options you mention: I guess I didn't see them since it assumed I did not have hw acceleration. If anyone is running arch Linux and faces the same problem, that is what I did to solve it: Download beta deb pacakge and decompress it (the files are in the data.tar.xz file) Copy the emby-server folder to /opt Create a new emby-ffprobe wrapper in /opt/emby-server/bin/ based on the /opt/emby-server/bin/emby-ffmpeg script (just change the last line to execute ffprobe) Modify the configuration in /etc/conf.d/emby-server so it uses the new binaries Modify the `FFmpeg options` in the `Advanced Transcoding` configuration (install the Diagnostics plugins to see it) so they point to the new binaries. Restart emby-server (sudo systemctl restart emby-server)

 1 point
 -
To be fair there probably is many guides out there but ill give you a summary 1 - Domain Make life easier down the road by purchasing a domain name, i recommend OVH as they sell them dirt cheap. 2- VPS Choose a decent vps provider, cheapest is not always best. but if in Europe a cheap option to test if it works for you is Hetzner. 3- Choose Distro Once you have your distro selected (i recommend Debian 11 minimal) the VPS provider will give you a IP address, go back to the company you brought the domain name from and make sure you set the following records: A - xx.xx.xx.xx (where xx's = your ip address from vps A - emby.xx.xx.xx.xx (these are subdomains which if you are using docker you will need as many as you like i.e 1 for portainer manager, 1 for issue logging, 1 for other clients) Think of what you wish to use and do and create these subdomains up front as it can take a while to propagate through the dns servers 3 - Update the server Using as SSH client (terminal on mac is built in Powershell on windows works also), log in with the Uname and Password that was issued to you when setting up the vps. ssh username@xx.xx.xx.xx Then Run sudo apt update && apt upgrade Confirm Yes. Now if the vps is located in a different timezone to you you can adjust the default timezone, the format is Area/Location, so fo UK you would type: timedatectl set-timezone Europe/London Now things i like to make sure are installed as default before i do anything include: Nano - Easy file editor Zip - obvious unzip - obvious wget - obtain items from http links curl - similar to above vnstat - monitor BW usage in real time ufw - uncomplicated firewall fail2ban - Intrusion prevention system This command will get you going sudo apt install nano wget curl zip unzip vnstat ufw fail2ban 4 - Get docker Installed (debian 11) This is the easy bit they have separate guides for Debian and Ubuntu so as i use Debian the commands here will work if you choose Debian 11. If you choose Ubuntu do not select version above 20.04 (the 21v wont work with there ubuntu instruction unless you hack it up abit) Copy this whole block first into terminal and press enter, if asked a question answer yes (y) sudo apt-get install \ apt-transport-https \ ca-certificates \ curl \ gnupg \ lsb-release Then curl -fsSL https://download.docker.com/linux/debian/gpg | sudo gpg --dearmor -o /usr/share/keyrings/docker-archive-keyring.gpg Then copy this whole block and paste and press enter echo \ "deb [arch=$(dpkg --print-architecture) signed-by=/usr/share/keyrings/docker-archive-keyring.gpg] https://download.docker.com/linux/debian \ $(lsb_release -cs) stable" | sudo tee /etc/apt/sources.list.d/docker.list > /dev/null Then update sudo apt-get update And finally run the install sudo apt-get install docker-ce docker-ce-cli containerd.io Okay so so far you have docker running now lets add an easy webui to manage the docker front end. I use Portainer as it is simple to use, to do this you will be visiting a site called Docker Hub, this is a good central point to find dockers that interest you and each docker usually has a setup guide, can seem daunting at first but after you have messed about with it its easy Now there are various ways of creating a docker, i am old school so the following is the way i like to do it, however many will say Docker Compose is a better way, both work so learn which ever you want So lets get portainer setup first time, below is an example i use however once i have setup SWAG Docker, i will recreate this first docker Copy and paste this into your terminal ssh session docker run -d \ --name=portainer \ --hostname=Portainer \ -e TZ=Europe/London \ --restart=always \ -p 9000:9000 \ -e PUID=0 \ -e PGID=0 \ -v /var/run/docker.sock:/var/run/docker.sock \ -v portainer_data:/data \ portainer/portainer-ce:latest --name - This is the name of the docker and how it is referred to by the system but more importantly behind a proxy server for SSl TZ - Timezone set this to your preferred location -v - These are mounted volumes, the second one is where you persistant datais kept, so you can destroy and redeploy the container and your existing data is retained otherwise you would have to start setup of that container all again PUID/PGID - this is the user applied to the docker = 0 is root user, and some dockers wont start correctly if set like this as a security measure, if you have a different username in your main server you can find these details by typing - id xxxxxxx where xxxxxx is your username i.e admin/ubuntu/johndoe, normally if it is the first username the values will be 1000/1000 -p 9000:9000 this is called a port map. The first value is the port a person will type in the address bar, the second value relates to the port thats open in the portainer container itself, logic behind this is that you may have many dockers where the container port is 443. This way you could say make the first value 8443, 7443,6443 etc. This is only relevant if you choose not to get free ssl as the proxy will handle most of the traffic The last line tells Docker which container to pull You should get a success message so time to see if it worked, so visit http://yourdomain.com:9000 As you have no SSL certs yet note the link is http and we add port 9000 you should be presented with portainer login page Add a new admin account and password and click next Select Attach local environment (not exact wording but usually the left most box) to connect portainer to your local docker environment If all has gone well you will see the following: Click on that big box with the docker logo to access your main config page Then click on the Containers section This page is where you manage all you containers, you can start stop delete or change settings Anyways to make things easier we will now make a quick network change 5 - Docker Networks In the left hand menu click Networks Click Add Network Enter a name for network i.e - My-Network Driver = Bridge Subnet = 172.20.0.0/16 Gateway = 172.20.0.1 Scroll to bottom and click add network The reason for this is working with proxy's like Swag is a lot easier where you have all containers within a unique network, it reduces the amount of work later on, Swag will just direct traffic to the docker name and port and comes with pre-configured setups to go. Okay so lets move portainer to the new network, so go back to the main container page (menu in left hand side) above and do the following: Click on the blue portainer link next to the green running icon Scroll too bottom Click join a network Select your network name you created in step 5 Select Join network Wait a few seconds and it will appear underneath in both your network and bridge network Now click Leave Network next to BRIDGE Step 6 - Emby and Swag Okay so lets install Emby docker Visit docker hub again and type EMBY in the search box, there are many versions including EMBY's own version. Now i will be honest here i tend to stick to Linuxserver.io containers as they are rock solid, updated frequently and just never had an issues with them, i will use them as number 1 choice for a container and then if they do not have one i work down the list Now below is a base config but you will need to change to suit your hardware Full details are available here for configuration options - linuxserver/emby - Docker Image | Docker Hub As an example heres mine (im running on AMD EPYC so there is no hardware passthrough config for IGPU (intel) or GPU but added the igpu flag back in docker run -d \ --name=emby \ --net=my-network \ --ip=172.20.0.4 \ -e PUID=1000 \ -e PGID=1000 \ -e TZ=Europe/London \ -p 8096:8096 \ -p 8920:8920 \ -v emby_data:/config \ -v /Mount:/Rclone \ --device /dev/dri:/dev/dri \ --restart unless-stopped \ ghcr.io/linuxserver/emby:version-4.6.7.0 Name - Obvious leave as is net = enter your network name you created in previous step ip= set a fix ip, just a tidy ocd thing this would follow the network you set up above with just the last section changing for each docker you create ID = as above tz = as above Ports 8096 and 8920 are the ports required by emby emby_data - persistant data storage (real location via ssh is /var/lib/docker/volumes/emby-data/_data) v /Mount - This is where you store your media on the server and /Rclone is how it will appear in Emby when browsing for folders to add. Now if you are storing your media on the server in lets say /home/myusername/media you would change the first part to /home/myusername/media: Now if you are storing your media remotely, say on Google Drive or One rive, you will need to install something like RCLONE and follow their guides (pretty simple to be fair but beyond the scope of this quick start guide) --device - this is the passthrough of igpu in this example, they give you options for gpus in the link i posted above, this can be removed if your vps is running AMD non igpu cpu etc Paste the block into ssh terminal and you should get success. If you refresh your portainer CONTAINER page it should now show Emby as Started if all went well. So visit yourdomainname.com:8096 and hopefully you will now have Emby setup page showing. 7 - Security So far everything is running unsecured so heres a rough guide to securing the two containers, remember those subdomains you created at the beginning? Good because we need them now So in this example you created these subdomains - manage.yourdomain.com and emby.yourdomain.com Lets add a simple to use Proxy/Nginx/SSL container by Linuxserver.io - linuxserver/swag - Docker Image | Docker Hub Now first off to avoid the LETSENCRYPT issue where the expired cert has nuked the app on certain TV's and devices we are going to use ZEROSSL which is also free for ACME ssl request So first signup for an account at ZeroSSL IT's free and quick to create an account docker run -d \ --name=swag \ --cap-add=NET_ADMIN \ --net=my-network \ --ip=172.20.0.5 \ -e VALIDATION=http \ -e PUID=1000 \ -e PGID=1000 \ -e TZ=Europe/London \ -e URL=yourdomain.com \ -e CERTPROVIDER=zerossl \ -e SUBDOMAINS=manage,emby \ -e EMAIL='zerosslaccount@whoever.com' \ -e ONLY_SUBDOMAINS=true \ -p 443:443 \ -v swag_data:/data \ -v /var/lib/docker/volumes/swag_data:/config \ -v /var/lib/docker/volumes/emby_data/_data/logs:/config/log/emby:ro \ -v /var/log:/config/log/server:ro \ --restart unless-stopped \ linuxserver/swag:version-1.27.0 Key points to note: Net - Change to the network you created Ip - give it a fixed IP as above thats not in use already (last section) URl = is your main domain name you created in step 1 Certprovider = Makes sure the docker uses ZeroSSL not Letsencrypt Validation http = this is how it will obtain the certs, at the moment you should have no firewall running so http will be fine. DNS is an option but that requires setting up API's so for now stay with http Subdomains = add all the subdomains you created in step one, seperated by a comma and without the main part of the domainname Email = The email you used to signup and login to ZEROSSL Only SUBDomains = If you are only going to use the subdomains set to true if you want the main domain included then set to false Now the volumes are as before, the 3rd volume is used for fail2ban within this container as when setup it will monitor emby logs for bruteforce login attacks, the fourth volume i added in as i have Authelia also protecting my site and those logs are stored in the main servers log file, you can leave this for now or delete Copy the above block once you have modified it with your details and paste again into SSH Terminal / Powershell and press enter If all goes well you should see no errors So go back to PORTAINER container page and refresh the page, the SWAG docker should now appear and be running if you click the first icon to the righ (piece of paper) you can see what logs are being written live. What you are looking for here is success notice and the last line is SERVER READY If you have any errors then you need to check that your sub and domain names are correct, your zerossl email is correct etc If you have made an error then you can just tick the box next to SWAG and click remove (do not click remove persistant volumes in next window) And follow the steps above again 8 - Success - Lets set up Swag to secure your sites Okay so your swag setup correctly and obtained the certs now a few tweaks to make Once again visit the container page but this time click on the fourth icon >_ Click connect This opens a ssh connection to inside the docker. Now lets get to the place we need to do all the work cd /config/nginx/proxy-confs Press Enter ls will list all the preset configs done for major apps, we are interested in 2 at this point - Portainer and Emby, at the moment they all show as sample as this means they are not active so lets create an active version, copy 1 line at a time and press enter after each one cp emby.subdomain.conf.sample emby.subdomain.conf cp portainer.subdomain.conf.sample portainer.subdomain.conf Remember the network you created above for simplicity down the line? Well this is the reason why, we only need to edit one word in each file for a basic setup This process is the same for all files nano emby.subdomain.conf The file will open so look for the following: server { listen 443 ssl; listen [::]:443 ssl; server_name emby.*; Now the only piece you need to change is the bit before the full stop. Above it is set to emby. If you called your subdomain part as emby, there is nothing to change here. But lets say you wanted the link to your emby instance to be media.yourdomain.com you would change that block as follows: server { listen 443 ssl; listen [::]:443 ssl; server_name media.*; Once you have checked and changed the domain name press the following to save CTRL o - This writes the file CTRL x - exits the editor Do the same for Portainer - follow the steps above and change the name to match your subdomain so in our example change section portainer.*; to manage.*; Now if you have done this correct: Click CONTAINER in left hand menu click the select box next to swag and click restart If the container restarted fine now we can check if it worked so we will test with PORTAINER First Open a new tab in your browser and enter manage.yourdomain.com the page should load without a port number and show it's secured with SSL. 9 - Success - Emby ssl Tweaks Now Emby wont quite be setup right for emby connect so we need to make a change this is explained in the SWAG config file you edited in the above step Makes the changes as explained above in Emby and then you should be able to visit emby.yourdomain.com and receive the ssl cert and in dashboard WAN name and port should show as emby.yourdomain.com:443 10- Tidy Up Now you have ssl setup and proxy is working, we need to make a cpl of changes to the existing dockers. If we no longer need the insecure public ports published then lets get rid of them Go back to Containers main page in portainer LH menu Do one at a time, so select the box to the left of portainer. Click remove DO NOT tick remove persistant volumes Portainer page will now throw an error as obviously it does not exist, copy the same text below into your main SSH terminal (with your ammendments obviously) docker run -d \ --name=portainer \ --hostname=Portainer \ -e TZ=Europe/London \ --restart=always \ -e PUID=0 \ -e PGID=0 \ -v /var/run/docker.sock:/var/run/docker.sock \ -v portainer_data:/data \ portainer/portainer-ce:latest We have only removed the -P 9000:9000 line as it's no longer needed as we are accessing via the proxy on port 443 You will notice when you copy this and hit enter in terminal it will be near instant as the image is already downloaded Go back to our browser and type - manage.yourdomain.com and you should be greated with the secure portainer page Repeat this for the EMBY container and this time copy and paste the following (with your ammendments obviously) docker run -d \ --name=emby \ --net=my-network \ --ip=172.20.0.4 \ -e PUID=1000 \ -e PGID=1000 \ -e TZ=Europe/London \ -v emby_data:/config \ -v /Mount:/Rclone \ --device /dev/dri:/dev/dri \ --restart unless-stopped \ ghcr.io/linuxserver/emby:version-4.6.7.0 Emby can only be accessed via SSL now In future if ya add more dockers you can go straight to leaving the ports out of the setup process if you have done the following Created a subdomain at your domain name provider Edited the relevant proxy-conf as per above with the subdomain updated restarted swag YOU DO NOT HAVE TO DO ANYTHING TO THE SWAG DOCKER - no need to redo this container 2022 Update If you remove the ports for emby as mentioned above, and seem to suffer some buffering issues, add the ports back in, some clients even though they were connected via ssl and proxy had horrendous buffering issues until these ports were reopened, don't ask me why as i don't understand the logic myself, but re-opening the ports the buffering instantly vanished) Obviously if you have applied firewall tweaks below then make sure the ports are reopened in UFW 11 - Firewalls & Fail2ban In your main SSH Terminal at a minimum turn the firewall on. If all your dockers run through SWAG on port 443 then you only need to add a cpl of ports to the IN firewall So you can follow these steps, press enter after each line sudo ufw default deny incoming sudo ufw default allow outgoing sudo ufw allow in 22/tcp sudo ufw allow in 80/tcp sudo ufw allow in 443/tcp sudo ufw enable confirm yes as you may be interrupted Now, technically you could get away with port 22/tcp only which is your ssh port (i would change it from default but thats a different guide you can follow) Reason i say that is as it stands Docker kind of bypasses your firewall when you publish a port (hence why we removed the direct access), now you can adjust UFW which i would do once you have a better idea of the system by following this guide here - ufw-docker/README.md at master · chaifeng/ufw-docker · GitHub as this secures the server a little bit more However as you are not running web servers on your main server as they are in docker then no harm will come, but you can test with just port 22 as you should have no issues, if the Swag docker has an issue renewing the certs then add the 80 and 443 ports as a test Now you can add any other docker you want to build up your arsenal of tools to maximise the use of the server For info, this may not be the best way, but thats the great thing with Linux there are many ways to achieve the same thing, and i have deployed docker setups like this time and time again without any issues each time improving security and performance. Ultimately just try it because its bloody good fun and can become quite addictive and enjoyable, and if it goes wrong, then just roll back, delete or reinstall your vps

 1 point
 -
Looks like there is a bounty for AC-4 support for almost 2 years. Developers - Dolby AC-4 Support - (bountysource.com) And open enhancement ticket on ffmpeg (mentioned in other topics). #8349 (Dolby AC-4 Support) – FFmpeg1 point
-
For anyone like me who started off creating their library of media and and deciding at a later date that maybe they want to move the those movies into their own folders, but don't want to manually create thousands of folders, and then manually move the files, you can automate that process with PowerShell (on WIndows). Open up a PowerShell prompt and navigate to the directory with your movies being stored, in my case on a network share. cd \\unraid\media\movies Make sure this command will create a folder for every file in the directory you just navigated to. WARNING, I was lazy when I made this. This will technically create a folder for any object in the folder that has a period in the name. So, if for whatever reason, you already have folders with a period in the name, it will try to create a folder for it as well. If you already have a folder structure with periods, either don't use this or revise the command. Get-ChildItem | Where-Object {$_.Name -Like "*.*"} | Select BaseName | ForEach-Object {New-Item -Name $_.BaseName -ItemType "Directory"} This next command will actually move every item with a period in the name, into a folder of the same name, minus the file extension. So, if you have multiple copies of a movie, with multiple resolutions, or if you keep your metadata in NFO files, ALL of those files will be moved into the same folder. Get-ChildItem | Where-Object {$_.Name -Like "*.*"} | ForEach-Object {Move-Item $_.Name $_.BaseName}1 point
-
Isn't downloading from YouTube against their T&C's?1 point
-
Hi, yes this has come up before. It's possible for the future. Thanks for the feedback.1 point