Leaderboard


Popular Content
Showing content with the highest reputation on 04/20/21 in Posts
-
Real Time Monitoring and Library Scans for Recorded TV libraries need separating out from the general file monitoring activity. on many occasions i have experienced where it is not possible to watch a recorded tv program, either in progress or finished, because the library scan/RTM is running on another library. If live tv is to be a selling point for emby, which it should be with the next gen improvements on the way, then you can't be sitting there waiting for a library scan to finish before you can actually watch something that emby has successfully recorded2 points
-
@darkside40 is right and wireshark doesn´t lie..... i have the same problem a feature for adding MAC and IP would help a lot2 points
-
Like i already stated above: I know my server is not the problem. WOL is working fine since years an does it today. Doesnt matter if i use etherwake, node red or any other reasonable WOL Client. My Wireshark captures show that the Emby Clients are the problem. I dont know what magic they try to use to determinate the MAC Address of the Server but on iOS i get everything from nulled MAC's to MAC's i dont know or old MAC's of the server which were not use for years. On Android TV Emby tried to wake the Server with a nulled MAC. But you can read for yourself here:2 points
-
OK guys, I found the error. Inside my downloads folder there's also the incomplete downloads folder from sabnzbd. As autoorganize seems to scrape all those little archive files it seems to get stuck. I just changed the incomplete downloads folder to be outside of my actual download folder and now it works! Thanks to yall!2 points
-
Request No. 1: Implement Metascore rating for movies, from Metacritic.com, in Emby. OMDb api provides this information. Request No. 2: Also, fix an option in settings to enable or disable a ratings source according to the user's choice.1 point
-
For me, Emby creates teh appearance of a new library for each Camera Upload folder. Not sure if that's intended or not, even though I only create 1 library for it.1 point
-
Hi guys, I wanted to move from plex to emby since a while for multiple reasons. I decided to make this guide first because I want to give back something to the amazing community behind UNRAID/REDDIT/EMBY and second because I couldn't find a step by step guide so I thought it would be nice to have a lot of useful information in a single place. If you just want to setup the hardware transcoding using intel quick sync video in emby on unraid go directly to STEP 8. I take also the opportunity to thank spaceinvaderone for the amazing videos he made about UNRAID, I learned a lot, and the linuxserver.io guys/gals for the amazing job they do supporting and maintaining the community images. Note: I am not affiliated with anybody nor I get paid to do this, this shows the steps I used to setup emby on unraid so to make it easier for you to do the same. Also english is not my native language so excuse me for any syntax/grammar error. Last premise before we start, if you want to add something or you think some steps needs additional informations to be clearer let me know in the comments. @Mods: I couldn't post it under "tutorial and guides" section. if you can please move it to the appropriate section, thank you. Let the fun begin... PREREQUISITES: -------------------- UNRAID 6.9-RC1 or newer UNRAID COMMUNITY APPLICATIONS (Refer to this post on how to install: https://forums.unraid.net/topic/38582-plug-in-community-applications/) EMBY v4.5 or newer EMBY PREMIERE SETUP: --------- STEP 1 - Setting up a dynamic DNS ----------------------------------------- Use your preferred dynamic dns provider to setup a custom dns tracking service. For example: "emby.hopto.org" where "emby" is the name you want and the rest is fixed depending on the dynamic dns provider. Ex.: "myembysrv.hopto.org" STEP 2 - CREATE A CUSTOM DOCKER NETWORK ---------------------------------------------------------- Inside the unraid web interface, open a terminal by clicking the terminal icon on the top right corner and type docker network create cdocknet where "cdocknet" is the name of our custom docker network. You can name it whatever you want. Press ENTER and then a long string of random characters (network id) should appear meaning the custom network was successfully created. If there is an error message make sure you correctly typed in the command otherwise search google for the error message and fix it before moving onto the next step. If everything is successful you can close the terminal window and proceed to the next step. STEP 3 - Install SWAG (Secure Web Application Gateway) ------------------------------------------------------------------- Inside the unraid web interface, go to apps then in the top right corner inside the search bar search for "swag" (without quotes) Click install and you will be redirected to the container settings. Change the following settings: Network type: -> Select Custom: cdocknet (or watherver name you assigned in step 2) HTTP: -> Change it to 8080 or another port that is not in use either in unraid or any docker you have HTTPS: -> Change it to 8443 or another port that is not in use either in unraid or any docker you have EMAIL: -> Your email address DOMAIN NAME: -> The Dynamic DNS domain name, so if we use the one I setup in the first step it is going to be hopto.org Yours can be different. Ex.: ddns.net, duckdns.org SUBDOMAINS: -> Delete the "www" and replance it with the custom name you chose in step 1, in our case emby. ONLY SUBDOMAINS: -> Set it to true (we tell swag to issue the cert. only for our subdomain as we don't own the top level domain be it hopto.org or whatever else you chose) You can leave the rest as default. Now before clicking "APPLY" open a new tab and go to your router setting and setup a port forward to unraid for the port 80 and 443. I cannot give a specific guidance here as every router setting is different. Try to search for port forwarding [your router model] in google and read how to do it. You should have a table/items like this. You need to setup 2 port forwarding, one for port 80 and one for port 443. NAME/APPLICATION NAME/SERVICE NAME: Swag80 IP ADDRESS: enter unraid ip address PUBLIC PORT: enter the default HTTP port, in this case 80 PRIVATE PORT: enter the custom port you setup for the docker, in our case 8080 PROTOCOL: TCP NAME/APPLICATION NAME/SERVICE NAME: Swag443 IP ADDRESS: enter unraid ip address PUBLIC PORT: enter the default HTTPS port, in this case 443 PRIVATE PORT: enter the custom port you setup for the docker, in our case 8443 PROTOCOL: TCP After you did so go back to unraid and click apply. Once swag is installed check the log setting to make sure everything is done without error thus a certificate is created and valid. Basically you shouldn't have any red/amber warning in the log and at the end you should see a "Server ready." message. If any red/amber shows then check the port are correctly forwarded (make sure the numbers are correct, the unraid server's ip address is correct) otherwise read what the error says and do a search to fix it. STEP 4 - Install Emby -------------------------- As before go under the apps tab in unraid to open the community applications and search for emby. You should see 3 or more emby containers, you can use the one you prefer. For our guide we use the official emby container. Click install and again you'll be redirected to the docker settings. Change the following settings: Network type: -> Select Custom: cdocknet (or watherver name you assigned in step 2; if you have multiple custom network make sure you use the same you setup in swag otherwise the reverse proxy won't work) Host path 2:* -> Path to your media folder share. Ex.: /mnt/user0/Media Then click apply and wait for the docker to be pulled. Once it's complete you can open emby web interface by clicking on the EmbyServer icon and select "WebUI". Emby asks you to setup a username and a password. Note this one will be the admin of the server so use a strong password. Don't worry about Emby connect, this is not required at this moment so you can leave it blank. If you have one feel free to enter it. Click next. You can already setup the library in this part or skip and do it later. For the purpose of this guide we skip it as it's not difficult and there is plenty of documentation on emby website on how to do that. So now you can click finish and you will have emby UI with all the libraries (if you setup any) and the possibility to access the server settings. STEP 5 - Configure SWAG proxy-conf --------------------------------------------- If you didn't change the default appdata config path in swag you will have all the config file under /mnt/user/appdata/swag. So from unraid webui set the appdata share to export with public access type. To do so just click on the appdatashare, then under SMB Security Settings set the following: Export: -> yes Security: -> Public Click apply then done. From your PC/MAC navigate to the appdata share and open the swag folder. In windows would be "This PC-> Network -> unraid_server_name -> appdata -> swag" Inside swag navigate to nginx and then open proxy-conf folder. Search and open a file named emby.subdomain.conf.sample with your preferred text editor be it notepad, notepad++, gedit or whatever. Inside this file you have to change: server_name emby.* to whatever name you setup in step 1 for the dynamic dns. Example if your dynamic dns is myembysrv.ddns.net in this line you would setup server_name myembysrv.* The other line we have to change is the set $upstream_app emby by replacing emby with the container name. If you used the official emby container and you didn't change it then you would set this up to set $upstream_app EmbyServer . You can find the container name in unraid. Now click save and rename the file by removing the ".sample" at the end. So the new file name will be "emby.subdomain.conf". Go back to unraid webui, click on the swag container icon and restart the container. (This reloads the configuration files in swag like the one we just modified) STEP 6 - Configure remote access on Emby --------------------------------------------------- Open emby webui by clicking on the emby docker icon in unraid, go to settings -> network. Tick the "Allow remote connections to this emby server" now some extra settings will appear. Scroll down till you find "Public HTTPS port number" and change it to "443" Right below you find the "External domain:" and set this to the dynamic dns we setup in step 1. In our case is "emby.hopto.org" Then scroll down a bit more till you find "Secure connection mode:" and change it to "Handled by reverse proxy" Then just below it untick the "Enable automatic port mapping" and then scroll at the end of the page and click save. Go back to unraid webui and restart emby docker. STEP 7 - Test the remote connection -------------------------------------------- Open a new tab and go to "https://emby.hopto.org", of course replace this with your custom dynamic dns entry. Ex.: "https://myembysrv.ddns.net" You should see a "Please sign in" page with emby logo asking you for a login and password. If you see a connection timeout then you did something wrong. Go back and re-read all the steps and make sure you did everything correctly. If you see an SSL cert error/browser warning that the connection is not secure then you messed up with the ports or skipped some steps. Again re-read and make sure you did everything properly. STEP 8 - Setting the HW (hardware) transcoding in Emby with intel QSV (Quick Sync Video) ---------------------------------------------------------------------------------------------------------- Requirements: Emby premiere Intel CPU that has Quick Sync Video (search your cpu at https://ark.intel.com/content/www/us/en/ark.html#@Processors) Compatible motherboards (sometimes iGPU has to be enabled in BIOS/UEFI, in some other cases you need a VGA/HDMI plugged-in to have it functional either by plugging in a monitor or by using a dummy VGA/HDMI adapter) If you meet the above requirements please read on... Open a terminal window in unraid (top right corner, click on the terminal icon inside the unraid webui) and type the following: ls /dev/dri and press ENTER If you see something like by-path/ card0 renderD128 this means that the QSV is already enabled in your unraid server and you can skip to the docker setting step otherwise read on. In the terminal window type: modprobe i915 then press ENTER (if there is any error stop and solve this before moving on. Make sure you meet all the requirements) Then type: ls /dev/dri and press ENTER. Now you should see something like this: by-path/ card0 renderD128 Now type chmod -R 777 /dev/dri to set the permission on the folder so we can access to it from the emby docker container. Once that's done close the terminal window, go over Emby docker container icon and click "Edit". This will bring the container settings up like the first time we installed it. Scroll down at the bottom and click on "+ Add another path, port, variable, label or device". A new window/popup will open. Change the following settings: Config Type -> Device Name -> /dev/dri Value -> /dev/dri Description -> Intel Quick Sync Video Then click "ADD" and the "APPLY" and after the container is pulled down again click on "DONE". Now open emby webui, go to "Settings -> Transcoding" and make sure you have "Enable hardware acceleration when available:" set to "Yes" or "Advanced". With advanced you can see the various preferred hardware encoders/decoders emby will use and tick/untick the ones you want. Scroll to the bottom and click on "Save". STEP 9 - Testing the hardware transcoding and make Intel QSV persistent across unraid server reboots ------------------------------------------------------------------------------------------------------------------------- To test if the hardware trascoding is working as intended just go to your library, open a movie and select a different quality. For example you can set it to 480p - 1Mbps and click play. If you go in your server dashboard inside emby webui settings you will see under Active devices the client name that is reproducing the movie and just below informations about wether it is being transcoded or not and which encoder/decoder is being used. For example if you see VAAPI (Video Acceleration Api) means the hardware transcoding is working using the intel QSV by accessing /dev/dri (Direct rendering infrastructure). Finally last step is to go back into unraid webui, open a terminal window and edit the go file to make sure Intel QSV is always on even if we reboot the server. To do so type: nano /boot/config/go and press ENTER Nano editor will open and you will see the content of the file. If you never modified it before it should be similar to: #!/bin/bash # Start the Management Utility /usr/local/sbin/emhttp & Just add the following lines to the bottom of the file modprobe i915 chmod -R 777 /dev/dri Your go file should look like this: #!/bin/bash # Start the Management Utility /usr/local/sbin/emhttp & modprobe i915 chmod -R 777 /dev/dri Save using the CTRL + O and then CTRL + X to exit Done! If you read it this far I thank you for the attention and I hope you found this guide useful. Finally you can enjoy your media on the sofa.1 point
-
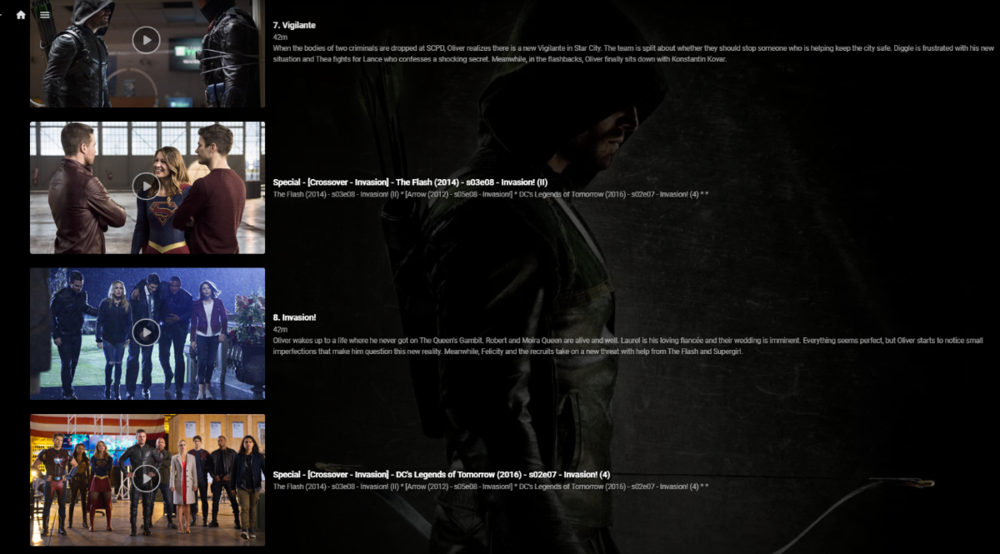
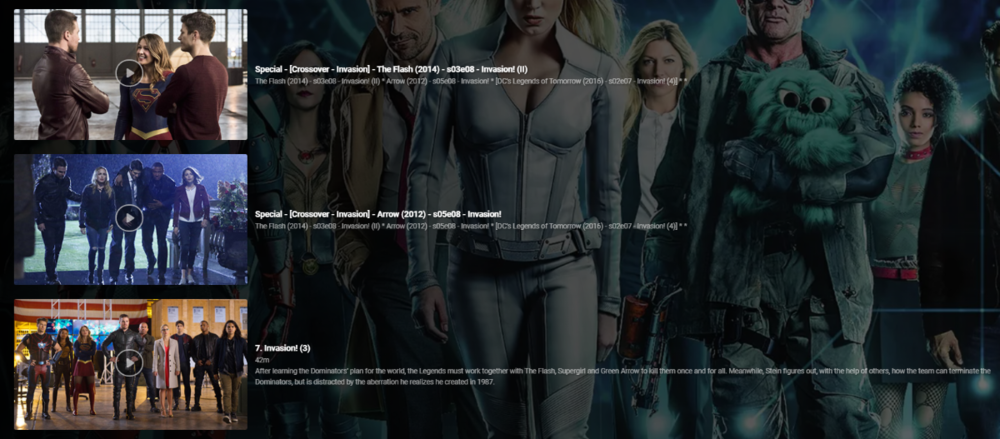
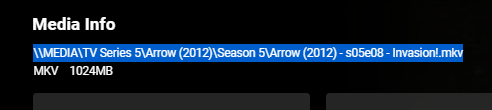
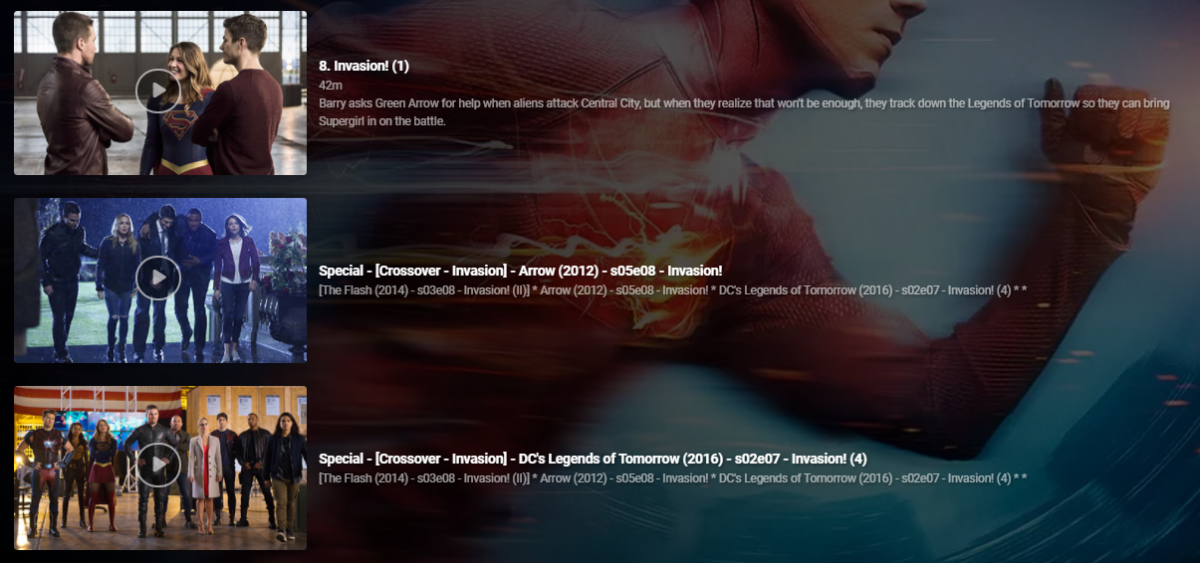
So up until this point I've been manually hacking together 'Crossover' episodes using 'Specials' - a very manually intensive and frankly laborious task. I soon realised that this is not only wasting my time, but nothing was consistent and I would lose the lot during a database rebuild or metadata refresh etc. So I thought i'd put together a script to automate this to make it - Repeatable Consistent Accurate What does it do ? Creates a .strm (link) file in the 'Specials/Season 0' folder - linking to the real media file. Copies the associated jpg file Creates a relevant nfo file - used for naming and placing the 'Special'. It does this for each member of the crossover and for all combinations. So in a simple 2 way crossover, it will create 1 'crossover' per show (2 crossover links created). You can have a maximum of 5 crossover events - so in this extreme example, each show would have an extra 4 'Specials/Crossovers' per normal episode (20 crossover links created). The reason for doing this is so it doesn't matter which show you are watching, you will always see ALL members of the crossover. So taking an example - Arrowverse Invasion ! (a 3 way crossover) The first part of the crossover is 'the Flash' so that appears as it would do normally ... (episode 8 ) .. .. the script has inserted the two 'crossover' episodes after ep8 - they are named accordingly (Arrow, then DC Legends) and the plot also details all the members of the crossover in order - with the current 'real' member in square brackets. .. Arrow is next in the crossover, so in that show, it is listing the crossovers as 'the Flash' (before) and DC Legends (after), with the Arrow episode being ep8. Finally, in the 3rd show - DC legends, it has put the two 'crossover' episodes before the DC legends Ep7. So it doesn't matter what show you are viewing it from - you always get the correct crossover sequence. Pre-requisites - The metadata nfo/artwork needs to be stored alongside the media file - this will not work if this option is not ticked (ie your metadata/artwork is held within the emby subdirectories instead). What is the script ? Unfortunately it's just a Windows based batch script that does the work (yuk, yes I know..) but it's been developed over time when I was just mucking about getting the concept correct and it works just fine, so I have no real inclination to convert it to Powershell or Python etc as speed is not really an issue here. Run it from a Command prompt - you do not need any elevated permissions but will need permissions to write to the media directories. What is the input file ? It's just a semi-colon delimited text file, listing all the crossover data. My exact file is attached, but you'll obviously need to generate your own in the format :- <special number>;<crossover name>;<show1 path to file>;<show1 season>;<show1 episode>;<show2 path to file.... blah blah <special number> is just a unique number sequence for each franchise, 10 will start the episode numbering at 101 - meaning it should not interfere with any existing specials. List of the episodes should match the crossover sequence - ie unc file 1 will show first, unc file 2 will show second etc.. Media File location ? Grab the media file location from the 'Media Info' section in a web browser - just copy and paste it into the input file. Testing I have only tested with UNC file paths (shares), but there is no reason it should not work with drive letters and folders. For your system, I suggest just creating a single crossover (or modify my file) and check to see what is has done before adding others. Nothing on the script deletes or modifies existing files in any way - it only creates new or copies existing files. Execution speed depends on your system, but for all the crossovers I have listed, it takes about 30 seconds to generate them all. Improvements Many things haha - I need to sort out creating the nfo files in a more elegant way .. I would also like to have each show listed as a new line in the 'plot' text, but could not get this to work. Down the line, I'd also like to get the input list created from the media ID's via the Emby API rather than UNC links, but one step at a time. Also - Read the Season and Episode from the UNC filename rather than add in the input file - should be easy enough to do, I just haven't got around to it yet .. Suggestions welcome Other things to note .. The crossover episodes are 'backdated' when they are created (year 2000) - they will therefore not screw up any 'new items or next up' lists. When created, you'll have to find them in the shows in the relevant season - or a quick check in Season 0 will list them all. 'Next Up Special Playing in sequence' - will only work in the Beta release - the current 'Release' does NOT honour the special sequence playback numbering. As soon as the long overdue Beta is promoted to Release, this will be fixed. (or run the beta).. edit 21/05 - 'Next Up' Special Playing sequence now works with the current Release - 4.6

 1 point
 -
** UPDATE ** There are two seperate plugins on this page - you will need to read the thread to see which one (or both) is best for you. The original plugin (Actor Web Scraper) works at the server dashboard, it cannot be used or accessed by clients. This is my first proper working attempt at this. Its a bit clumsy but works. I may revisit this one and update it, but for now it is what it is. The newer plugin (Custom Person Provider) is internal and works when you click an Actor card, it is also triggered by clients. (but configured from the dashboard which they cannot access). This plugin can quickly be turned on/off in the config page. ----------------------------------------------------- This is the first working beta release - special thanks to @roaku for their help getting the javascript on the webui working It only scrapes one actor at a time, im not going to do one that hits these websites continuously for the whole lot in one go so don't ask. Please feel free to try it, test it whatever. Built with net standard 2.0, so should be compatible with most emby releases. I have added linux support but have no way to test it - so let me know if it works Feel free to suggest anything it lack or improvements that could be made. Enjoy There is another plugin lower down in this thread, "custompersonprovider" which uses the internal Actor image system, its in Alpa stage, and it works seperately from this one. Please read the blub if you are going to try it. As always the blurb: I accept no liability for anything - use at your own risk Custom Poster Provider ** Updated 5 feb 2021 *** Added a few more scrapers, but also added the ability to pull images from other Emby servers ** UPDATE 25 JAN 2021 WITH FIXES ** *** NEW 3rd Feb 2021 *** Added Internal Image Search Scraper Plugin. This is seperate to the Actor Web Scraper. This is Called Custom Person Provider because it works when you click the actor image inside Emby. Try not to use all the scrapers as it will actually slow down load times for your clients who click on Actors that DO NOT have an image already. I have added a config page so that scrapers can be turned on /off. Trakt images are webp , they work well but may cause image processing error in the log from emby when it tries to resize it as it acesses it. I am currently not sure if all "client" app support it either, all of my tests do, but thats not all devices. ActorWebScraper.zip ActorWebScraper-server 4.6.0.20.zip CustomPersonProvider.zip
.thumb.png.cb53c1371d991ad20af7d0f079169261.png)
.png.9166297e244c1890d029d1d82ca9a6f6.png)
.thumb.png.6cb9880f042f4e910b35029e52faf997.png)
.thumb.png.c70ea02b6794b681fa810e37688aba41.png)
.thumb.png.319417685fb83dc7af37c76436395b5a.png)
.thumb.png.0cd3bb536bed155dddec60ddea97c840.png)
.png.41015b52e97ef688ee401ad8a5643b7c.png) 1 point
1 point -
Upgraded to the new version and that worked. Thank you for the help1 point
-
Well...MY post was very specific to ATSC31 point
-
The only reason I worded it that way is time and time again this happens. Manufactures where taking 1080 broadcasts and cable feeds and downscaling them to work on 720 TVs. The same 720 TV were being marketed as HD TVs which technically is true as 1080 was considered FULL HD, but how many consumers knew the difference? Many a person never even knew better as the TV was much better than the old SD set (everything looked better). Hell, just using Emby Server Beta we can take a 4K HDR movie and convert it and display it on a 720 or 1080 set and have it look better than the 720 or 1080 version so anything is possible. Nothing like this should ever happen with the big names (Samsung, Sony, Toshiba, LG, etc) brands but "buyer beware" always comes to mind especially for early adopters. It's too easy NOT to read and understand the specs given and anyone putting down $ on a new TV should educate themselves to know what codec (video and AUDIO) and specs the unit can use. But if we want to have this type of speculative conversation we should move it to the general forum and not pollute this thread.1 point
-
Right track... Well, initially it will always be transcoded There are always two steps to take: 1. implement it in the server 2. Implement a detection mechanism in the client, so that it can report to the server whether it can take it1 point
-
Never mind, I misunderstand what you were saying. Yes Emby knows it started a recording so it shouldn't need to scan in order to create the DB entry.1 point
-
I would say a Emby Server would be generally be located in a wired network, why would you use an unstable shared medium like Wifi for a media server. Nevertheless the feature is available in most Emby Clients and it is useful, especially if you live somewhere where electricity prices are high. Unfortunately i would say it does not work in many situations. Like i said, the fix should be really easy. Of course i cant tell it for sure because Emby is closed source. But i would appreciate if this problem could be sorted out in the near future.1 point
-
Thanks for the info, that's very good news. For AC-4 decoding: this will be added to the beta channel after the next release is out.1 point
-
Any time frame for that? The feature is available for several years now but must be considered mainly defunctional. For example in my Network WOL only works if i send the magic packet to the broadcast of the subnet not to 255.255.255.255. And 00:00:00:00:00:00 is quite a bad value to hardcode. To be honest that should be quite easy to fix for an experienced software engineer.1 point
-
Just a fix to one CSS theme, looks better than original app. If you like Plex colors try this as custom CSS: @import url('https://gilbn.github.io/theme.park/CSS/themes/jellyfin/plex.css'); body{--theme-primary-color:#e5a00d;--theme-text-color:rgba(255, 255, 255, .87);--theme-text-color-opaque:#fff;--theme-accent-text-color:#e5a00d;--theme-primary-color-lightened:#e5a00d;--theme-icon-focus-background:rgba(255,145,0, 0.2);--theme-background:#141414;--button-background:#2c2c2c;--card-background:#2C2C2C;--header-background:var(--theme-background);--header-blur-background:rgba(20,20,20,0.66);--footer-background:#1d1d1d;--footer-blur-background:rgba(29,29,31,0.66);--theme-body-secondary-text-color:rgba(255, 255, 255, .6);--line-background:rgba(255, 255, 255, .08);--line-size:.08em;--scrollbar-thumb-background:rgba(255,255,255,.3);} .mainDrawer{background:#2C2C2C !important;} The only one thing I like about Plex is the theme, some fixes in theme.park theme makes a visual difference. This look with Emby system is the best thing. Sorry if someone don't like Plex stuff, this is just a theme, Emby is better in many ways.1 point
-
It's quite simple. In Hubitat you have the option to install custom apps. In that area you point it to the raw github file and it'll pull in the code. Then you go to your normal apps section and install the app. You have to enter in your Emby server info and also consider the webhook section from emby to point to your hubitat. Fromt here the app creates devices in hubitat (just like your lights, plugs, locks, etc...) You can then use those devices as triggers or conditions in rule machine. So to do lights you'd create a rule that basically says "If state of emby device changes to playing, then dim lights". You can make them as complex as you want. You can also create separate rules based on the type of media playing (tv, movie, music) or even if a specific show is playing.1 point
-
Ha that's a big library. Honestly you're better off using a NUC or a 8th gen or higher laptop. Anything with modern quicksync, 16 gigs of ram, and an SSD will handle that.1 point
-
Hmm, maybe squeeze a few times (you can't 'over crimp' an RJ45 contact blade) as I guess the tool cutting blade might be a bit bent or out of position ? Side cutters to cut them off as a last resort I guess, but you shouldn't need to. Looking good - do I see corrugated cable conduit there for your power cables ? - very professional ...1 point
-
I have the Connect Quatro and a friend of mine has the HDHR5-4k. We put them side by side and I did a comparaison using all 8 tuners on the same channel at the same time (Same antenna through an splitter). Basically, I did not see any significative difference between both units in my case. Some tuners handle a little bit better some impairements, but that was the case on both units. Basically what I saw is that both units are pretty much the same about atsc 1.0. That is only my experience. I guess mileage may vary.1 point
-
I installed the stable version of emby now and plugin is working without any issue ...1 point
-
Yes it will. The developer has also introduced another new subtitle plugin that you may want to check out.1 point
-
Not yet, but it's on our to do list. Thanks.1 point
-
What will be of much bigger interest is whether the Roku would support this also with HLS streaming (MPEGTS segments). That would be really great.1 point
-
What if we could improve that seasons view? What if it could be larger than before? What if you had the Roku app looking nothing like a Roku app anymore? I am asking because I am interested to hear you on this. When you say instead of fixing minor issues what exactly are the issues? We would have fixed them if we had known. We may already have them fixed in future versions we just have not released beyond our own internal testing team. Being on a Roku will not mean you are stuck with that box, square and old format of doing things. Where the focus as you move right is stuck on the left and uses this white box around everything. All images on everything are very square. We can improve this. There is much better coming.. I just do not want to let the cat out of the bag. I must remain.. speechless. There has been much time spent on improve the Roku application it just hasn't been made public. But soon you may see some of these improvements trickle in. We do listen. Please give us feedback on where you see any issues so we can improve. Knowing that we failed you is enough though. We then feel that. Thanks for not pulling punches. Which issues should we fix today? If you had the steering wheel and could move us towards particular issues, what are they going to be? Please take the wheel. The detail view problems with small images on the season view is also a concern. The entire application should be viewable from 10+ feet away. It is a television interface and the Roku is designed for older eyes. Combined when things get smaller on a Roku you confuse your audience and force them to get closer. How close do you need to move to your television when view the new season screen before it becomes comfortable to view? Be honest... It isn't 10 feet. NOOOOO!!1shift!!!!!!!!!!one But seriously I understand exactly what you mean. We will be better in the future. Thanks for all input you provide. Please do not feel the need to be nice. We want how you "really feel" not some watered down version. Thanks.1 point
-
Yeah looks like a compatibility update will be required for the beta version, and for the next release.1 point
-
Hat sich schon Erledigt ich dummkopf Hab einfach Das lauffwerk auf Dem Emby pc als netzwerklaufwerk in windows gespeichert1 point
-
I just got the V10 Roku firmware update and my Roku Ultra 4800x can now direct play ATSC 3.0 HEVC/AC-4 in a TS container. I use NextPVR (server and Roku channel) not Emby but I expect it is not be that far away. TS seeking isn't any better though. Martin1 point
-
So looking at the log - I have noticed something interesting. Starting @ 13:59 until 14:12 - the value of SqliteItemRepository: GetItems query time (slow) slowly increases from approx 1 second to 2.6 seconds. If you look at the polling interval of these requests, they are every 2-3 seconds - the same time the audio stutters... Any delay beyond a few hundred microseconds may be delaying the buffering process somewhere ? Could this be related ? I'm not 100% sure what this log entry is even doing - but as it repeats consistently, it's having a big system impact. Have you tried disabling the DLNA features in emby ? What plugins do you have loaded ? GetItems query time (slow): 2575ms. Query: select A.type,A.data,A.Id,A.StartDate,A.EndDate,A.IsMovie,A.IsSeries,A.IsRepeat,A.CommunityRating,A.CustomRating,A.IndexNumber,A.IsLocked,A.PreferredMetadataLanguage,A.PreferredMetadataCountryCode,A.Width,A.Height,A.DateLastRefreshed,A.Name,A.Path,A.PremiereDate,A.Overview,A.ParentIndexNumber,A.ProductionYear,A.OfficialRating,A.ForcedSortName,A.RunTimeTicks,A.Size,A.Container,A.DateCreated,A.DateModified,A.guid,A.Genres,A.ParentId,A.IsInMixedFolder,A.DateLastSaved,A.LockedFields,A.Studios,A.Tags,A.OriginalTitle,A.CriticRating,A.IsVirtualItem,A.SeriesName,A.Album,A.AlbumId,A.SeriesId,A.PresentationUniqueKey,A.InheritedParentalRatingValue,A.Tagline,A.ProviderIds,A.Images,A.ProductionLocations,A.TotalBitrate,A.Artists,A.AlbumArtists,A.ExternalId,A.SeriesPresentationUniqueKey,A.Status,A.DisplayOrder,A.ThreeDFormat,UserDatas.Rating,UserDatas.IsFavorite,UserDatas.Played,UserDatas.PlayCount,UserDatas.PlaybackPositionTicks,UserDatas.LastPlayedDateInt,UserDatas.AudioStreamIndex,UserDatas.SubtitleStreamIndex from MediaItems A left join UserDatas on A.UserDataKeyId=UserDatas.UserDataKeyId And (UserDatas.UserId=@UserId) where IsFolder=@IsFolder AND IsVirtualItem=@IsVirtualItem AND MediaType=@MediaTypes AND TopParentId in (8,5,6,4,7) Group by PresentationUniqueKey ORDER BY SortName collate NATURALSORT ASC LIMIT 30 OFFSET 11280 This is the query which gets run every 2-3 seconds - what is it doing ?! edit - also noticed this is being reported as a 24fps file, as opposed to a 23.976fps. Are the other files that play ok also 24fps ?1 point
-
I tried this yesterday and it does work. It's very similar to running behind a public VPN service. It's not the easiest setup to do but could be useful for those people who can't get a public IP address. On windows it requires use of powershell. I had to use a domain, get certs, configure the tunnel, set ingress rules, etc. Then create tunnel and match to service being used. I doubt many people without good networking knowledge will be able to use this in it's current state. If you just want to try the free tunnel with their random subdomain (free method) you can follow the guide here: https://developers.cloudflare.com/argo-tunnel/trycloudflare If you don't mind some random domain this might be worth checking out especially if you don't have a public IP. I think I'd still go for using a public VPN service however.1 point
-
My inbox automatically goes to that view now so I guess it is a persistent setting once you click it. LOL Abo.1 point
-
1 point
-
It shows the first unwatched episode that comes after the episode that was most recently played.1 point
-
I did all that last night. I was reading a bit about the UDM Pro and found mixed information on whether or not you can really use it without the cloud account. Regardless, you still have to have the cloud account for the initial setup.1 point
-
Il s'est possiblement passé quelques choses durant la nuit.. Tout fonctionne..;)1 point
-
Thanks for confirming, a fix is coming when I get some time to finish this change1 point
-
No, I'm still working on a new version and will release it in the next days.1 point
-
1 point
-
https://github.com/MRobi1/Hubitat Here you go. Emby Communicator app for Hubitat. Wrote it about a year ago just never got around to releasing it on the Hubitat boards.1 point
-
Glad you got it figured out.1 point
-
Update - I figured out what the issue was. I installed binhex’s repo, I didn’t realize there was an official one. I tried installing that and everything is there. Binhex’s repo is missing a lot of plugins. Thanks again to everyone who assisted.1 point
-
That's ok the feed was from your house. Thanks for everything you do here on the forums and elsewhere. It's greatly appreciated! This is the best managed forum I've used in years!1 point
-
Hi, yes I agree this is a good idea. Thanks for the feedback.1 point
-
I can handle 4-5 clients at the same time1 point
-
@Scrums Now you have your own thread (thanks @Happy2Play) we can try and help you. I'm curious what fw rule you applied on the NAS - did you also include all the DLNA UDP Ports ? Does the NAS firewall have any sort of logging so you can see which ports are getting blocked ? Remember your emby and dlna requests will be incoming into the NAS, so make sure you have the direction correct. A quick way to test if it is 100% a firewall issue, is to simply allow any:any for a short test.1 point
-
It does exist. If you acquire your media legally, you will cease to have this problem.1 point
-
Ok, i changed my name. Thanks.1 point
-
Yes it is annoying isn't it -
 1 point


.png.fcf8e6f34a3ba4b4aa03c647343d2353.png)
.png.50b9f3b8d82cc36d56ab656cf7a72625.png)
.png.93b11e0d91c2bde645fcfd5de83e4bfb.png)
.png.07e8150d68ec98c7db334dda8fcf2d5e.png)
.png.a5cf24dcb5c9f922d8ed05c0ad9179be.png)