Leaderboard


Popular Content
Showing content with the highest reputation on 03/26/21 in Posts
-
Experimental version uploaded on page 1 of this thread. Changes: delete item (Context menu) fixed add user fixed taglines fixed hibernate fixes (to be tested) sync performance Login fixes (to be tested) The tagline fixes requires a DB reset.3 points
-
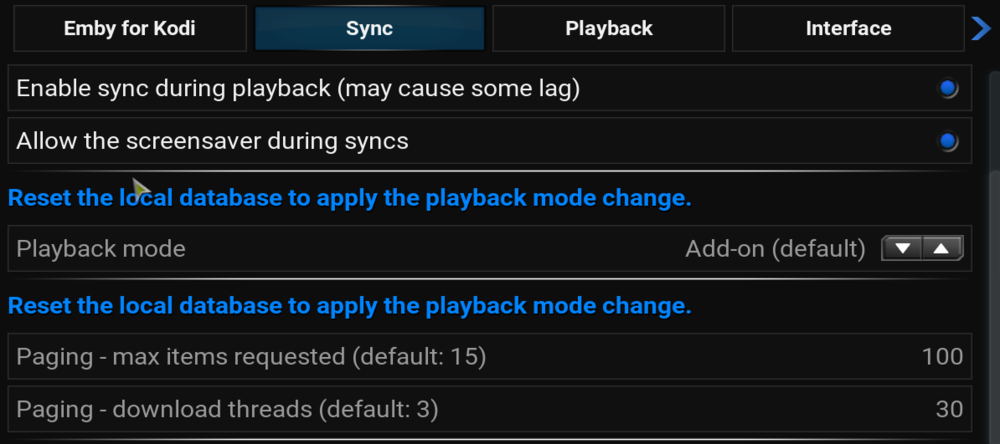
Paging settings are addressing simultaneous background threads and number of downloads. Download threads = simultaneous workers (threads) max items = Number of items pushed from Emby server per query. e.g. 1000 items to be synced, it's splits 1000 items into 100 items each2 points
-
Performance hint: Increase in plugin option -> sync: Paging max items. I use 100 Increase in plugin option -> sync: Paging download threads. I use 30 The default values are ridiculously low. I'll change the default values by next version2 points
-
Hey, that seem to have helped! Thanks! I guess this narrows down the issue to the streaming, is there any way I can help to investigate that further? I found this older thread that sounds like same thing and if so, I guess this is a recurring issue. For future reference if anyone else encounters this issue: 1. I have added an optional UNC path to my library like so 2. Enabled "Pass Direct Path" in the Emby client's Playback settings 3. When the video is playing the Stats box shows "Stream type: File"
 2 points
 -
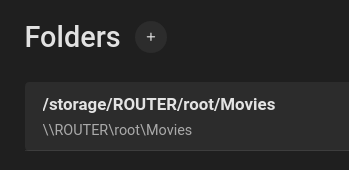
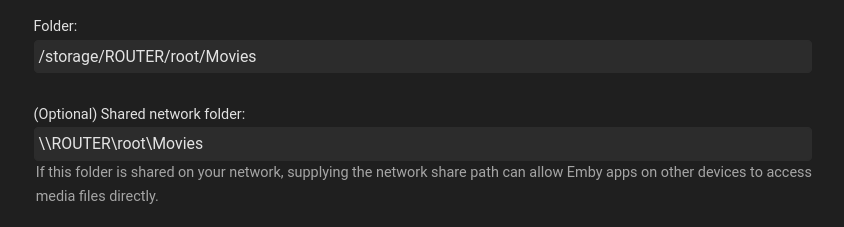
https://support.emby.media/support/solutions/articles/44002058112-shield-tv-direct-file-access To add to this wiki (which should be in there actually..) it's important that the server is uppercase in the optional emby library path. ie if your normal unc path is \\server\myshare - the optional library path should be \\SERVER\myshare - as that is how the SHIELD mounts them - lowercase will not work. @cayars - Could we update the wiki to state this please ? Ah apologies - you have in the other associated doc - https://support.emby.media/support/solutions/articles/44001159320-optional-network-paths2 points
-
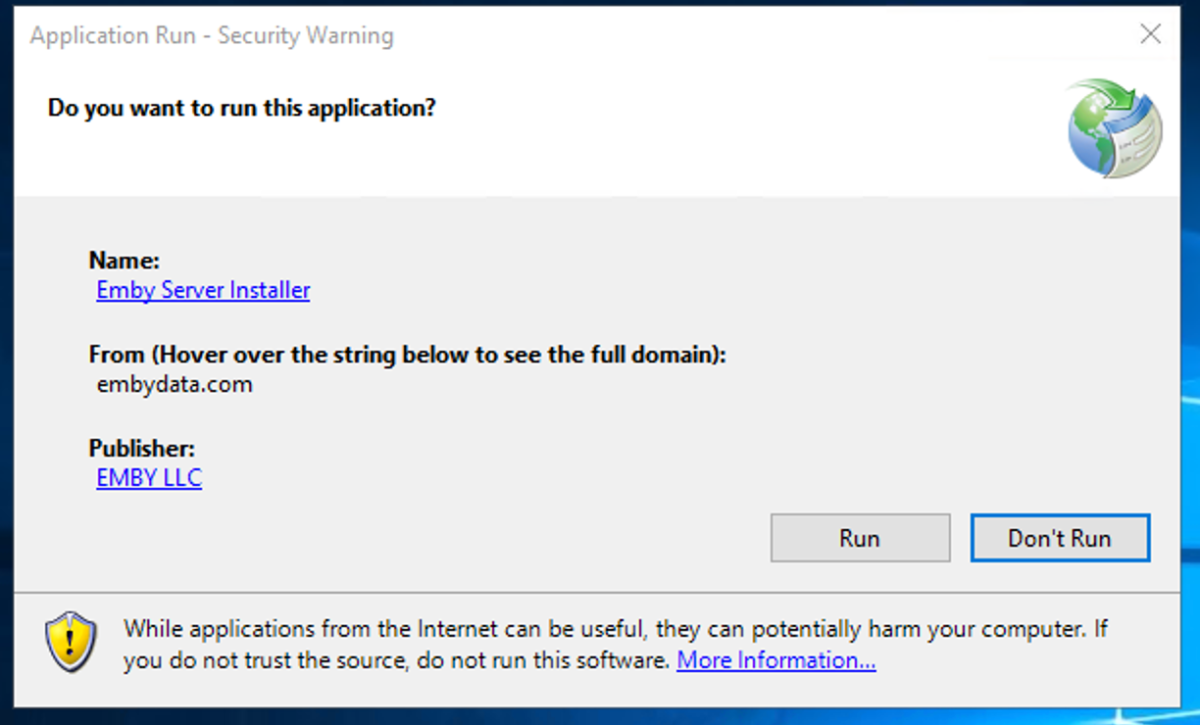
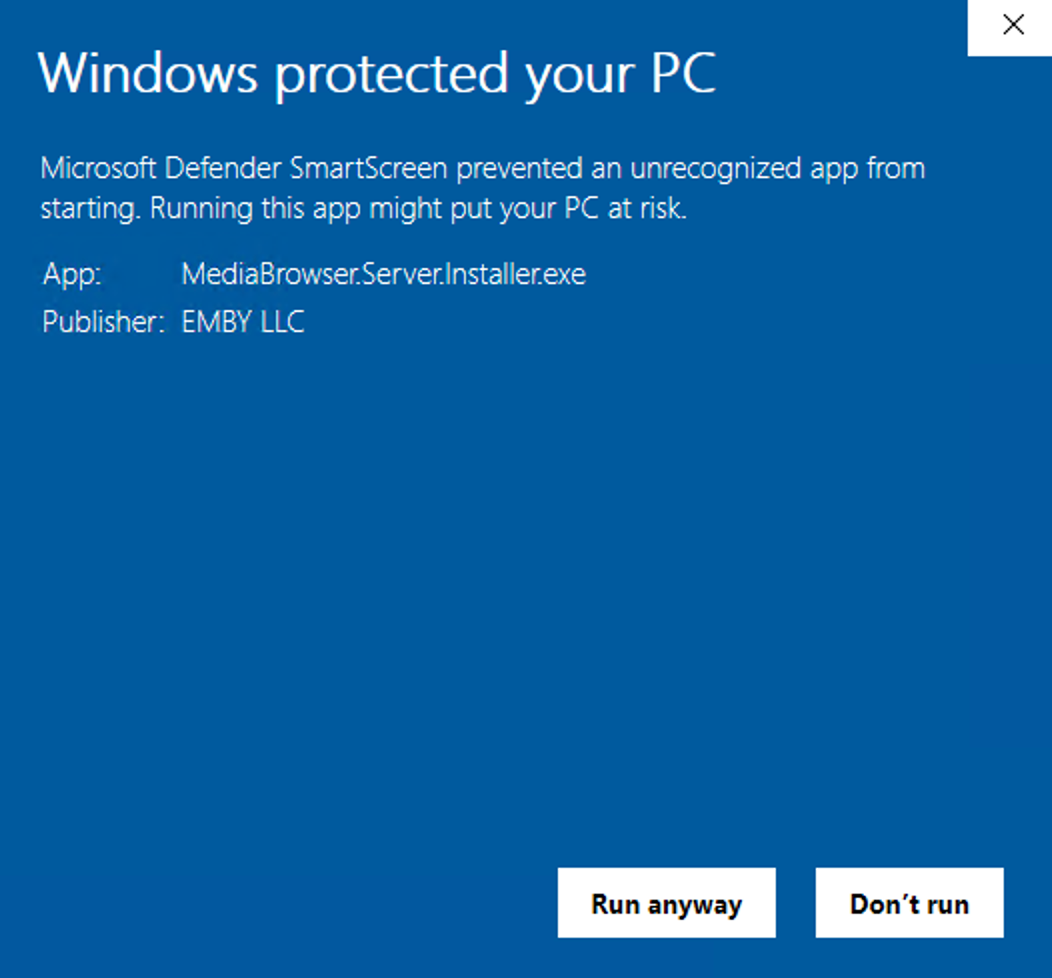
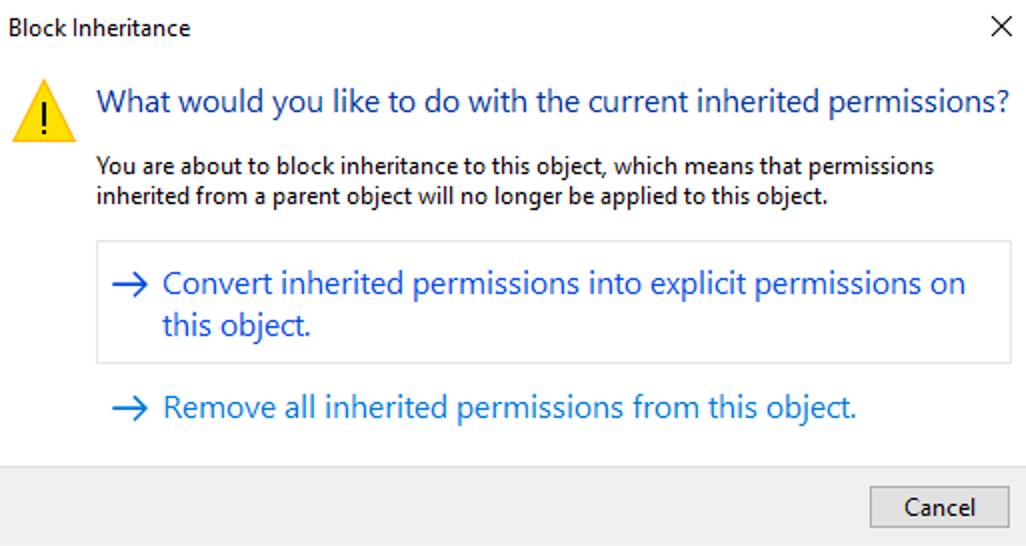
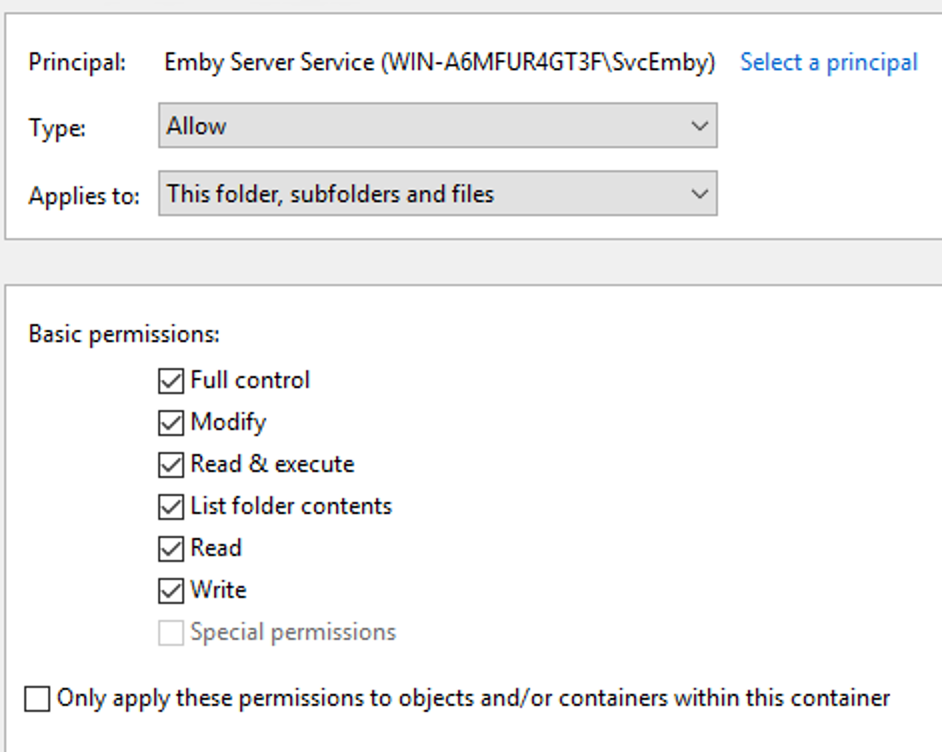
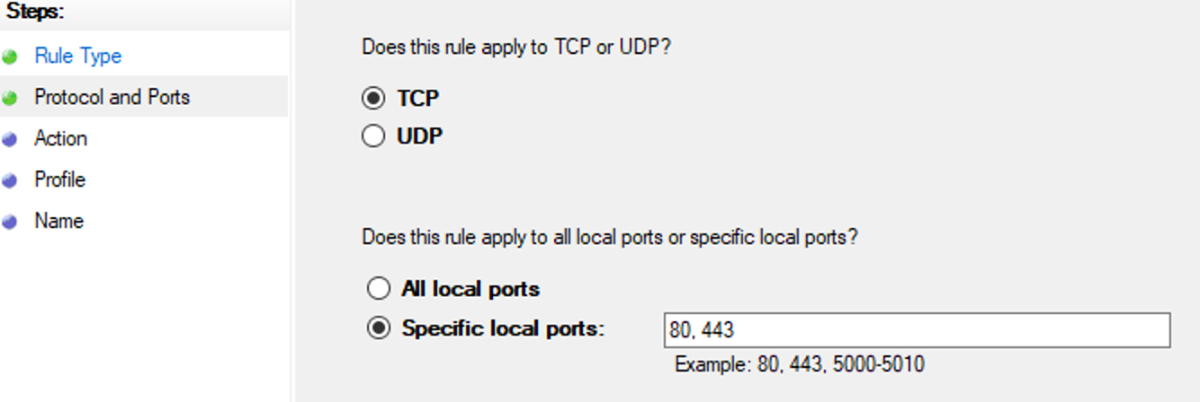
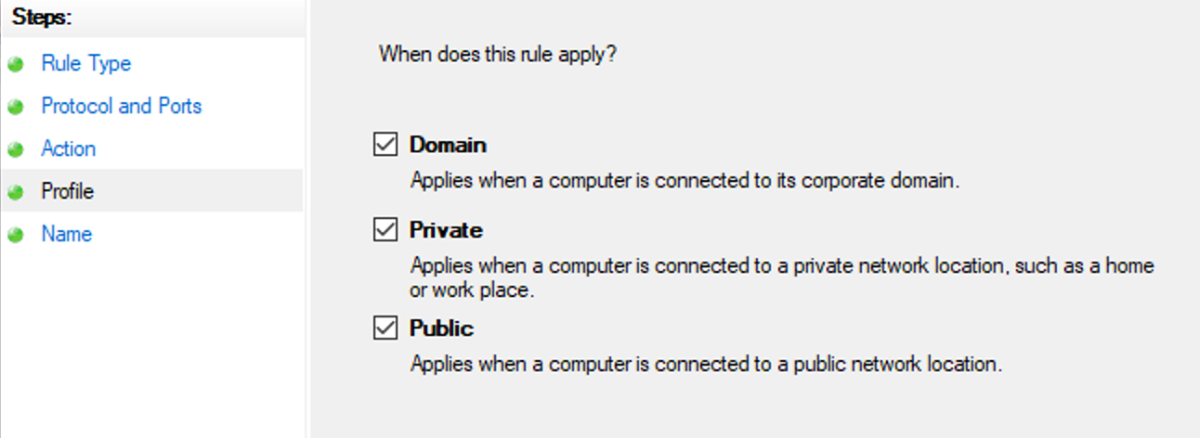
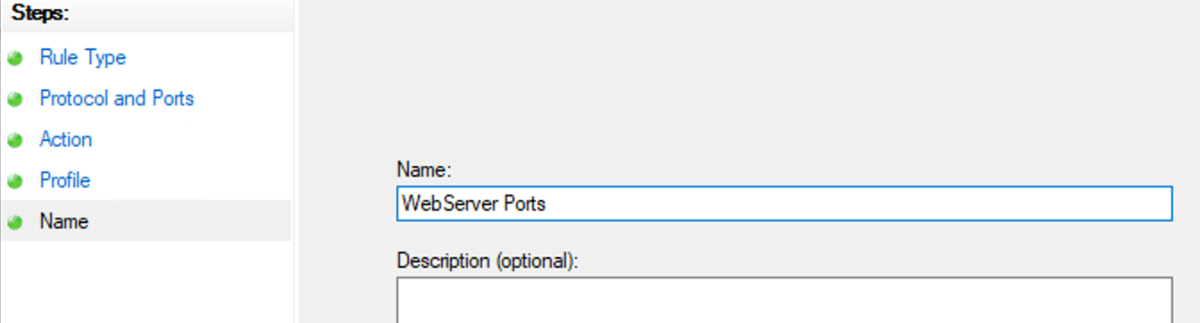
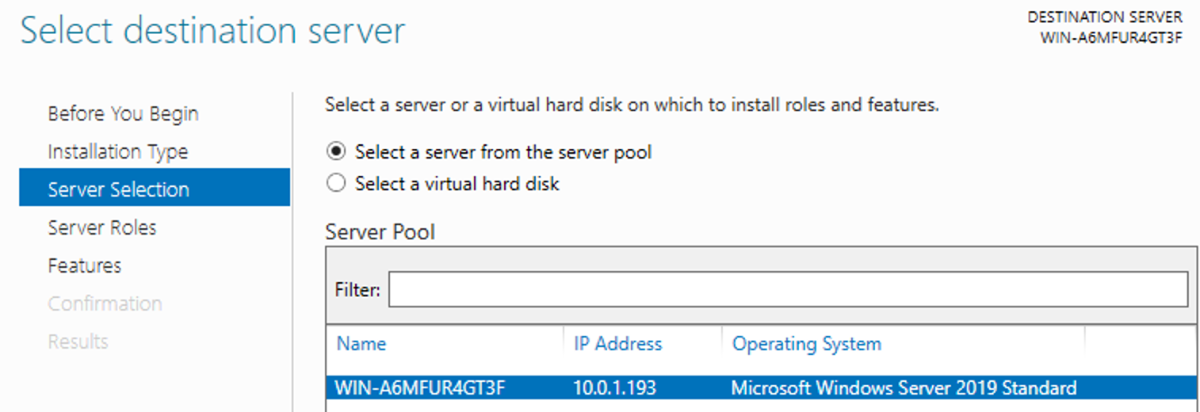
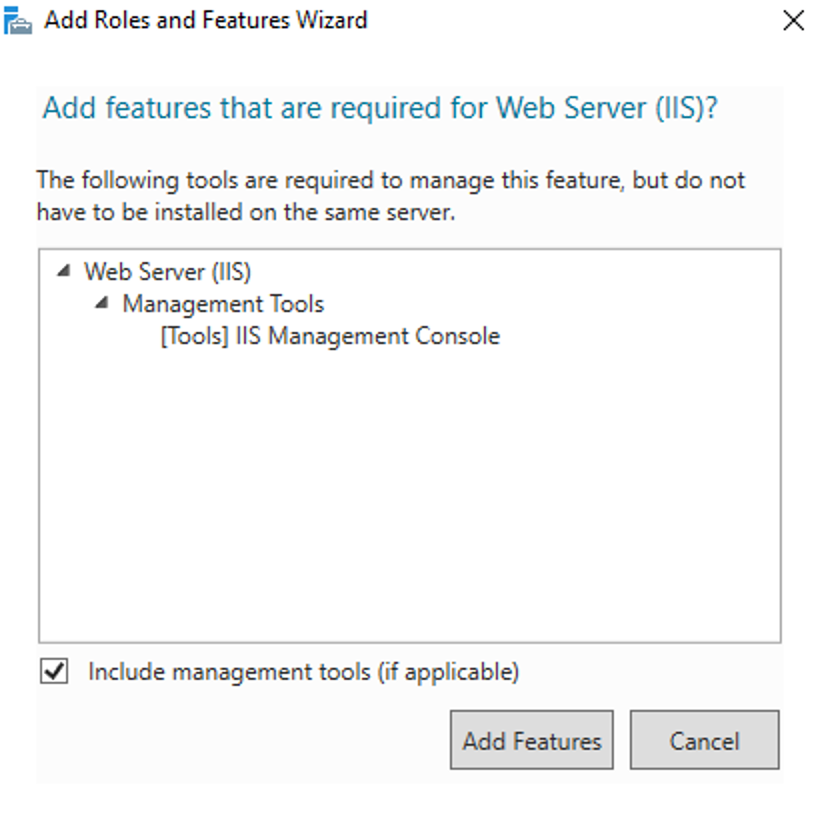
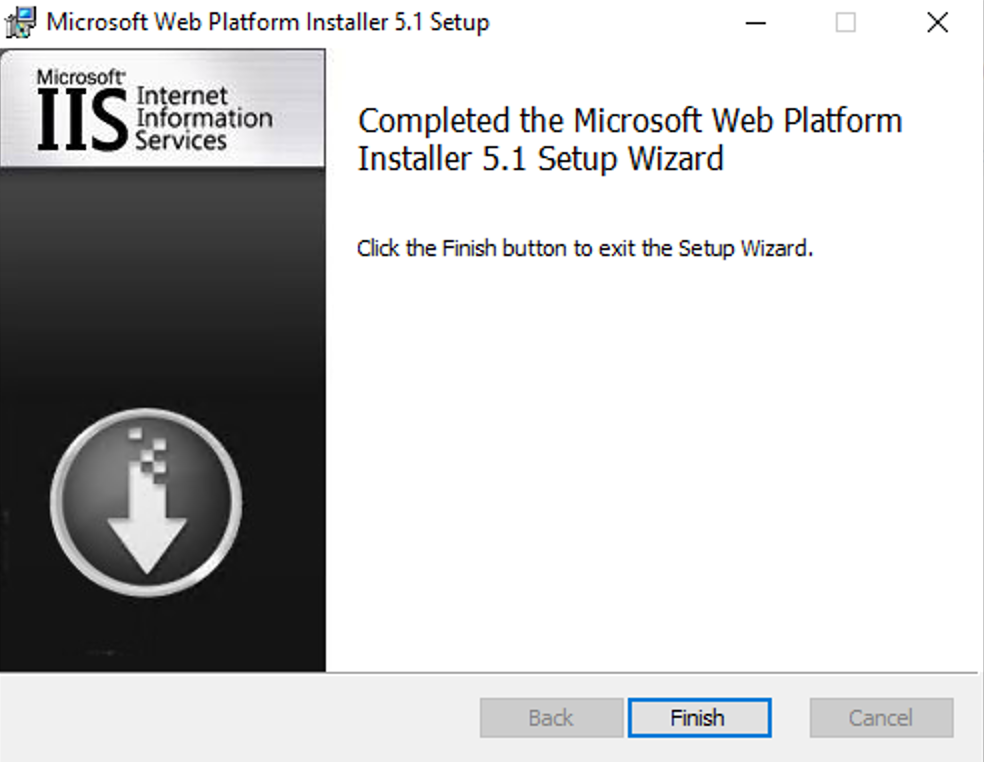
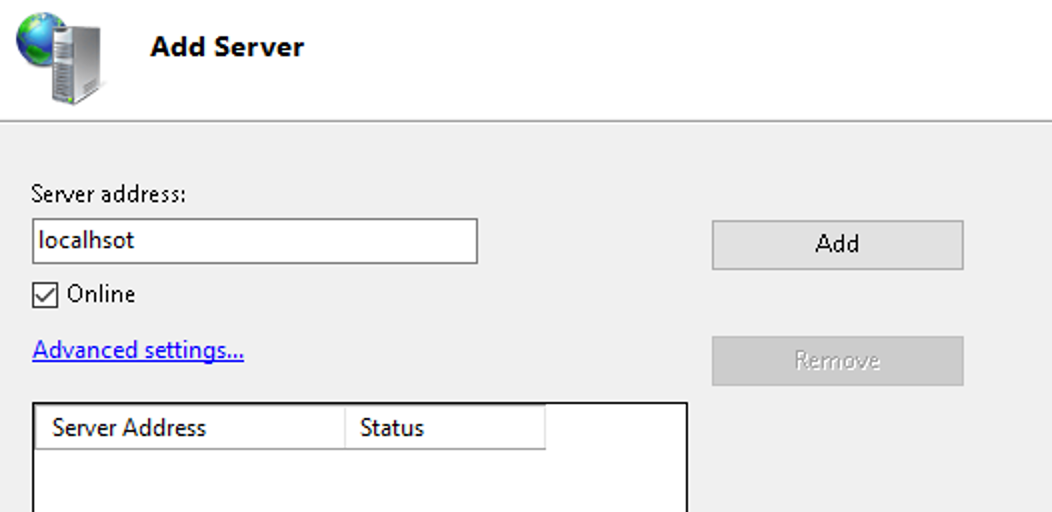
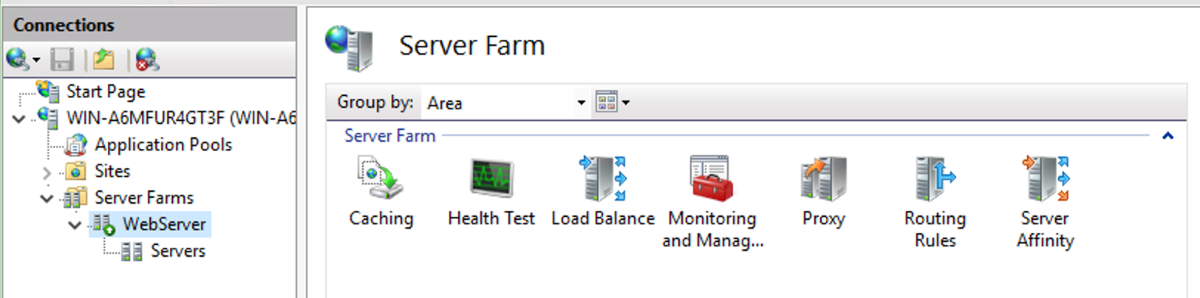
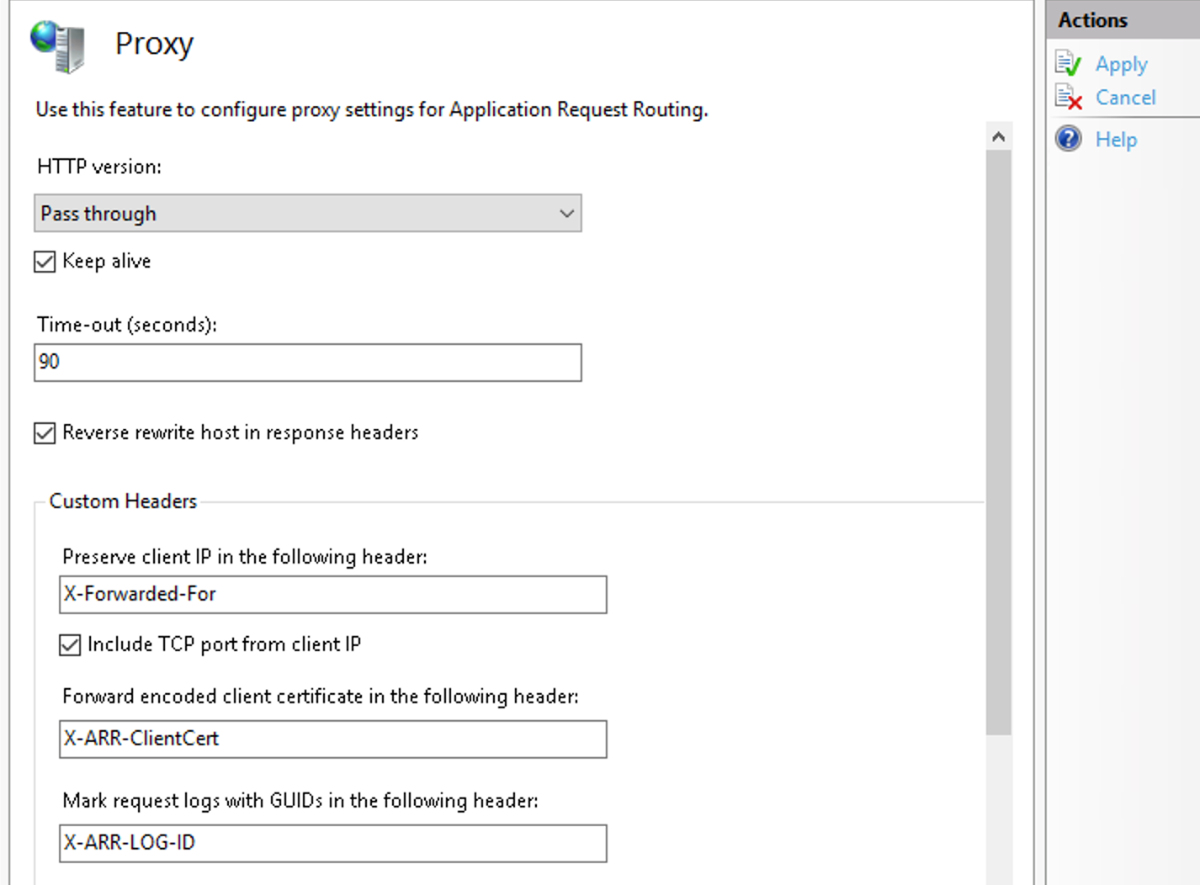
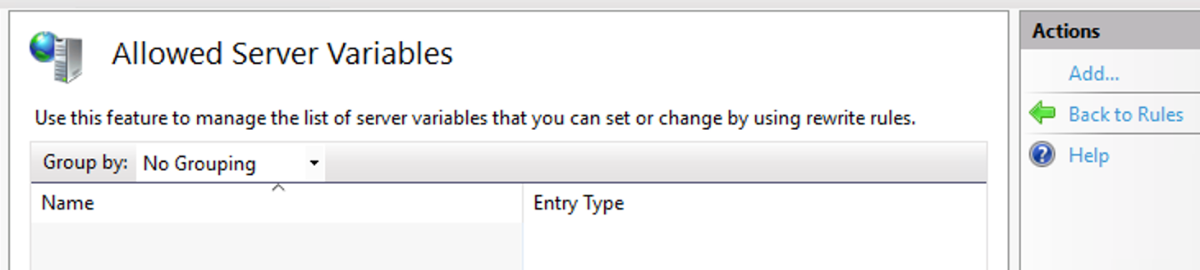
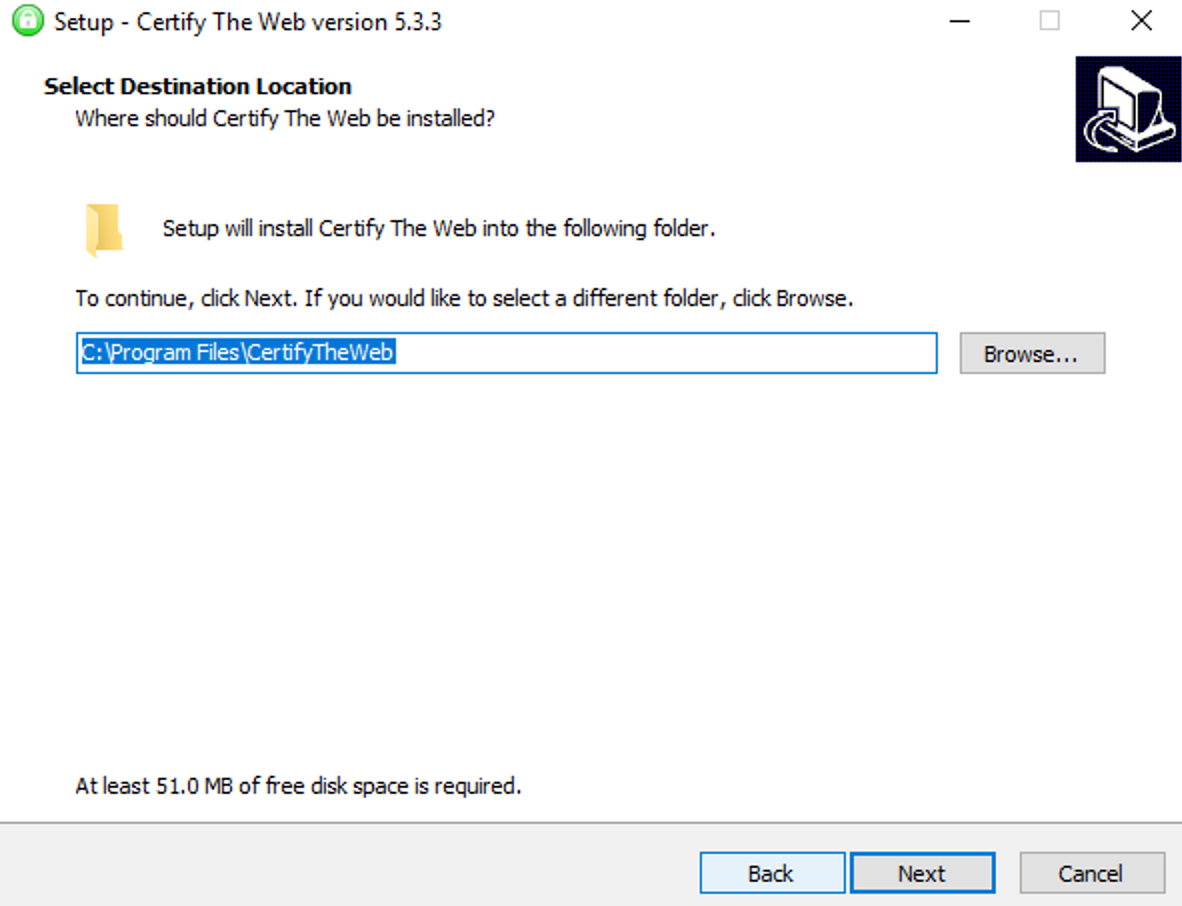
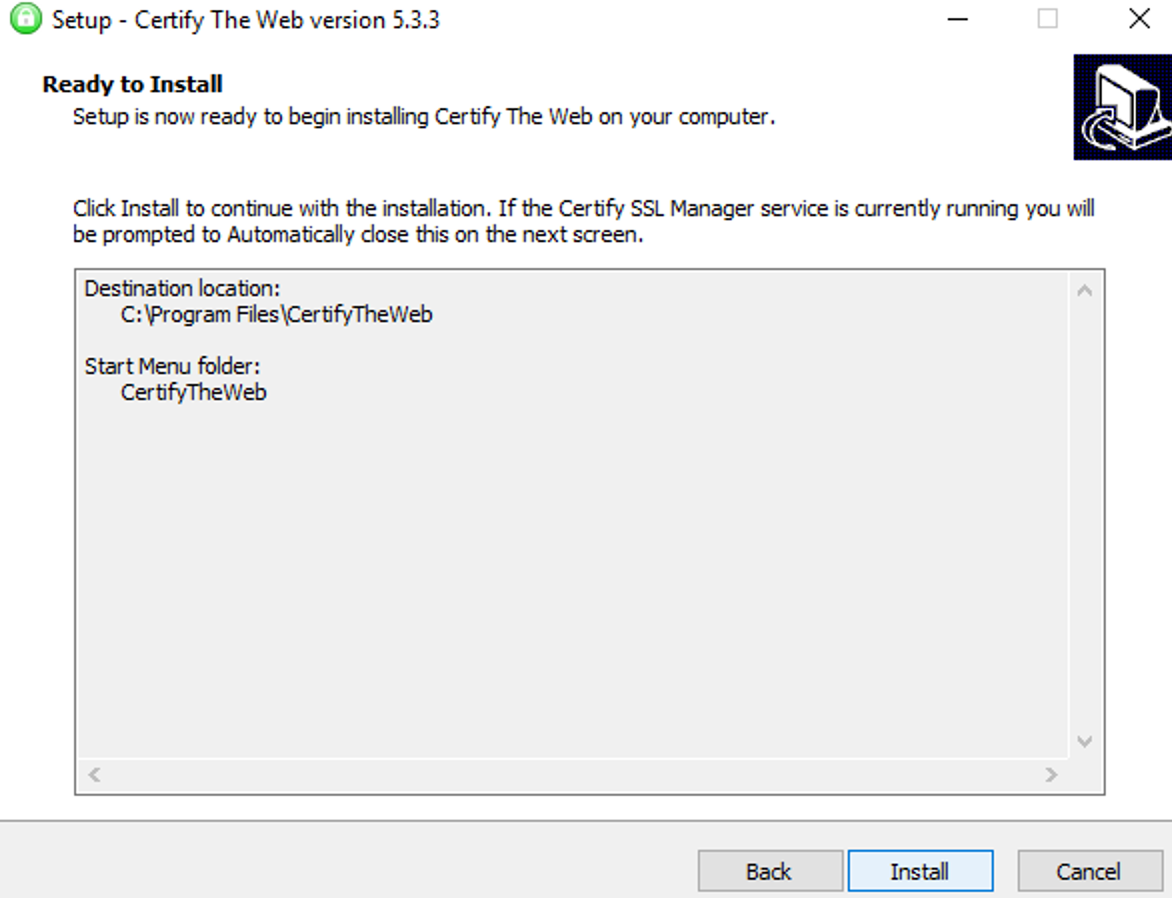
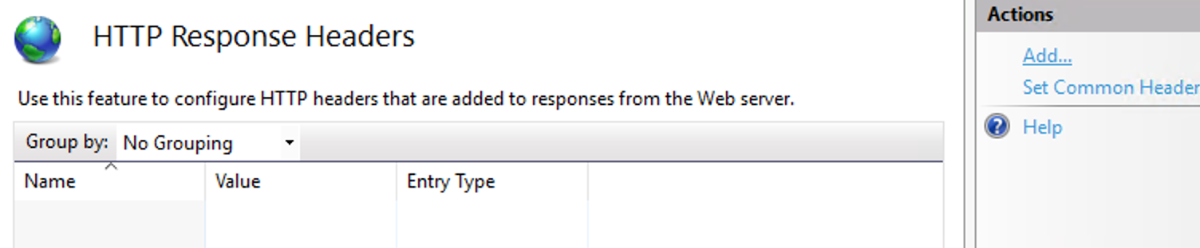
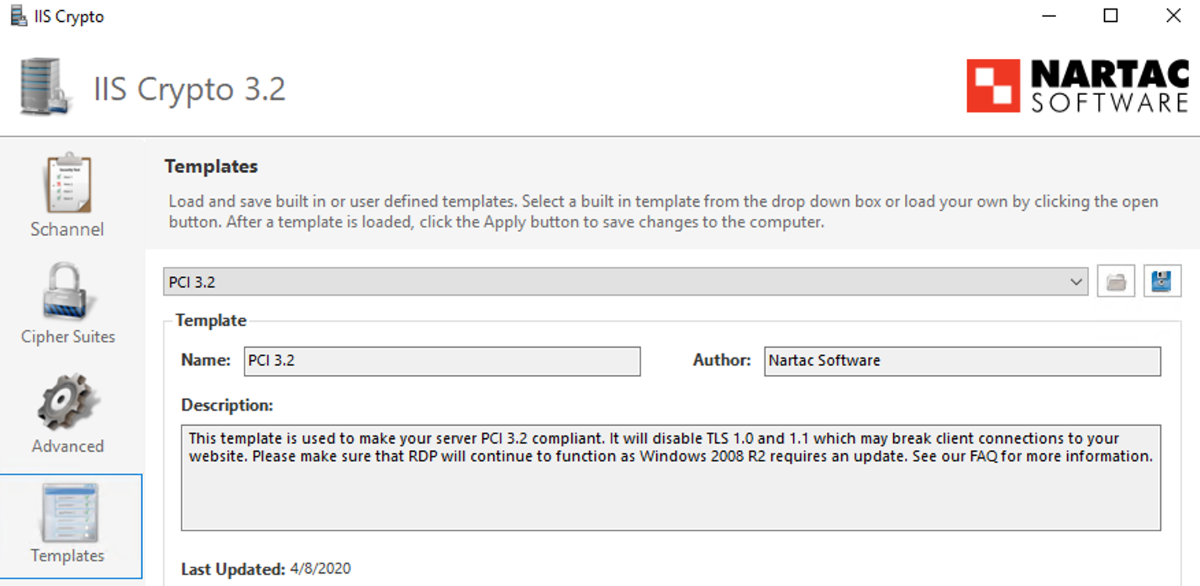
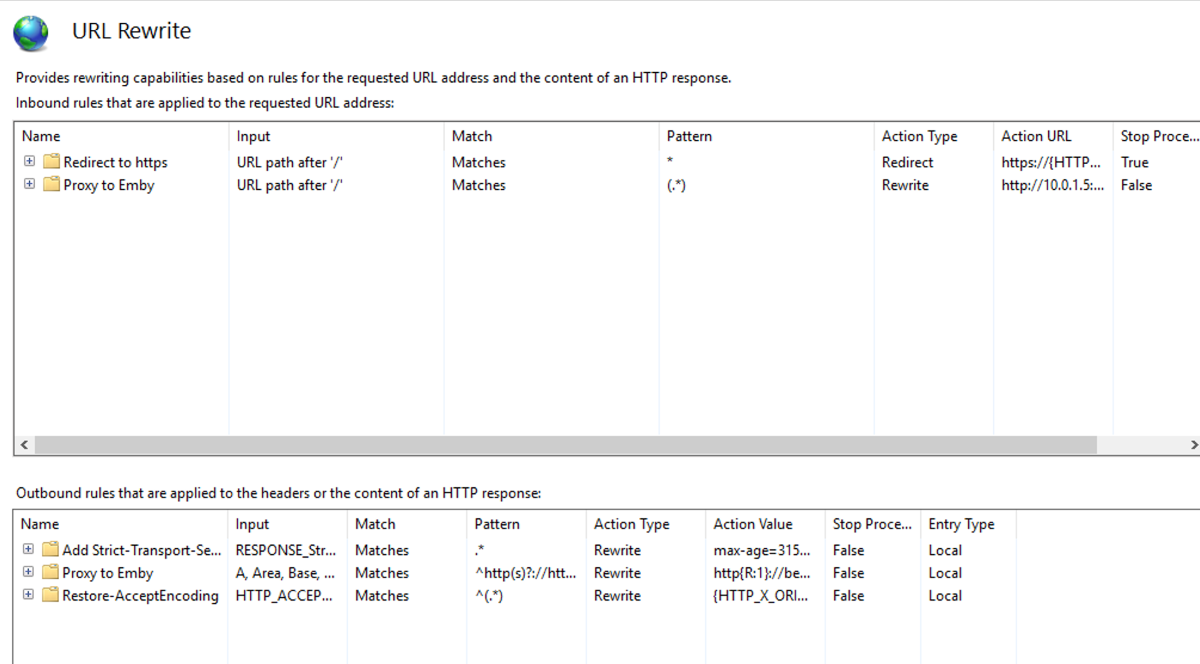
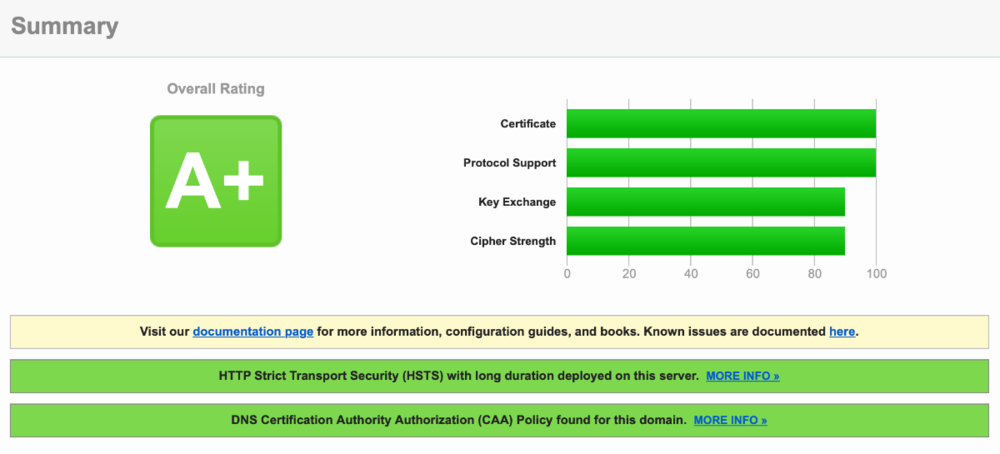
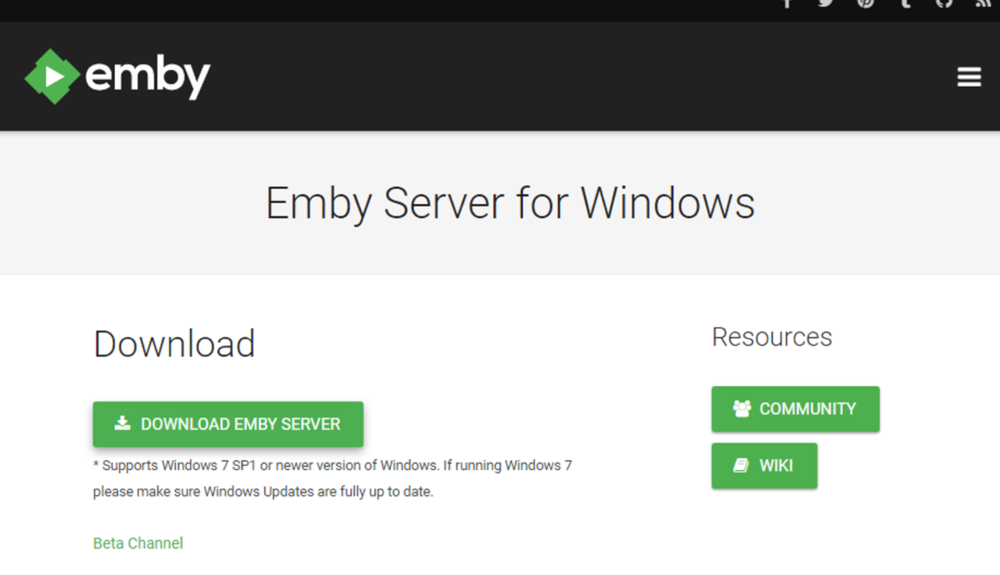
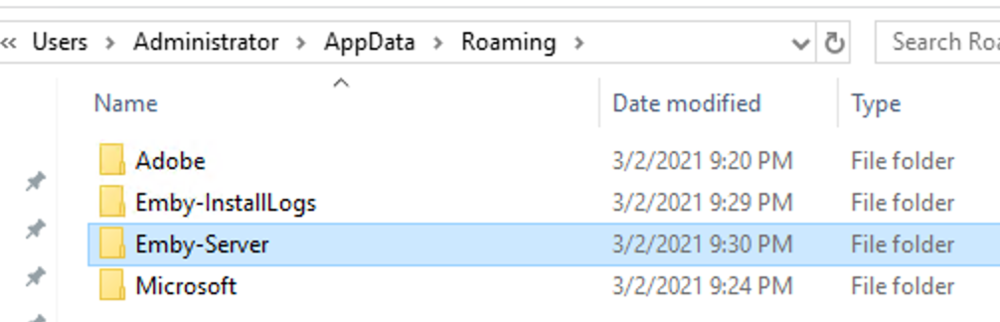
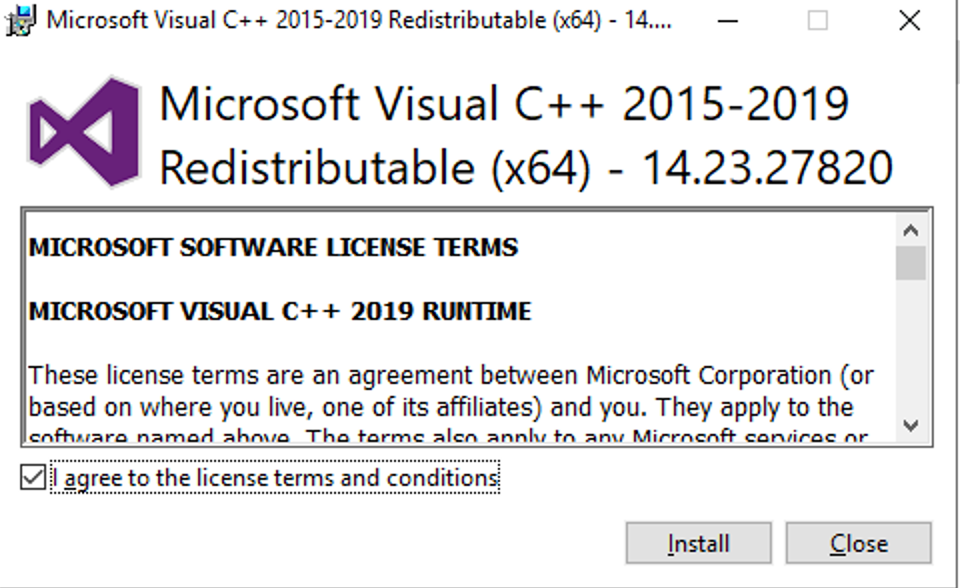
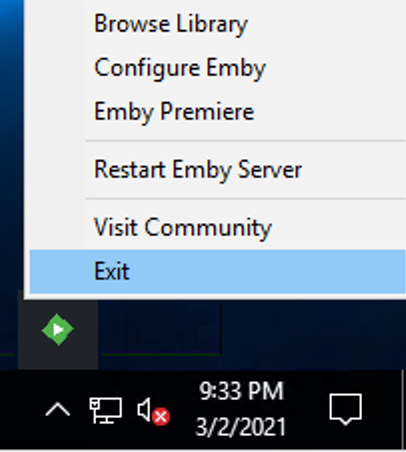
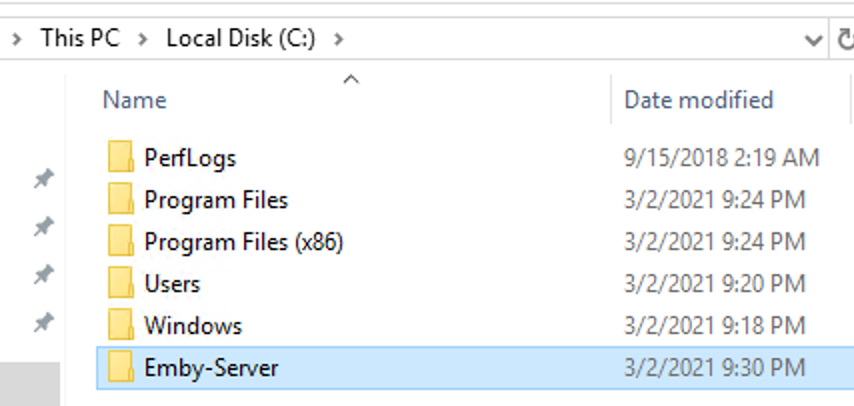
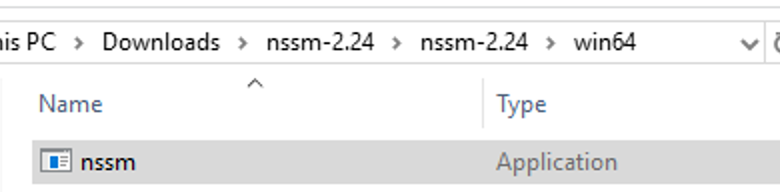
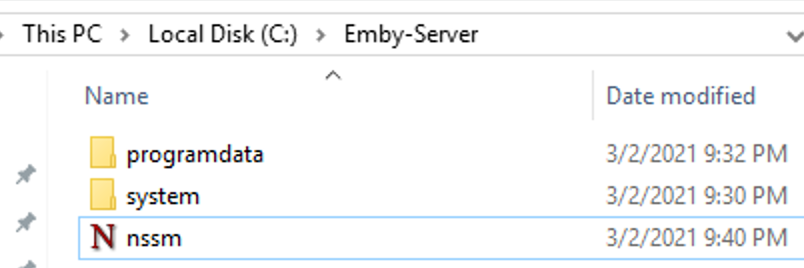
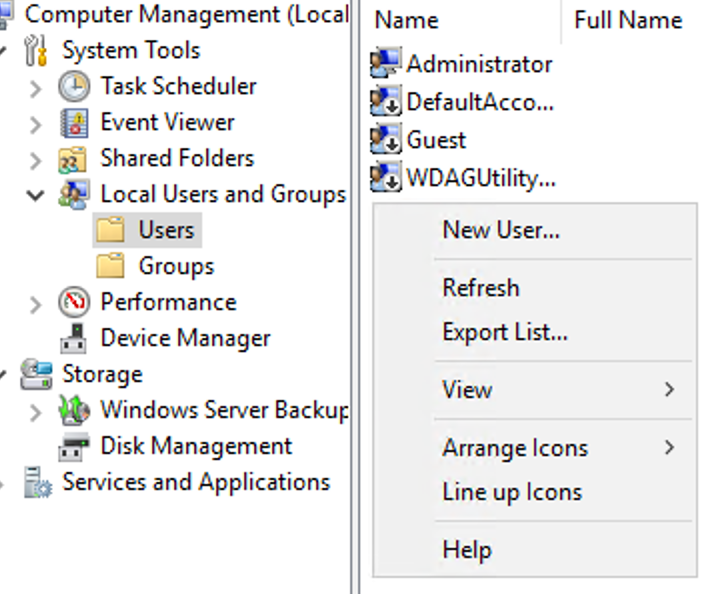
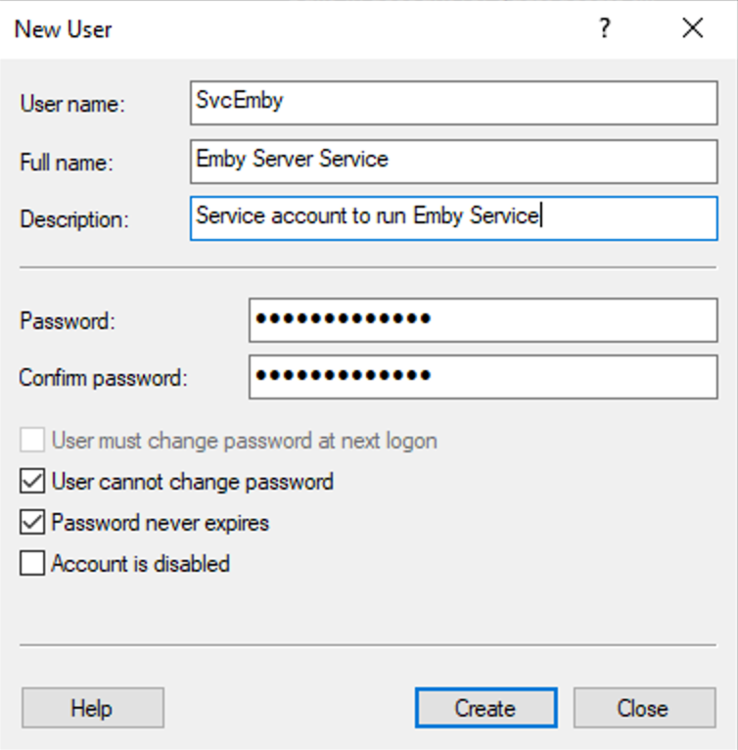
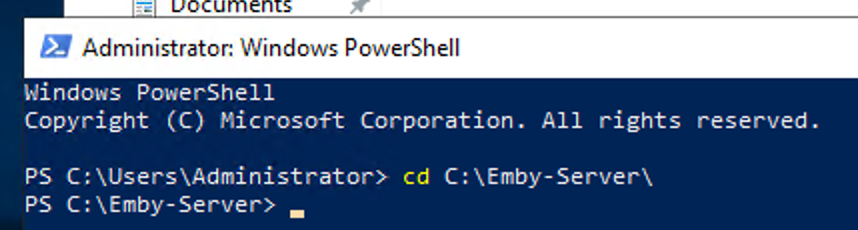
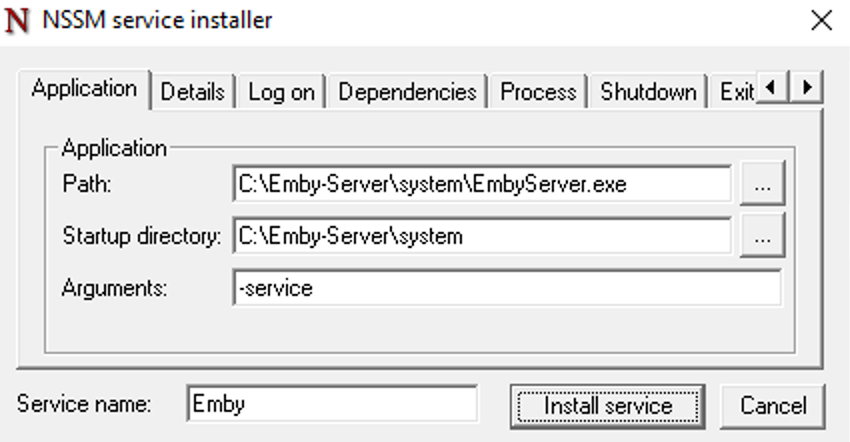
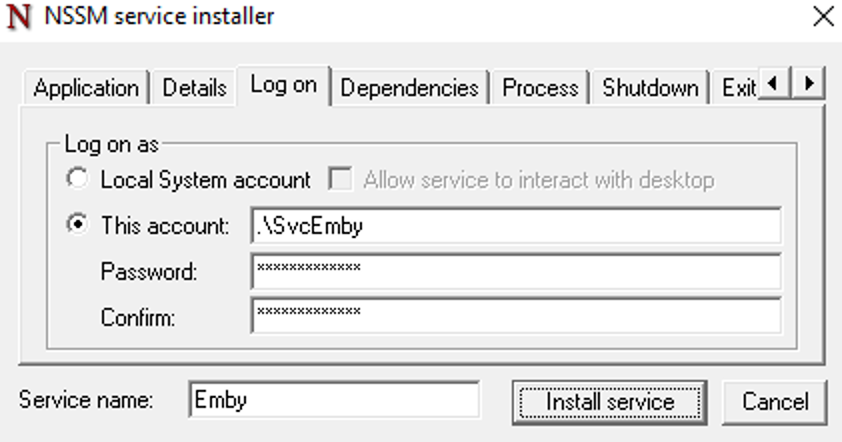
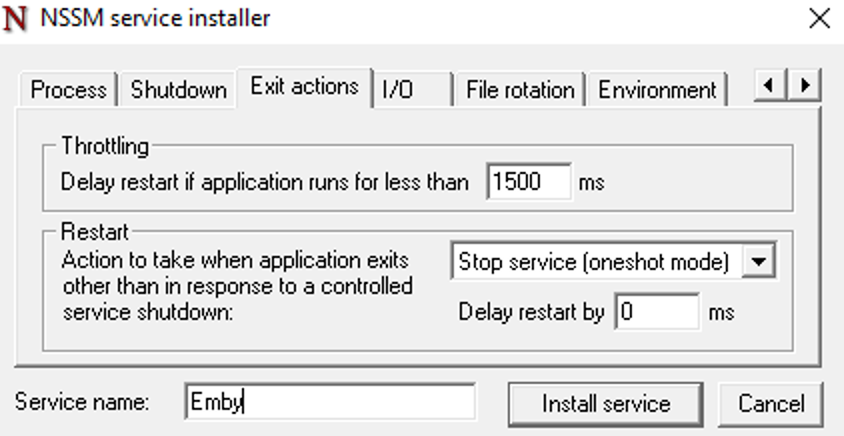
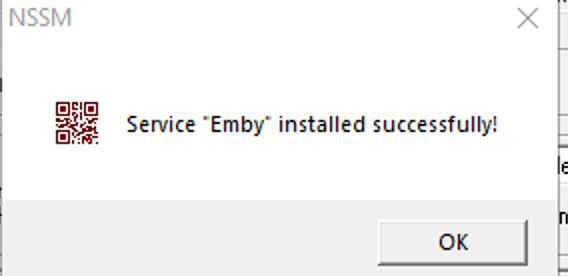
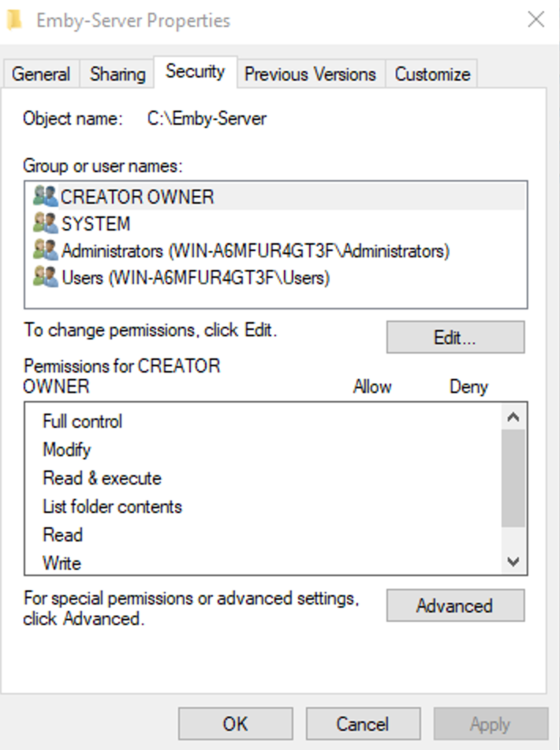
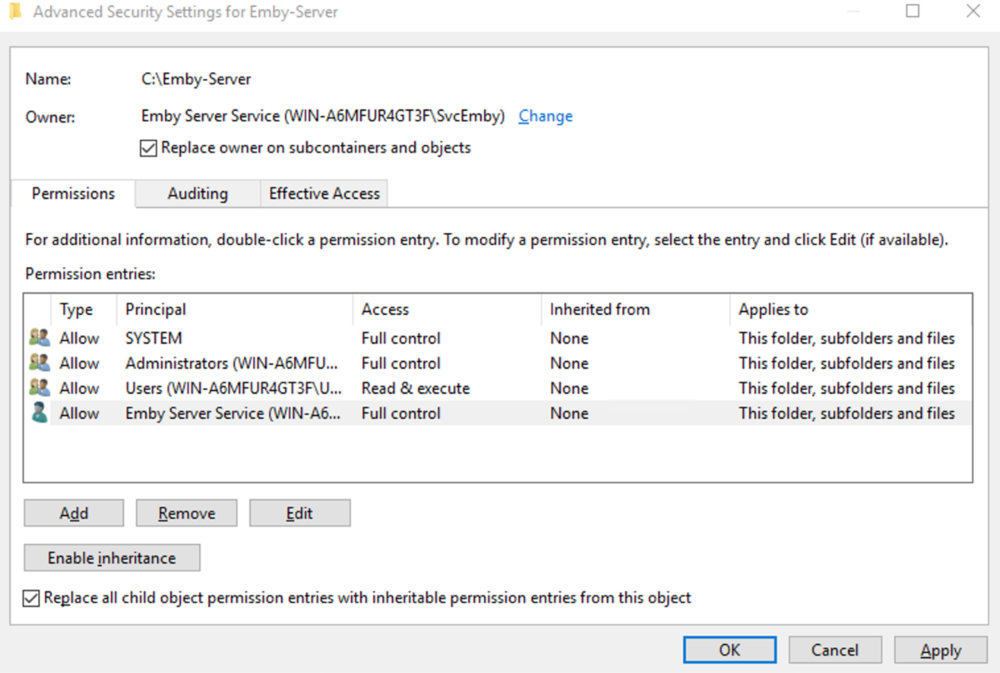
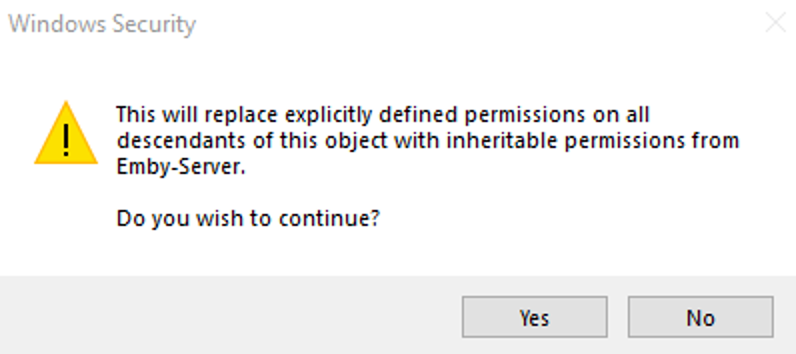
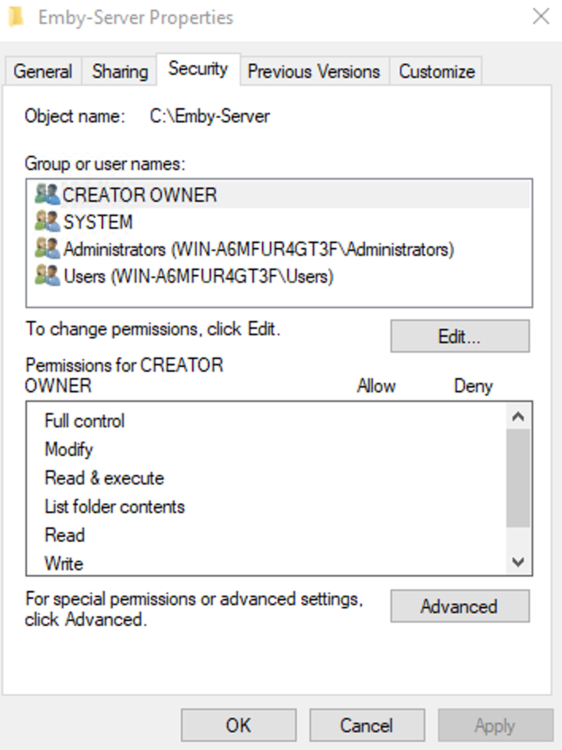
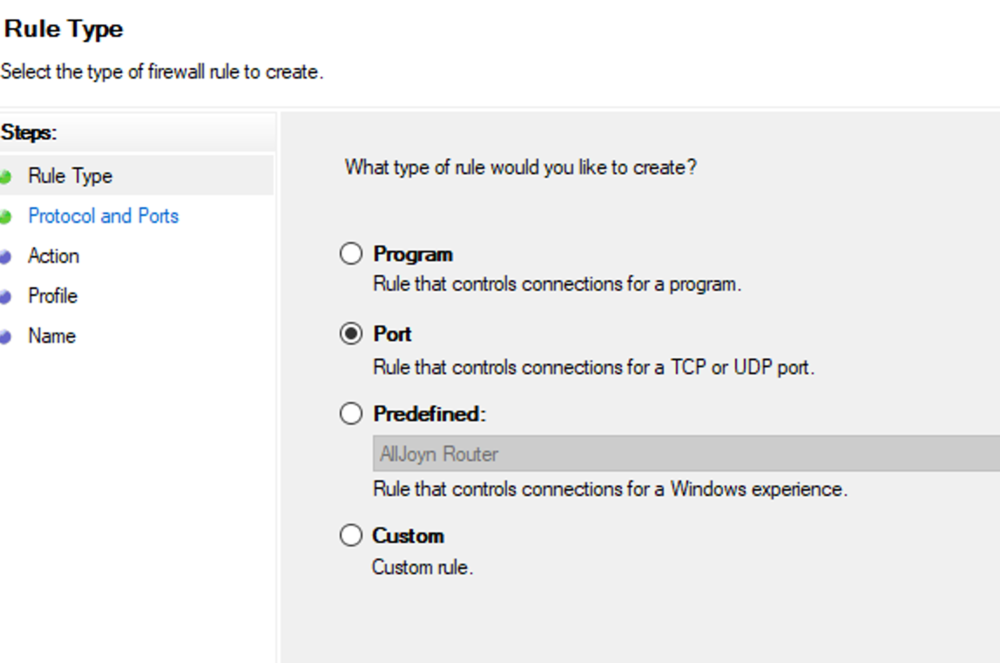
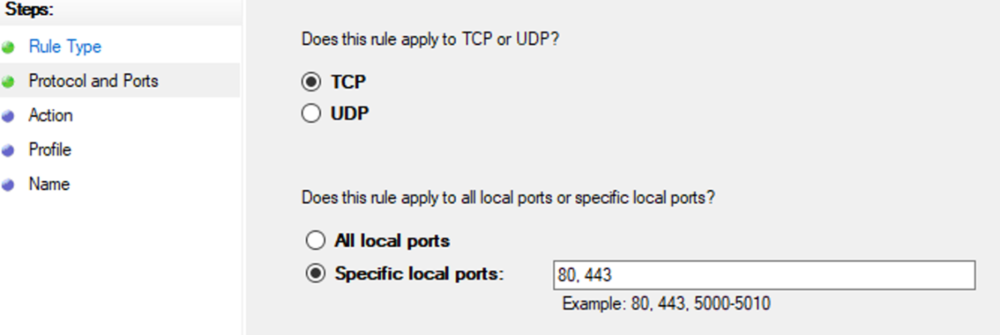
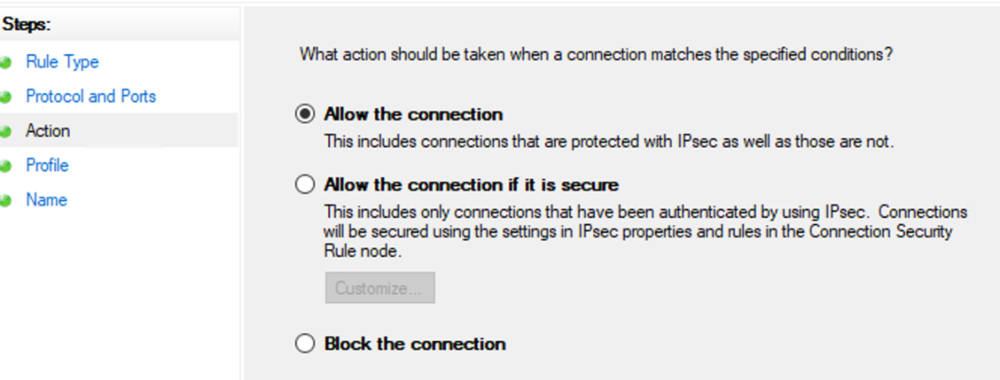
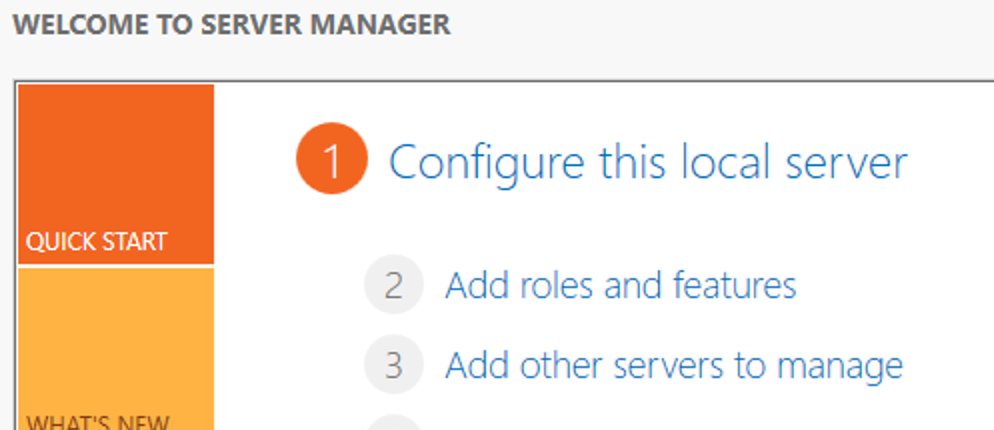
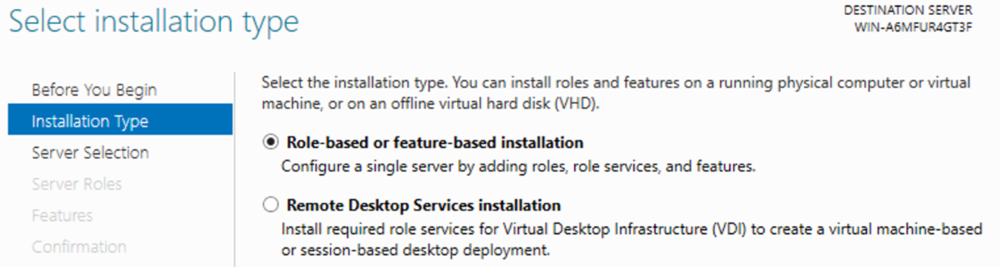
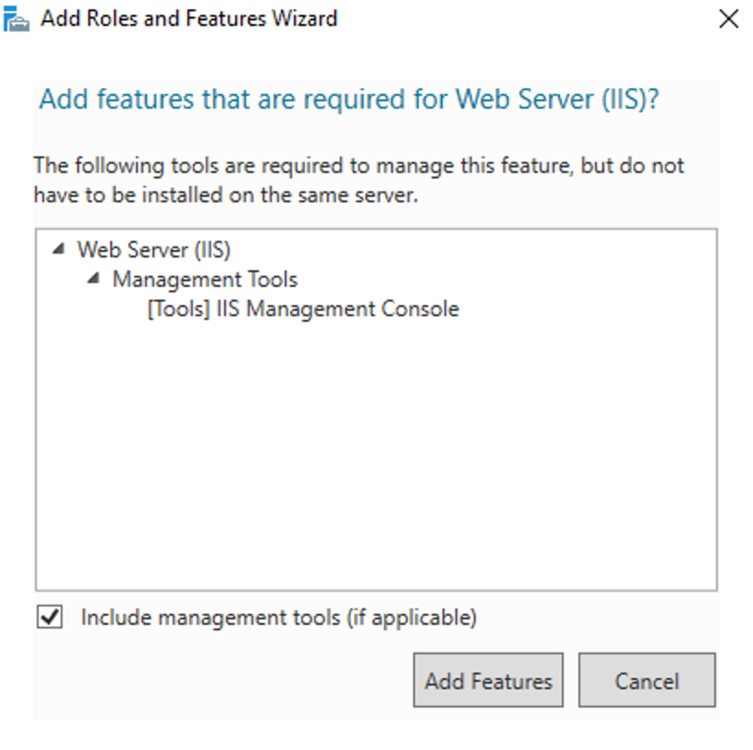
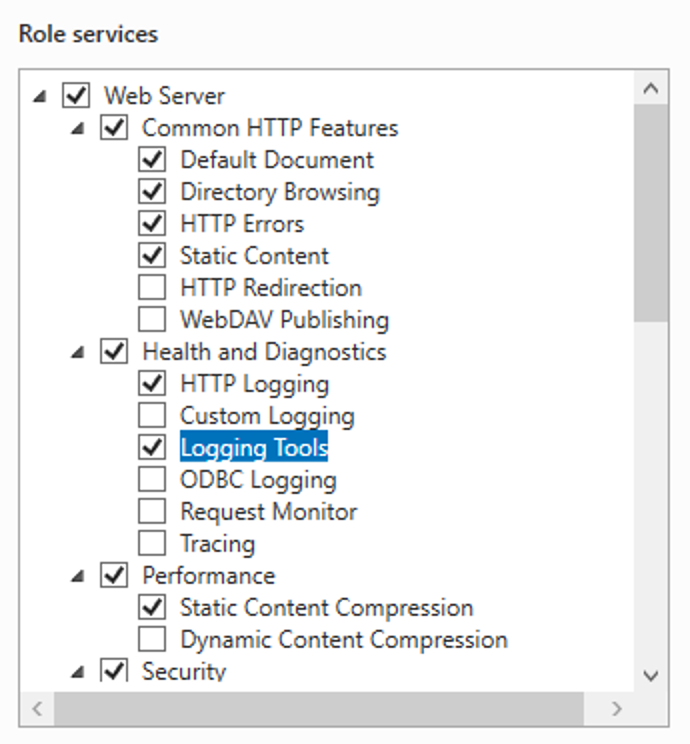
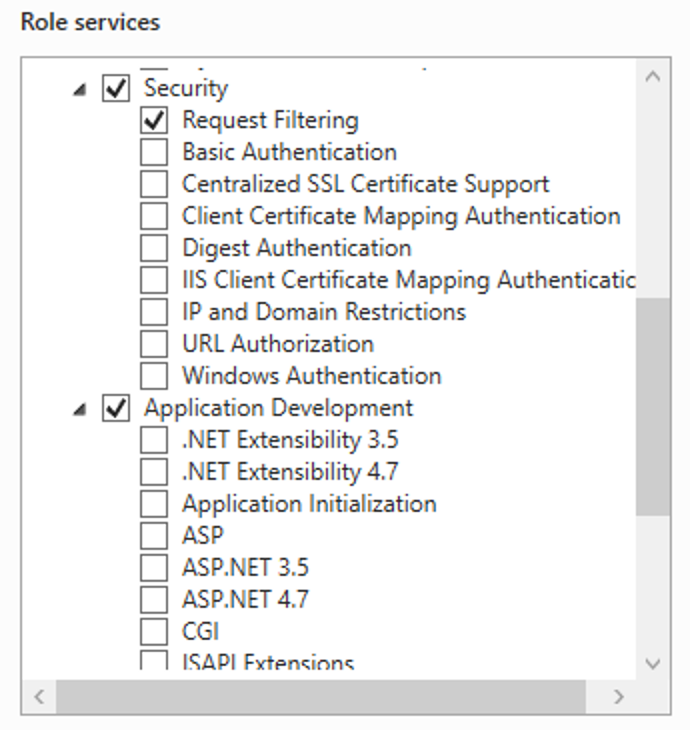
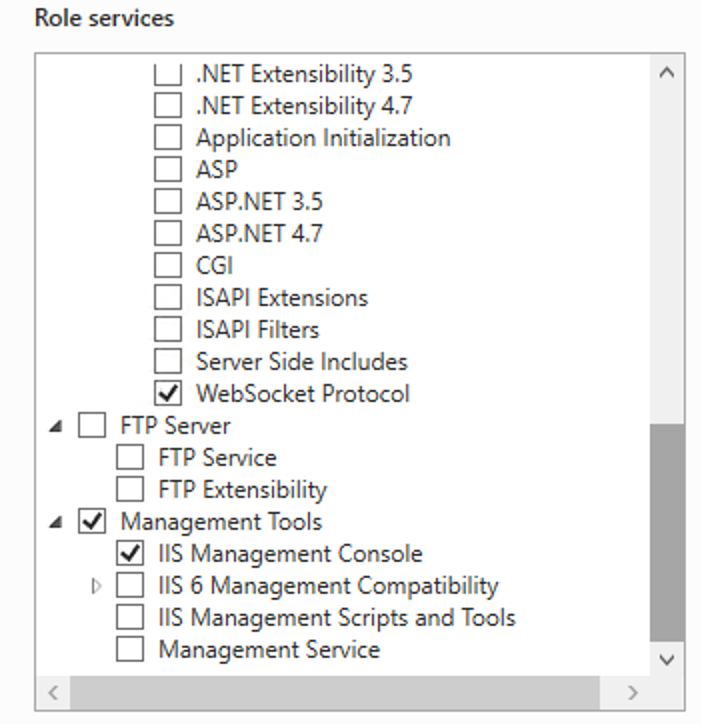
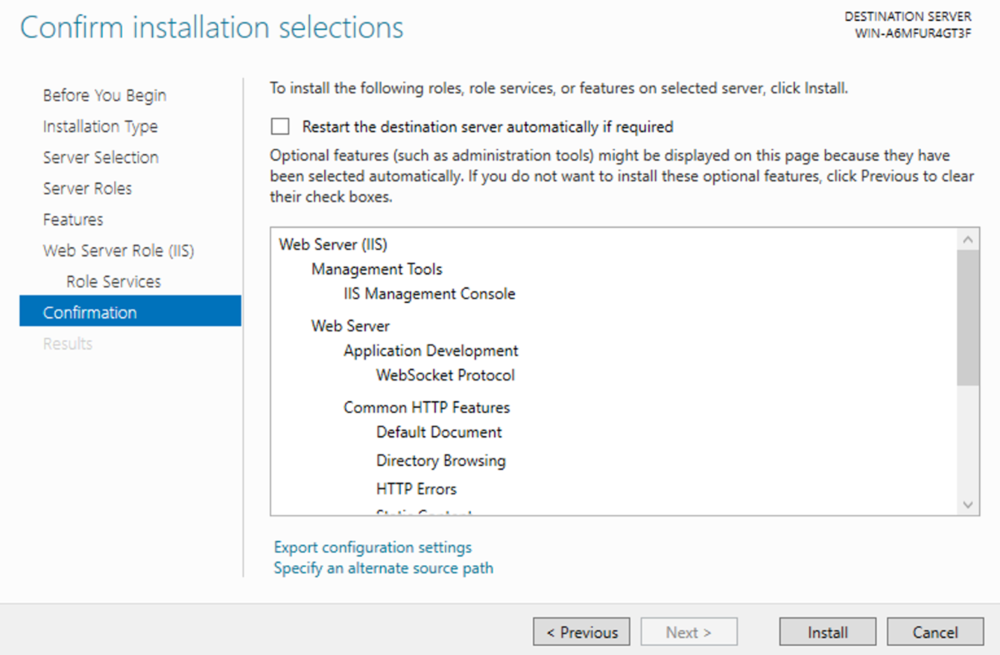
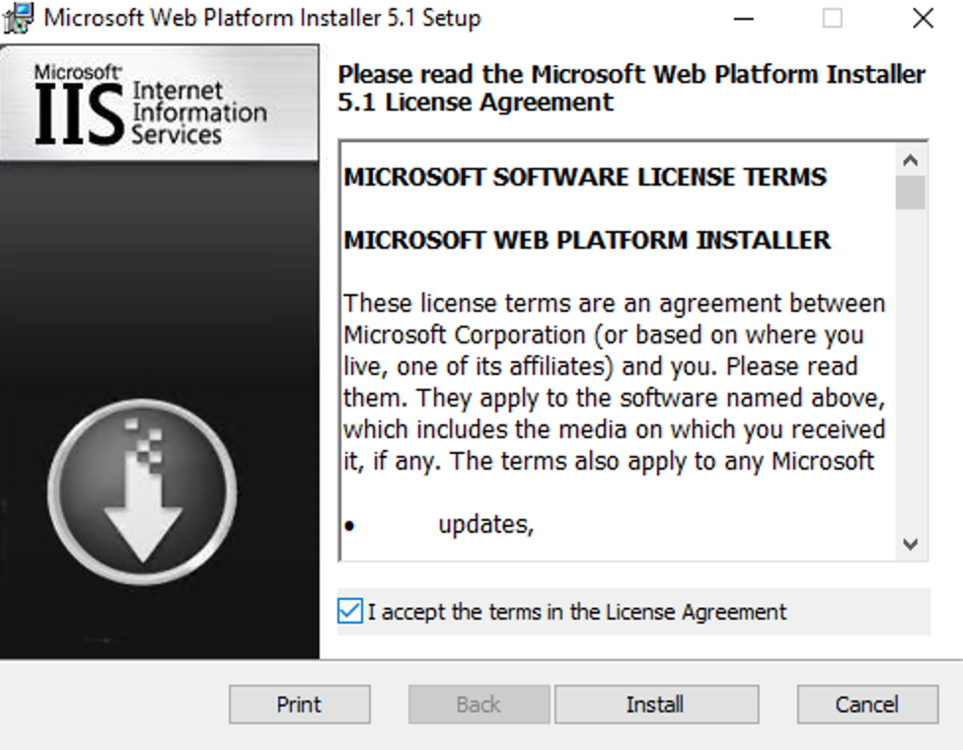
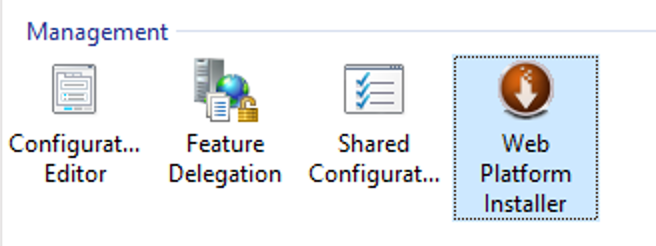
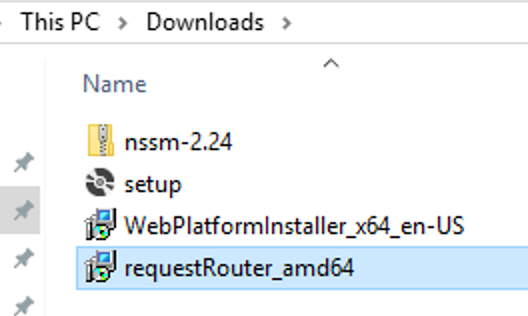
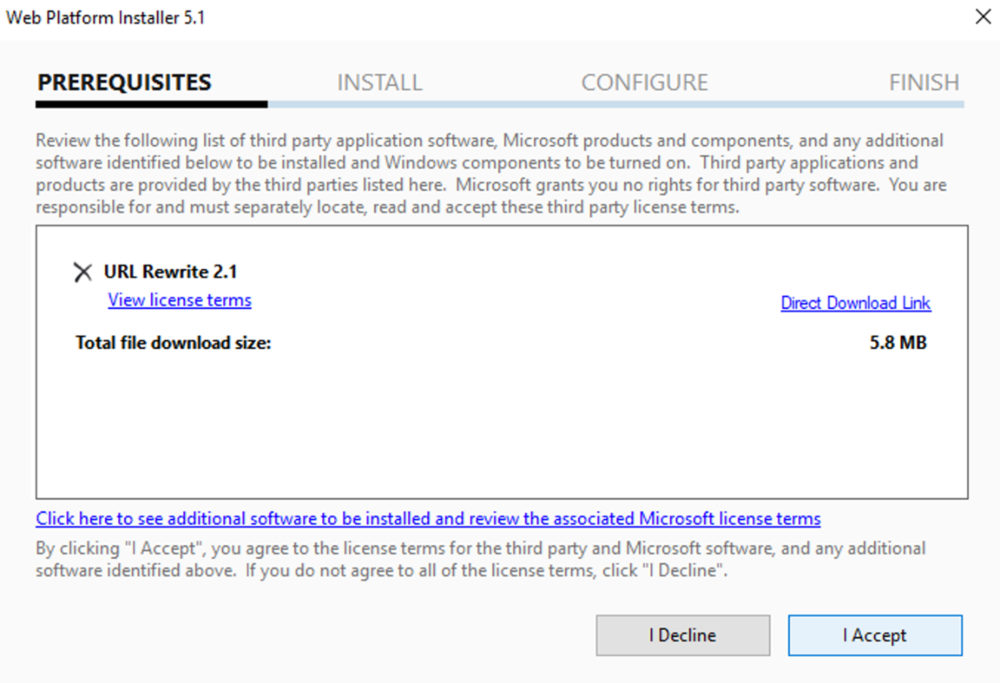
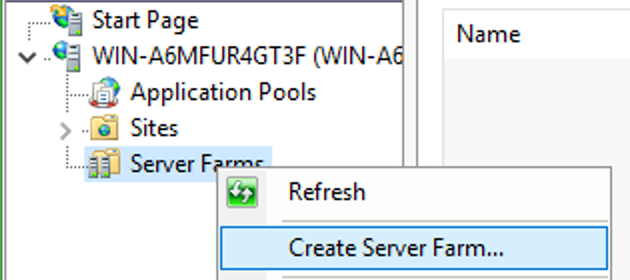
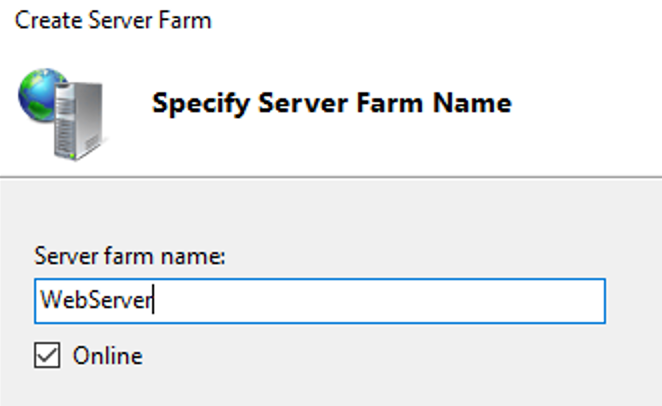
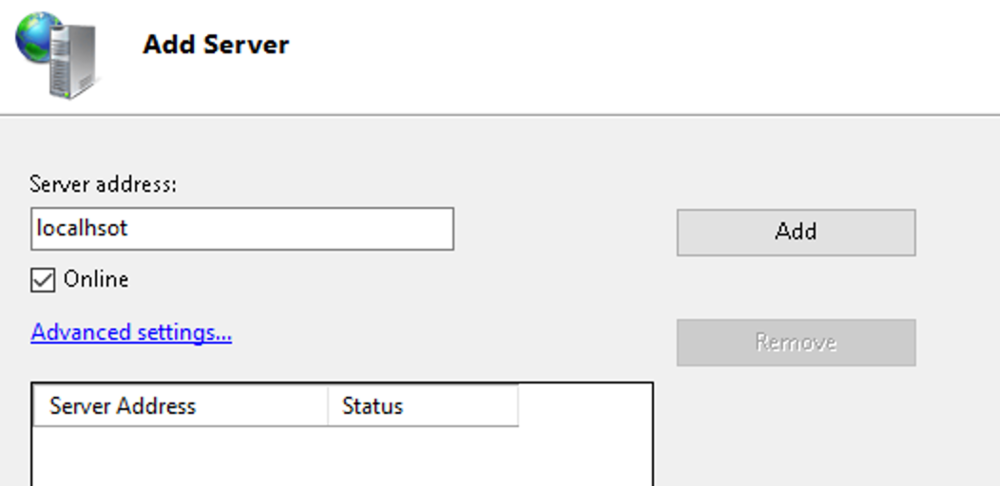
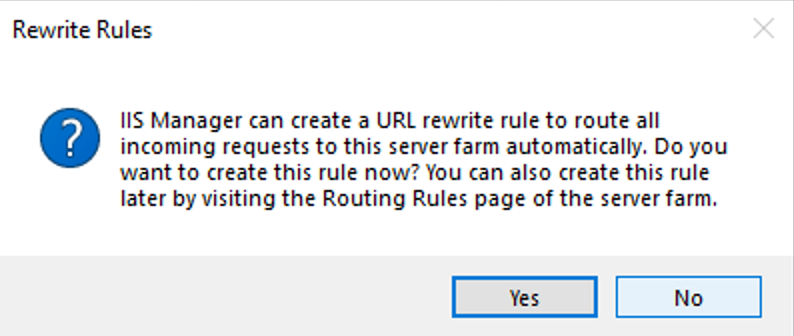
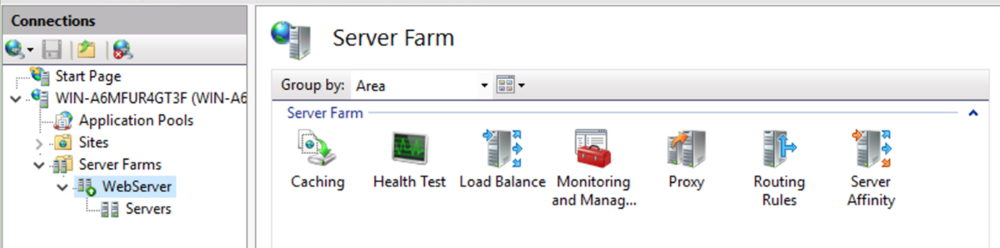
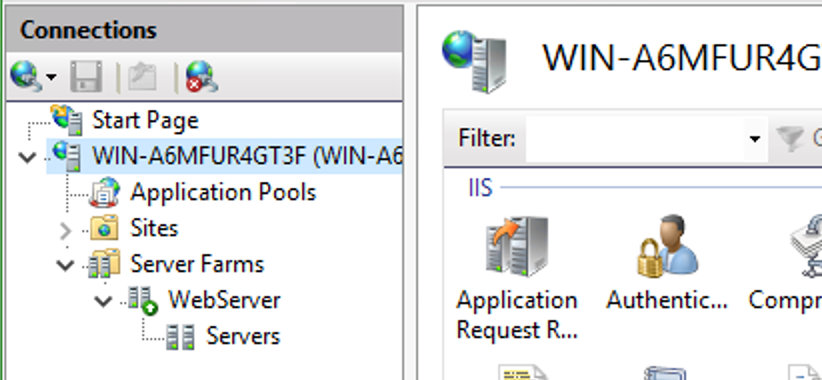
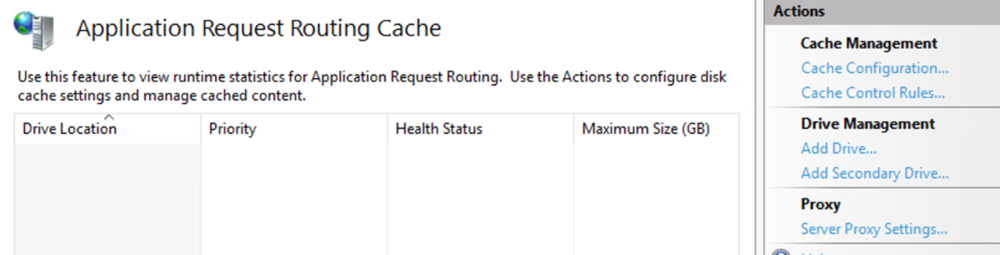
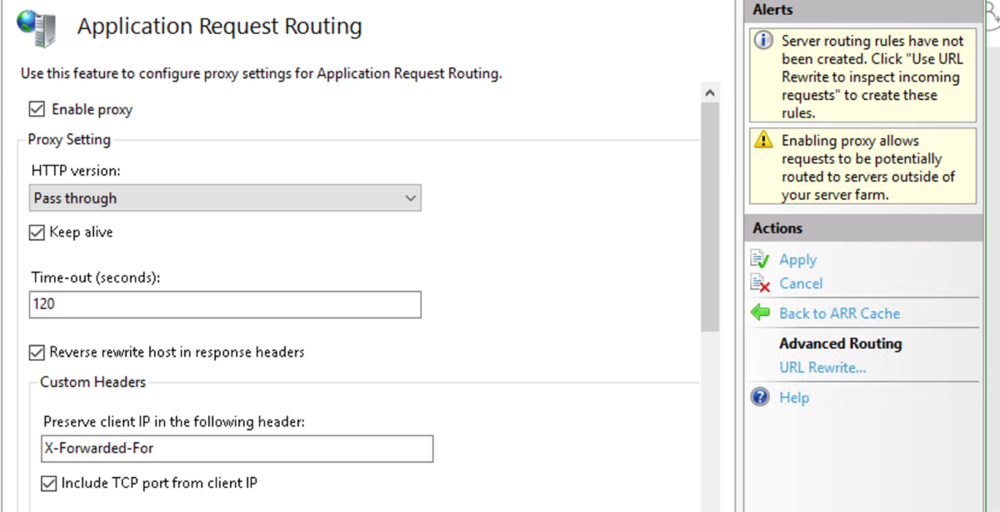
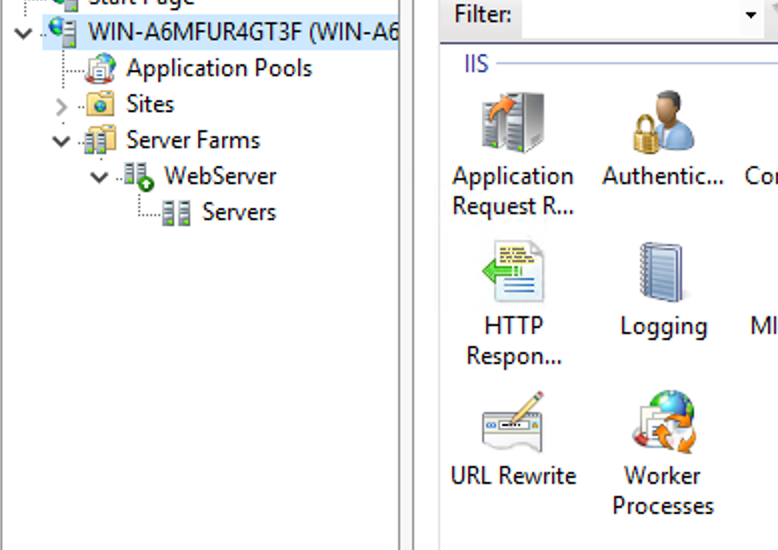
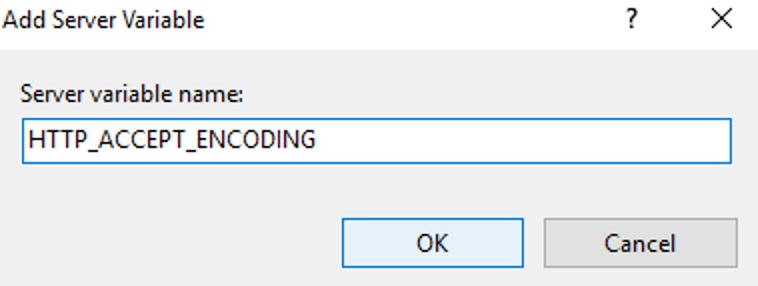
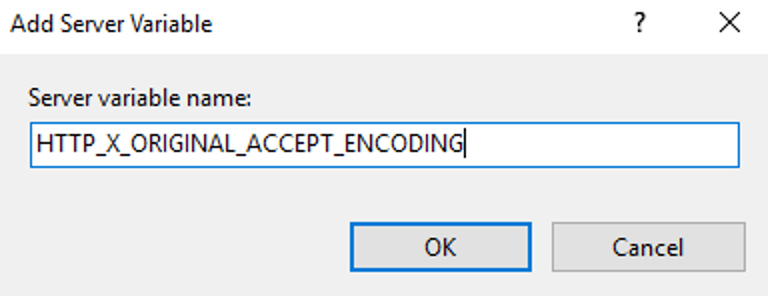
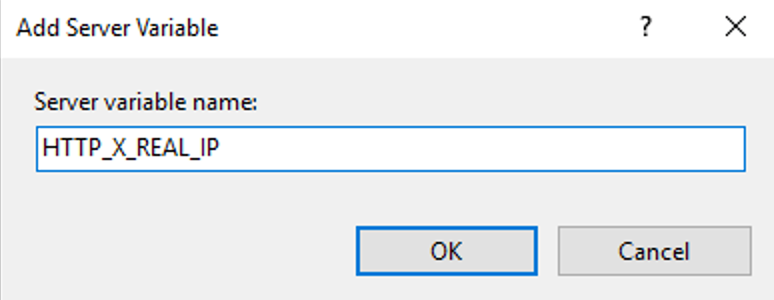
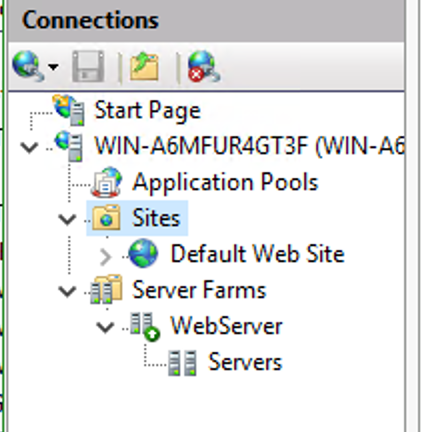
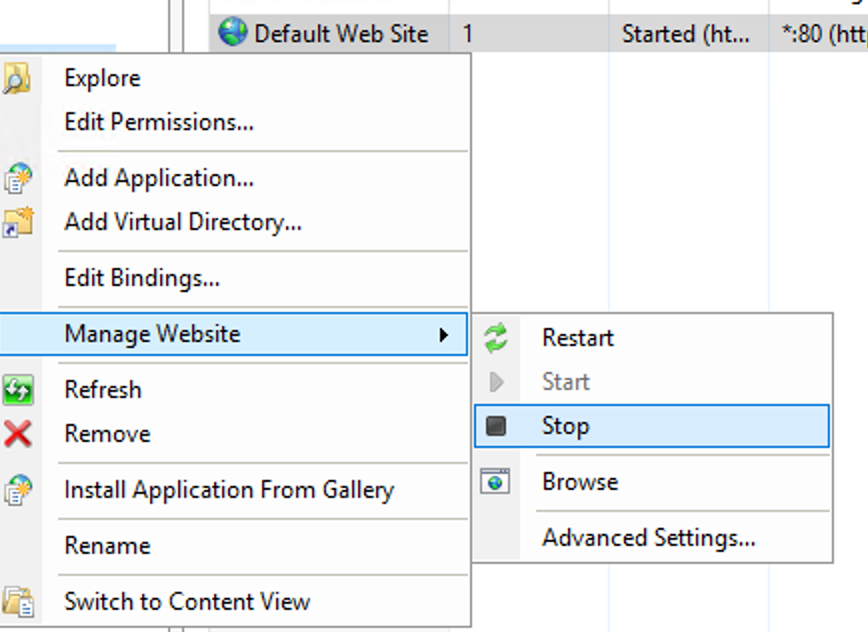
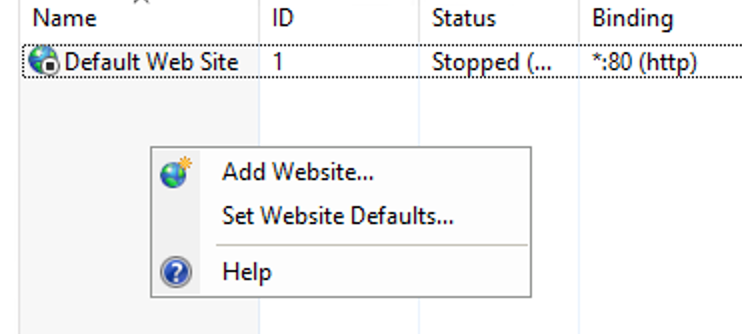
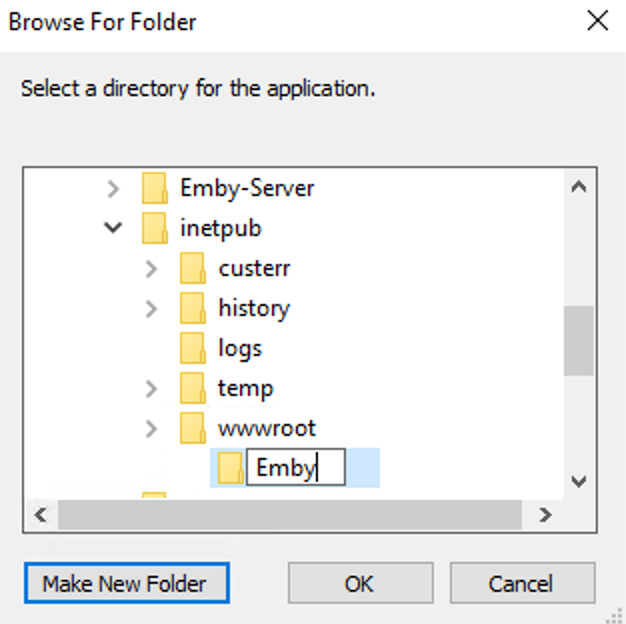
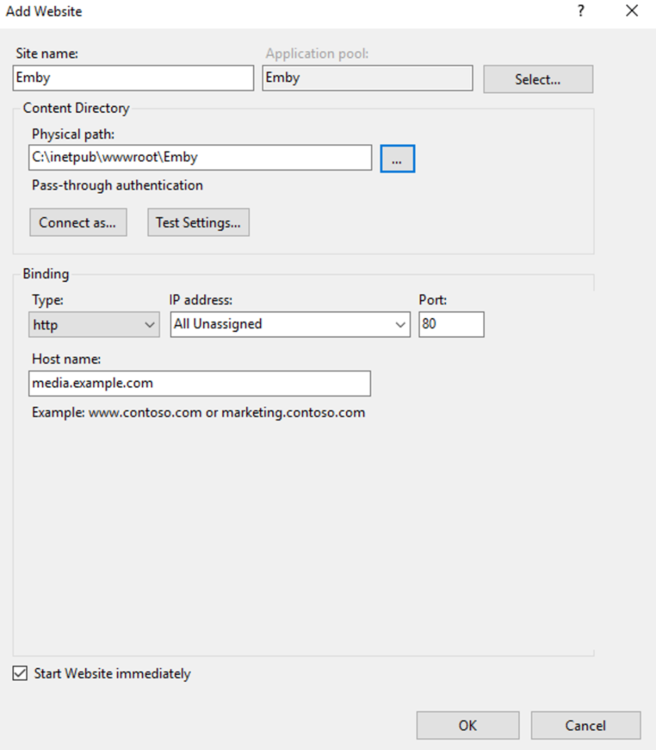
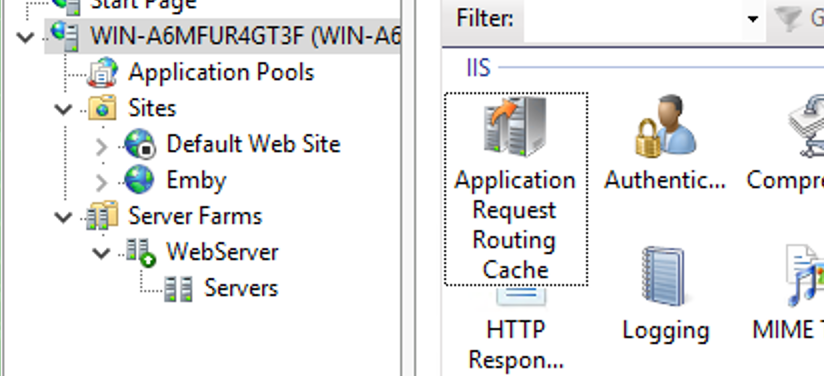
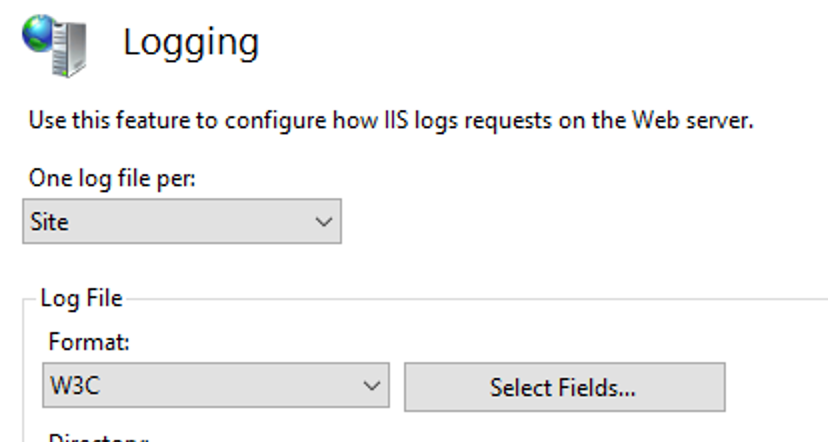
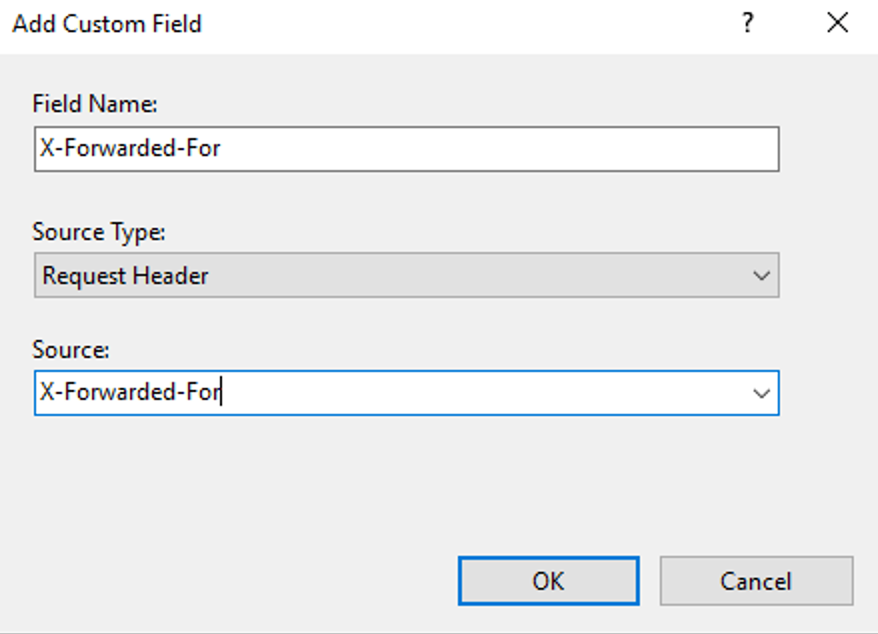
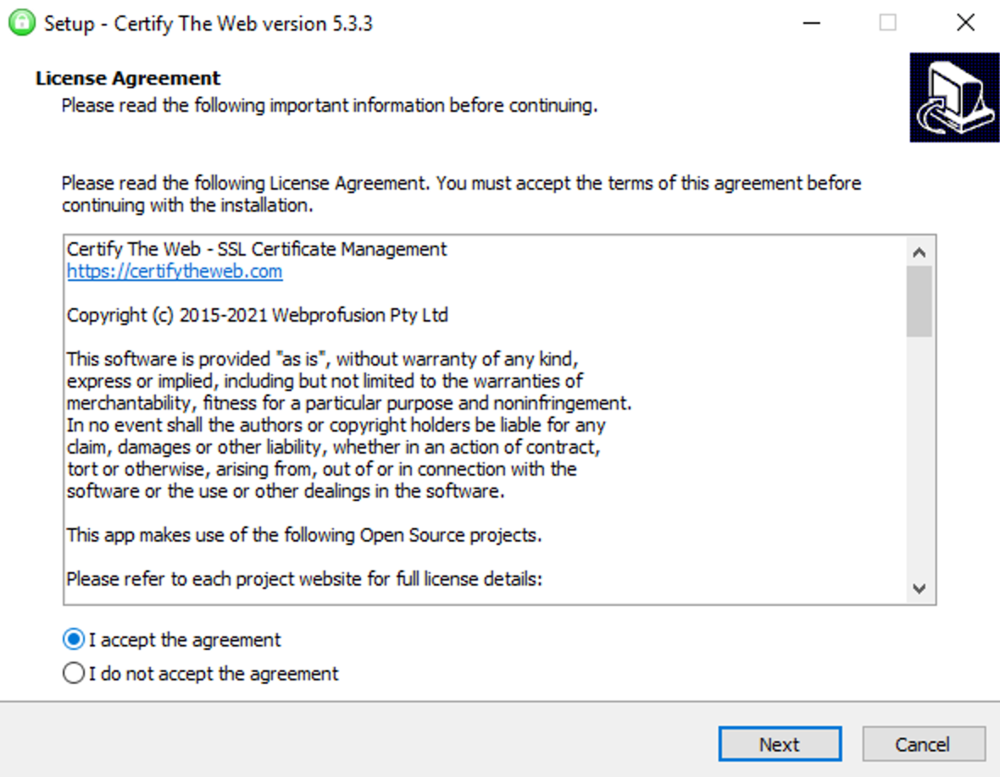
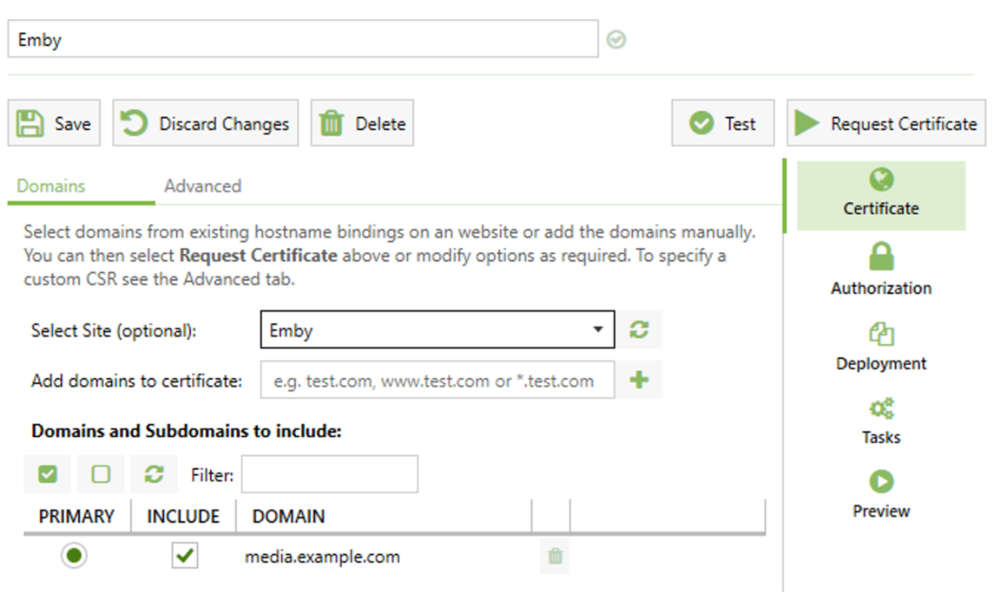
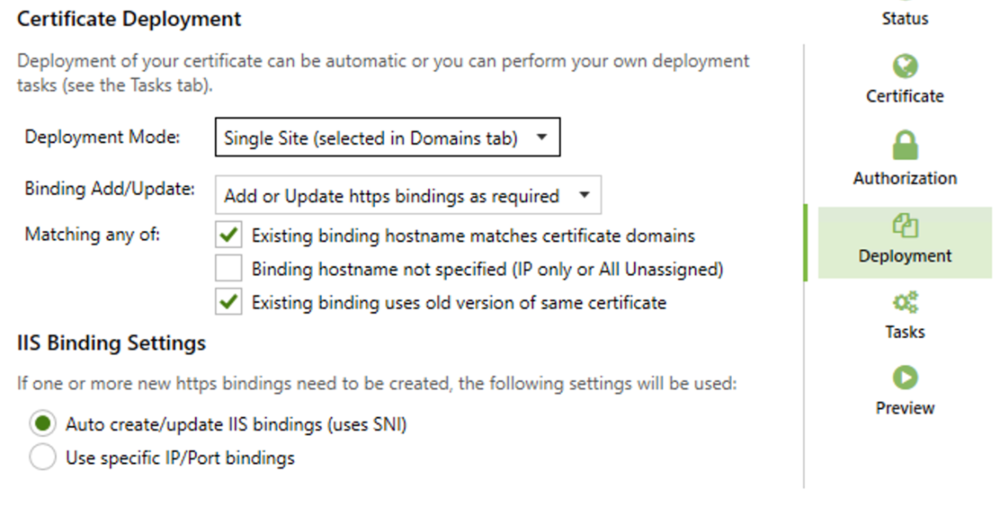
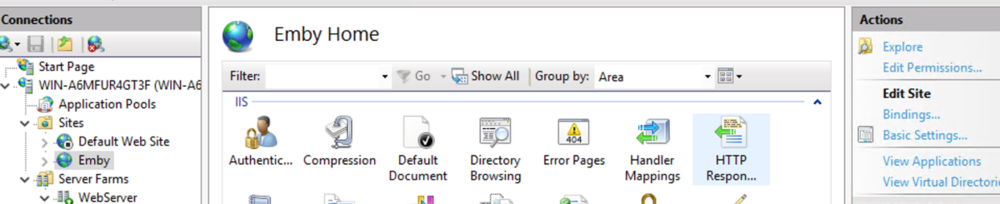
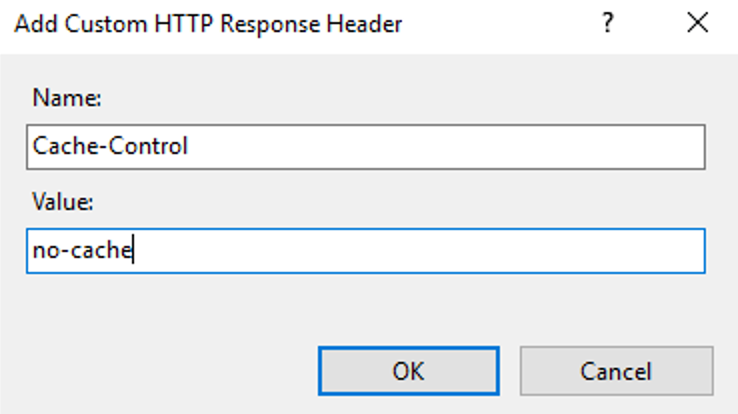
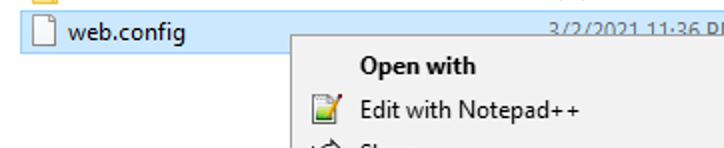
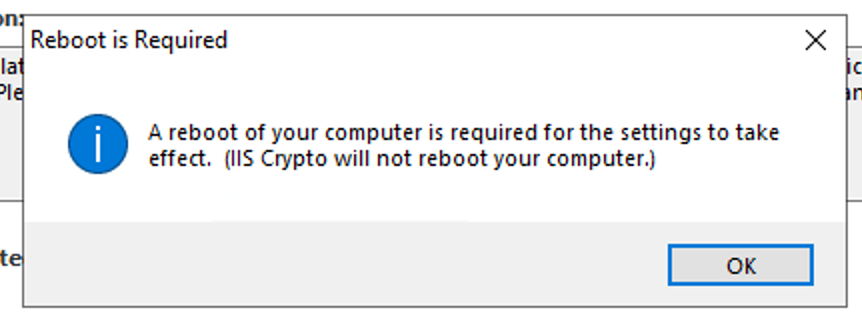
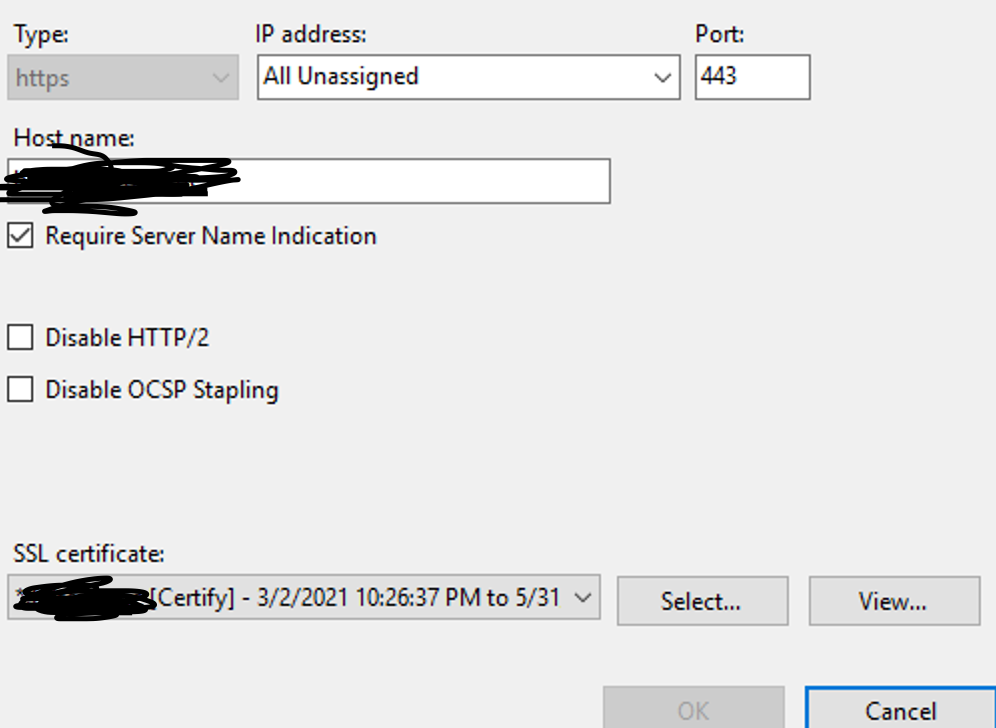
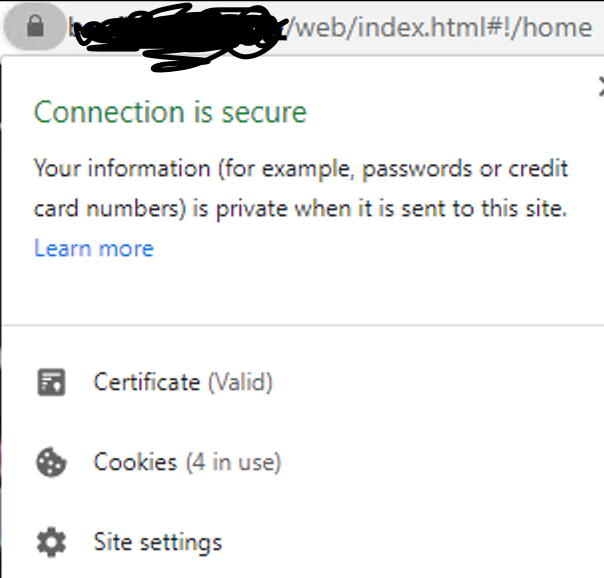
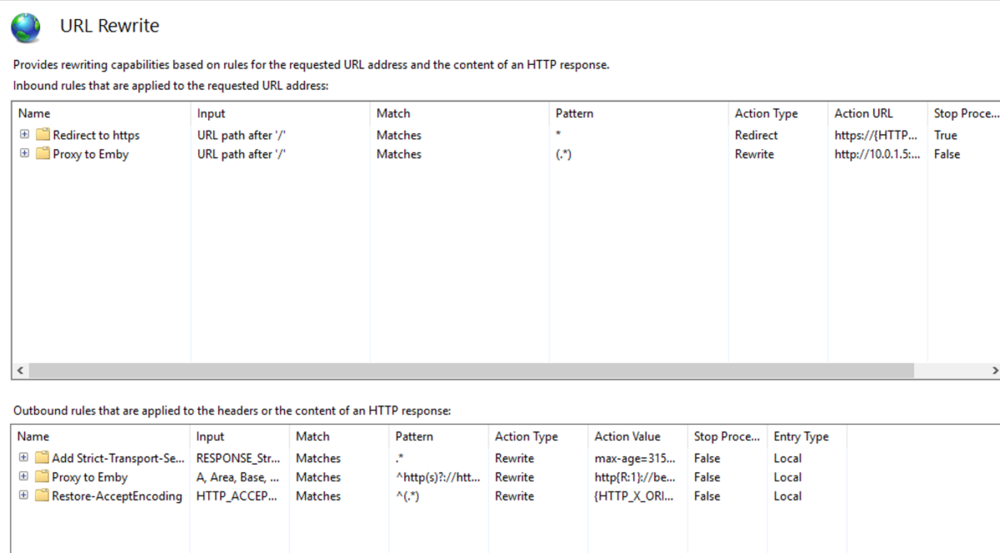
This guide will explain how to setup a Windows Server instance of Emby server with IIS as full transparent reverse proxy with SSL offload and auto-renewing certificates via Lets Encrypt. First, What is IIS? IIS or Internet Information Services is the web server service provided with Windows and Windows server installations. It is industry standard technology and is widely supported and regularly maintained by Microsoft. Second, What is a reverse proxy? A reverse proxy will take requests coming into your server (in this case HTTPS on port 443) and route them to a backend application (in this case Emby Server on port 8096 on the same box or another). Reverse proxies are very useful if you only have 1 public IP and multiple services you would like to run on a single port (443, for example is standard secure web traffic) or multiple servers that need to appear as one. Third, Why do I want a certificate for my site from Lets Encrypt? Well, most sites now days are secure (read they encrypt your traffic to prevent people from seeing your data), browsers these days flag sites that are not using properly signed certificate chains or run on insecure ports. If you use a self signed certificate in Emby, you may have difficulty getting things like the iOS app or Roku app to work properly outside your home. (Not sure about the rest of you, but Emby on the kid’s iPad is a life saver for long car rides). Let’s Encrypt provides free SSL certificates that are signed by certificate authorities that will be recognized on all devices and platforms. I will be using Windows Server 2019 with IIS 10 and AAR 3. All of this should work with Windows Server 2012R2 and Windows Server 2016 as well as Windows 10, however there may be some differences. You can use either stable or beta version of Emby Server, however in this guide we will use the stable version. At the time of writing, this guide will get you a full A+ rating from SSLlabs.com security test. (For comparison purposes, Facebook’s rating is a B.) In this guide we will: Install Emby Server Move Emby Server Installation to a non-user-locked location Setup a service user to run Emby Server as Configure Emby Server to run as a service Configure Windows Firewall Install IIS Install AAR Install IIS Rewrite module Configure AAR Configure IIS as a reverse proxy for Emby Configure SSL cypher suites for the server Install the Certify the Web client. Configure Certify the Web for auto-renewing SSL certificate for your domain Note: To be externally accessible, you will need to configure your route/modem to port forward 80 and 443 to your server. Pre-reqs/Assumptions: A physical server or VM running Windows Server An Internet Connection A DynDNS/No-IP URL (or similar routable dns name pointed at your router’s public IP) You have port forwarded ports 80 and 443 through your router to the machine you will use as a reverse proxy (in this guide we will use the same box for the reverse proxy and Emby server, but these can be run on different hosts). You have installed Notepad++ on the machine you will be setting up. Install Emby Server Download Emby Server Run the Installer Click Run when prompted If prompted by smart screen, click run anyway If prompted to install Visual C++ runtime, click install It will install to default location of %APPDATA%\Emby-Server. Move Emby Server to Non-User Locked Location Ensure that Emby Server is not running (right click icon in system tray if present and click Exit) Navigate to default location of %APPDATA% (%userprofille%\appdata\roaming) Right click the folder and click "cut" Navigate to C:\ (or root of the drive you wish to have Emby run from) Right click in the whitespace and paste. (if prompted to provide administrator permission, approve) Create a Service Account to run Emby as Note: Instructions show how to do this using local users and computers, you can also do this with Active Directory Users and Computers if your server is running that role. Right click on the start button (Windows flag) on the left side of the task bar Click Computer Management Expand Local Users and Groups on the left side Click Users Right click the whitespace and click new user Complete the new user dialog as shown (make sure you save whatever password you use as you will need it later, ProTip: don't re-use passwords) Click create Click close Close the computer management window Setup NSSM NSSM (Non-Sucking Service Manager) is needed to run Emby Server as a service as Emby Server does not include the nessicary components to run as a Windows service by default. Download here: https://nssm.cc/download Double click downloaded zip to open it in windows explorer Navigate to /win64 folder inside zip Copy/extract 64 bit version of the file to C:\Emby-Server Setup Folder Permissions Navigate to C:\ Right click the Emby-Server folder Click Properties Click Security tab Click Advanced Click Disable Inheritance Click Convert to Explicit Select CREATOR OWNER Click Remove Select Users (special) Click Remove Click Add Enter SvcEmby in the dialog Click OK Click Full Control Click OK Click Change next to owner at the top of the box Type SvcEmby in the dialog Click OK Check the Replace owner check box Check the Replace permissions checkbox Verify the dialog window looks similar to this (computer name will be different) Click OK When prompted if you want to replace permissions click Yes Verify security tab looks like this Click OK Setup Emby as a Service using NSSM Right click the start button on the left side of the task bar Click Windows Powershell (Admin) Type: "cd C:\Emby-Server" and press enter Type ".\nssm.exe install Emby" and press enter The install service dialog will launch, fill out as follows: Application Tab Details Tab Logon Tab (note, if you are using active directory it should be: YOURDOMAIN\SvcEmby) Exit Actions Tab Click Install Service Click OK Config ure Windows Firewall Click Start Click Control Panel Click Windows Defender Firewall Click Advanced Settings on the left hand side Click Inbound Rules Click New Rule on the right hand side Click Port Click Next Type 80, 443 in the ports box Click Next Click Next Click Next Name it Web Server Ports Click Finish Install IIS (Internet Information Services) Click Start Click Server Manager Click Add Roles and Features Click next on the Before you Begin page Click Role Based install Click Next Verify you are installing on your local server Click Next Check the box for "Web Server (IIS)" When prompted to install management tools Click Add Features Click Next Under Features, click Next Click Next again to get to role services Check the boxes for all of the following role services Make sure you check the box for web sockets under Application Development, this is needed for various features of Emby to work right. Click Next Click Install Once installation completes, click close Install Web Platform Installer add-on Download from: https://www.microsoft.com/web/downloads/platform.aspx Run the Web Platform Installer add-on installer Click Install Click Finish Install AAR (Advanced Application Routing) Download from: https://www.microsoft.com/en-us/download/details.aspx?id=47333 Run the Request Router installer Click Install Install IIS Re-Write Module Click Start Click Administrative Tools Open Internet Information Services (IIS) Manager Click the name of your server on the left Double Click on the Web Platform Installer In the search box type "url rewrite" Click Add Click Install Click I Agree Click Finish Configure AAR Click Start Click Administrative Tools Open Internet Information Services (IIS) Manager Click the name of your server on the left Right Click Server Farms Click Create Server Farm Name your Server Farm Click Next Enter the IP address of the server or "localhost" Click Add Click Finish Click No in the dialog that pops up Expand your newly created Server Farm Click Proxy Configure settings as shown Click Apply Click your Server Click Application Request Routing Click Server Proxy Settings Configure settings as shown Click Apply Click Your Server Configure IIS Server Variables Click Url Re-Write Click View Server Variables Click Add Type "HTTP_ACCEPT_ENCODING" Click OK Click Add Type "HTTP_X_ORIGINAL_ACCEPT_ENCODING" Click OK Click Add Type "HTTP_X_FORWARDED_FOR" Click OK Click Add Type "HTTP_X_REAL_IP" Click OK Click Your Server Create Emby Site Expand Sites on the left hand side Right Click "Default Web Site" Highlight "Manage Website" Click Stop Right Click the white space in the Sites list Click Add Website Click the "..." button to the right of Physical Path Browse to C:\inetpub\wwwroot Click it Click Make New Folder Call it Emby Click OK Under Binding Fill in with your public host name (see dynamic dns mentioned in pre-reqs) Click OK Configure Logging Click your server Click Logging Click Select Fields Click Add Field Configure as shown Click OK Click OK Click Apply Install and Configure Certify The Web client Download From: https://certifytheweb.com Run the Certify the Web installer Click Next Click Next Click Next Click Install Click Finish Click New Certificate Click on on Contact Prompt Fill in your contact email Click Register Contact Click New Certificate again Select Emby from the sites list Name and domain will populate automatically. Click Deployment Configure as shown Complete certificate verification process Click your site in IIS manager Click Bindings Verify there is an HTTPS binding and that it looks similar to this (with your domain information) Edit Web.Config for Emby Site Click HTTP Response Headers Click Add Configure as show (we are just creating a header to get the web.config to exist, we will paste in a premed one below, so these values dont really matter) Click OK Open an Explorer window and Browse to C:\inetpub\wwwroot\Emby Right click web.config and Edit with Notepad++ Replace existing content with web.config below <?xml version="1.0" encoding="UTF-8"?> <configuration> <system.webServer> <rewrite> <rules> <clear></clear> <rule name="Redirect to https" enabled="true" patternSyntax="Wildcard" stopProcessing="true"> <match url="*" negate="false" /> <conditions logicalGrouping="MatchAny"> <add input="{HTTPS}" pattern="off" /> </conditions> <action type="Redirect" url="https://{HTTP_HOST}{REQUEST_URI}" redirectType="Found" /> </rule> <rule name="Proxy to Emby" stopProcessing="false"> <match url="(.*)" /> <serverVariables> <set name="HTTP_X_ORIGINAL_ACCEPT_ENCODING" value="{HTTP_ACCEPT_ENCODING}" /> <set name="HTTP_ACCEPT_ENCODING" value="" /> <set name="HTTP_X_REAL_IP" value="{REMOTE_ADDR}" /> </serverVariables> <action type="Rewrite" url="http://localhost:8096/{R:1}" logRewrittenUrl="true" /> <conditions> <add input="/{R:1}" pattern=".well-known" negate="true" /> </conditions> </rule> </rules> <outboundRules> <rule name="Add Strict-Transport-Security when HTTPS" enabled="true"> <match serverVariable="RESPONSE_Strict_Transport_Security" pattern=".*" /> <conditions> <add input="{HTTPS}" pattern="on" /> </conditions> <action type="Rewrite" value="max-age=31536000; includeSubDomains; preload" /> </rule> <rule name="Proxy to Emby" preCondition="ResponseIsHtml1" enabled="true"> <match filterByTags="A, Area, Base, Form, Frame, Head, IFrame, Img, Input, Link, Script" pattern="^http(s)?://http://localhost:8096/(.*)" /> <action type="Rewrite" value="http{R:1}://media.example.com/{R:2}" /> </rule> <rule name="Restore-AcceptEncoding" preCondition="NeedsRestoringAcceptEncoding"> <match serverVariable="HTTP_ACCEPT_ENCODING" pattern="^(.*)" /> <action type="Rewrite" value="{HTTP_X_ORIGINAL_ACCEPT_ENCODING}" /> </rule> <preConditions> <preCondition name="ResponseIsHtml1"> <add input="{RESPONSE_CONTENT_TYPE}" pattern="^text/(.+)" /> </preCondition> <preCondition name="NeedsRestoringAcceptEncoding"> <add input="{HTTP_X_ORIGINAL_ACCEPT_ENCODING}" pattern=".+" /> </preCondition> </preConditions> </outboundRules> </rewrite> <caching enabled="false" enableKernelCache="false" /> <httpProtocol> <customHeaders> <add name="X-Frame-Options" value="SAMEORIGIN" /> <add name="X-Xss-Protection" value="1; mode=block" /> <add name="X-Content-Type-Options" value="nosniff" /> <add name="Referrer-Policy" value="same-origin" /> <add name="Feature-Policy" value="sync-xhr 'self'" /> <add name="Cache-Control" value="no-cache" /> </customHeaders> </httpProtocol> </system.webServer> </configuration> Save changes (if prompted to restart Notepad++ in admin mode allow it and then try saving again) IIS will now be properly configured as a reverse proxy for Emby. Under IIS Manager > Rewrite you should now see the following rules: Configure Server Cyphers Download here: https://www.nartac.com/Products/IISCrypto/Download (GUI version) Run the IISCrypto too Click Templates In the template drop down box, select PCI 3.2 This will disable IIS from being able to serve via SSL 2.0, 3.0; TLS 1.0 and TLS 1.1. This will leave just the industry standard TLS 1.2. Click Apply Click OK. Reboot your server. Emby Internal Settings Navigate to your server via the localhost:8096 address Click the gear in the top right corner Click Network from the list of tabs on the right Configure as shown (use your hostname in the external domain box) Conclusion Upon rebooting your computer will start IIS services and Emby server as a service. Traffic coming in on port 80 (if someone just types your url without HTTPS in their browser's address bar) will be automatically redirected to port 443 and the HTTPS:// version of your host name. Your certificate will auto-renew every so often and re-bind to the site in IIS without any interaction on your part. This allows for a server that you can for the most part setup, and forget about and just manage your Emby installation via its web ui. There are a lot of ways to set up Emby server depending on your environment and other factors. For my environment this made the most sense and since large portions of this took quite a bit of digging and research to get working just right, I figured Id make someone else's life a little easier if they were trying to do something similar. These instructions can be adapted for Windows Server 2012 R2, Windows Server 2016, Windows 8 and Windows 10. In the end browsing to your domain should look like this in the browser Additional Information for Updating When Updating your Emby installation. Simply stop the service for Emby, install like you normally would, then just cut the system folder inside the %appdata%\emby-server folder and paste it into the C:\Emby-Server folder. When prompted replace all files, then start the service again once the copy completes. Additional Information about Connecting with Emby Apps When connecting to your Emby installation remotely with Emby apps remember to prefix your domain name with https:// and use 443 for the port number. <Edit> Additional Information about changing Emby Server Title: For those users who wish to change their page title in browser (as discussed here), here is additional Web.Config information that will let you do just that! Using IIS Re-Write rules to change the page title means, you don't have to edit files to reset it every time you upgrade your Emby Server! Add these 3 rules at the bottom of the rules list, replace whole <preConditions> block too.: NOTE: Make sure you replace ALL 4 instances of NAME_OF_YOUR_SERVER with what you want your server to display in the tab bar. <rule name="RewriteTitle" preCondition="ResponseIsHtml1" enabled="true"> <match filterByTags="None" pattern="<title>(.*)</title>" /> <action type="Rewrite" value="<title>NAME_OF_YOUR_SERVER</title>" /> </rule> <rule name="RewriteAppHeaderJs" preCondition="ResponseIsJS" enabled="true"> <match filterByTags="None" pattern="document.title="Emby"" /> <action type="Rewrite" value="document.title="NAME_OF_YOUR_SERVER"" /> </rule> <rule name="RewriteAppHeaderJs2" preCondition="ResponseIsJS" enabled="true"> <match filterByTags="None" pattern="title.Name||"Emby":"Emby"" /> <action type="Rewrite" value="title.Name||"NAME_OF_YOUR_SERVER":"NAME_OF_YOUR_SERVER"" /> </rule> <preConditions> <preCondition name="ResponseIsHtml1"> <add input="{RESPONSE_CONTENT_TYPE}" pattern="^text/(.+)" /> </preCondition> <preCondition name="ResponseIsJS"> <add input="{RESPONSE_CONTENT_TYPE}" pattern="application/javascript|text/javascript" /> </preCondition> <preCondition name="NeedsRestoringAcceptEncoding"> <add input="{HTTP_X_ORIGINAL_ACCEPT_ENCODING}" pattern=".+" /> </preCondition> </preConditions> </Edit>


 1 point
 -
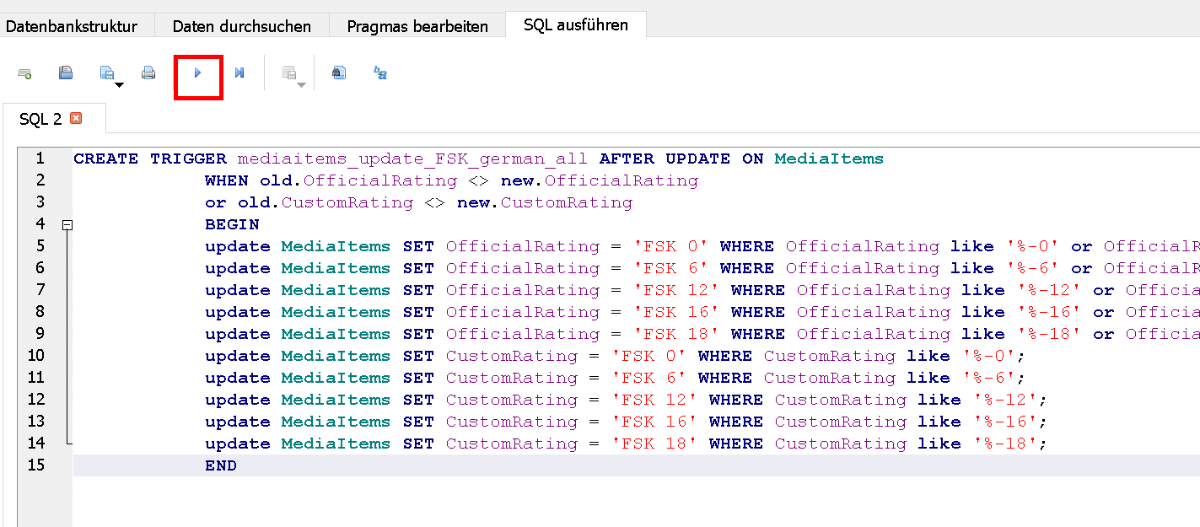
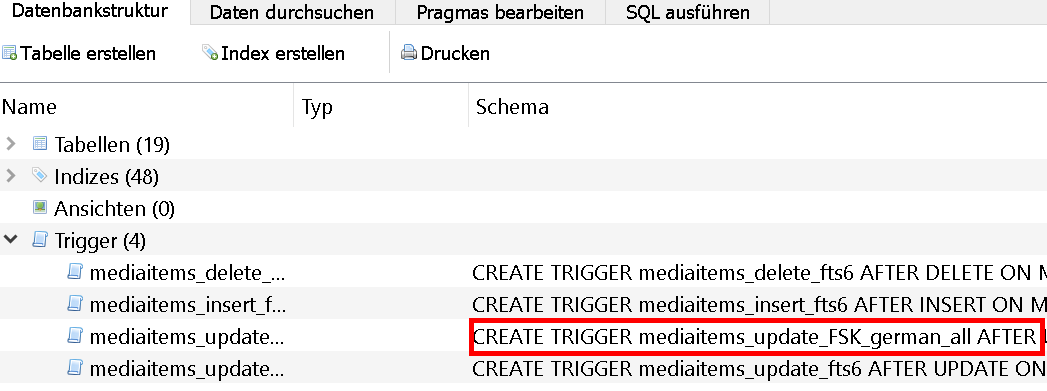
Hallo miteinander, emby und TMM (tiny mediamanager) haben ja leider unterschiedliche Schreibweisen bei den FSK Freigaben: TMM: FSK 16 (in der Kurzform, die ich nutze) emby: FSK-16 oder DE-16 Ich scrape meine Sachen üblicherweise mit TMM und lasse sie dann in Emby über die nfo einlesen. Das klappt gut, wenn ich aber doch mal etwas bei der Altersfreigabe in Emby mache, habe ich den Bindestrich wieder drin Eigentlich ist es mir ja egal, welche Schreibweise genutzt wird, nur einheitlich sollte sie für mich sein (die Filter usw. funktionieren zwar, es sieht aber unschön aus). Die Sache mit den Bindestrichen wurde hier und bei TMM schon mal angesprochen, allerdings kann man das wohl bisher weder in emby noch bei TMM konfigurieren (zumindestens habe ich dazu nichts gefunden) Mein Lösung besteht jetzt darin, das direkt auf der Datenbank per Trigger zu korrigieren. Bei jedem Update der Tabelle mit einer Änderung bei der Altersfreigabe wird grob gesagt aus FSK-16 bzw. DE-16 ein FSK 16 usw. Der Trigger (in der library.db) sieht wie folgt aus Neben dem Ändern der Schreibweise wandelt der jetzt auch direkt die US Ratings in FSK Freigaben um. Das passt natürlich nicht so ganz mit den Freigaben, für mich reicht das aber. wer die US Ratings nicht braucht, kann den entsprechenden Passus natürlich anpassen/löschen Beim Bearbeiten der Metadateien in Emby werden zwar die hinterlegten deutschen Freigaben mit Bindestrich angezeigt, beim Speichern wird dann aber direkt umgewandelt. Bei Filmen klappt das "on the fly" bei Serien hakt es manchmal noch bzw. wird erst beim Neustart von Emby durchgeführt. Da bin ich noch nicht dahinter gekommen, woran das liegt. ich habe es nicht herausgefunden, warum das bei Serien nicht klappt, darum lass ich nachts einfach kurz den Emby Server neu starten (per cron job --> service emby-server restart ) In die nfo wird bei dieser Vorgehsnweise allerdings die Freigabe mit Bindestrich geschrieben, das stört mich aber erst einmal nicht. Schön wäre natürlich, wenn man die Schreibweise in emby irgendwo konfigurieren könnte Und weil mir die lange Liste der Aktivitäten auch nicht so gefiel, habe ich da auch noch einen Trigger eingebaut, der alle Aktivitäten älter 14 Tage entfernt (kann man natürlich auch an seine persönliche Wünsche anpassen) Falls das für jemanden interessant sein sollte, könnte ich auch noch eine kurze Anleitung schreiben. VG Update vom 2021-05-05 Wie bearbeitet man die einzelnen Datenbanken? Bei mir läuft Emby auf einem NAS (früher) bzw. einem Server unter ubuntu. Die Anpassungen habe ich mit Windows vorgenommen. benötigt wird: DB Browser for SQLite (https://sqlitebrowser.org/dl/) Vorgehensweise: Emby herunterfahren die library.db auf die lokale Festplatte (Windows) kopieren (normalerweise hat man keine Schreibrechte im Emby Ordner) die Datenbanken liegen (unter Linux/NAS) im Unterordner DATA im EMBY Verzeichnis. wo der Emby Ordner liegt kann man in den Emby Einstellung in der Übersicht sehen. Da werden rechts die Pfade angezeigt wenn man ein NAS nutzt kann man die DB's mit dem eingebauten Dateimanger des NAS kopeiren, Unter Ubuntu nutze ich Webmin (da ist auch ein Dateimanger drin) WINSCP/Putty o.ä. funktioniert auch In SQLite die gewünschte DB öffnen Tab SQL ausführen anklicken SQL Code einfügen + ausführen Ich hatte beim kopieren des obigen Codes zwischendurch mal Probleme. Komischerweise wurde mir beim Ausführen ein Fehler angezeigt. Für den Fall, dass das mit dem kopieren nicht funktioniert, habe ich denselben Code auch noch mal als TXT File angehangen FSK Trigger.txt Button AUSFÜHREN drücken Wenn der Trigger erfolgreich erstellt wurde, erscheint folgende Meldung ausserdem wird der Trigger dann unter Datenbankstruktur/Trigger angezeigt Die DB schließen und dabei die Änderungen speichern danach die geänderte library.db wieder in den DATA Ordner auf den Server/das NAS kopieren (dabei wird die alte library.db überschrieben) dabei darauf achten, dass die entsprechenden Unix Rechte/Benutzer gesetzt sein müssen (wie die anderen DB's). Wenn man die alte Version überschreibt, stimmen die normalerweise Emby starten


 1 point
 -
VERSION 6.2.22: Download link for manual update: https://github.com/MediaBrowser/plugin.video.emby/archive/refs/tags/6.2.22.zip Release Notes: https://github.com/MediaBrowser/plugin.video.emby/releases/tag/6.2.221 point
-
Small update, this issue is now also appearing for me in Chrome, recreation steps seem to be somewhat inconsistent.1 point
-
No problem and actually this issue was not only related to taglines. Wrong data were added to Kodi DB which could also have an impact to other functionalities.1 point
-
Thanks for fixing the tagline issue. I know it was only cosmetic bit it looked so ugly.1 point
-
Repair: Same as manually: remove lib followed by add lib Update: Keeps lib, just queries all lib-items from Emby server for refresh. Difference: If invalid recordsets already in the Kodi DB, an update will not fix it. It just adds new/changed content.1 point
-
You are most likely right. I don't have a second Shield either, but I do have the means to spin up a seconds Emby server (Windows) and a second Android TV device (an older Sony TV) - here are my findings: - Playing on the Shield from the Windows server (Stream type: HTTP) - no issues, everything seems smooth - Playing on another Android TV device from the Shield server (Stream type: HTTP) - it does not freeze, the video doesn't stop every 15-20 seconds. There is some micro stutter but that's probably a networking issue since the TV is in another room and connected wirelessly (lower bitrate movies are fine). Let me know if there is any other test I can do to help examine this problem further. By the way, it seems that enabling "Pass Direct Path" client side is enough to trigger "file mode", even without providing the optional UNC path for the library. I haven't updated any of my other libraries (so they have empty "Shared network folder") but playing videos from them results in "Stream type: File".1 point
-
I dont need to click on Kodi to open it anymore, I just look at the desktop shortcut and it opens. What do those 2 settings actually do, I blindly follow whatever you said but how/where would I notice a difference?
 1 point
 -
If you play with the settings, restart Kodi. Realtime changes are not tested yet, and probably wont work.1 point
-
Workaround confirmed (but I'm busted, now you know where I was going with this...
 1 point
 -
Thanks, confirmed. That's a bug, I'll fix it. You can still access the settings via plugin -> configuration, It's exactly the same1 point
-
stop at AB1 in your example. i.e., just enter this first half of the postcode and search on that1 point
-
Hi, currently the user interface can automatically switch networks, but not the media player at this time, so yes this will cause interruptions of playback. It's something we'll look at improving in future updates. Thanks.1 point
-
Hi, yes it's possible for the future, but right now this isn't supported.1 point
-
Does this answer your question? You need to login with the admin user account on your server. Have you forgotten this? If you've forgotten this, try going through the forgot password process again, only this time, leave the username blank on the forgot password screen. This will then reset the password for every single user on your server, so at that point, you should be able to get in with a blank password. I believe the root issue here is you are confusing the difference between the locally managed users on your server, and our Emby Connect cloud login feature. Remember these are two different things.1 point
-
Thank you sir. It worked perfectly.1 point
-
Custom SVG support or user supplied font(s) might happen, but it would be awhile and might turn out to be too unpredictable for me to support. One of the benefits of using a single, predictable font based icon set is that the number of things that can go wrong across many browsers and backends is drastically reduced.1 point
-
Have you checked out the urls used by the web app?1 point
-
I've got so much content I'd be lucky to know 1% of the trivia I'd get.1 point
-
I still thank the "idiot" as local db reset did the trick, episodes count back to normal values. You know what they say, make it idiot proof and they'll come up with a better idiot Thanks again !1 point
-
I can query them via the API ? curl -X GET "http://***:8096/emby/Items?Fields=Chapters&Ids=440729&api_key=***" -H "accept: application/json" QueryResult_BaseItemDto{ Items[BaseItemDto{...}] TotalRecordCountinteger($int32) } Output - { "Items": [ { "Name": "Spartacus", "ServerId": "e9f679de4d284ca2bf07eb4e72a19ea7", "Id": "440729", "RunTimeTicks": 118038180000, "IsFolder": false, "Type": "Movie", "ImageTags": { "Primary": "8142d00c86f41cfa35c4e3576a507359", "Logo": "3ee63bb9bdf748e7b47632c3d7b3bdb1", "Thumb": "33c6391c68abb9fe673a5aefb3052831" }, "BackdropImageTags": [ "95a5992d37af26fda7fe16a3359dab98", "23494a9c7ae96dfea94460d238bd3021" ], "Chapters": [ { "StartPositionTicks": 0, "Name": "Overture", "ImageTag": "fd1ef87c51224ed35e7fdc63dbe9ccc1" }, { "StartPositionTicks": 2433680000, "Name": "Main Titles", "ImageTag": "fd1ef87c51224ed35e7fdc63dbe9ccc1" }, { "StartPositionTicks": 4645470000, "Name": "A Disease Called Human Slavery", "ImageTag": "fd1ef87c51224ed35e7fdc63dbe9ccc1" ..... },1 point
-
from emby net gen, manage libraries, then all options offered. Please note I'm running kodi on windows10 EDIT: libraries sync in progress, movies and tv shows being substantial take a little while

 1 point
 -
@CharleyVarrickseems to be working fine for me. But for me the Kodi db on my Win10 system is sometimes out of sync with the Emby server for other things like missing artwork and ratings. A local db reset is the only way I found to get everything back in sync. I installed Kodi19 with E4K yesterday morning on my Shield, that is on 24/7, and no issues there until now.
 1 point
 -
That is eerie I performed a search and what do you know, I too have 41 Cheech Marin movies1 point
-
I pay $10.00 a year from google for mine. My domain name is still worth looking into though. Thanks for the help.1 point
-
I can live with it as it is then.1 point
-
Seems I was lucky and everything went fine.1 point
-
Thank you so much guys, I already fixed this, thanks to Happy2Play for the help with McAfee... I appreciate that1 point
-
I found a workaround. I recreated the playlists in m3u8 format using PotPlayer. After rebuilding my music library, the missing tracks have reappeared. Thanks for your help.1 point
-
@arrbee99What issues are you having as all I did was add border-radius to button. /* Remove Fade and Add Box to Focus Item */ div.cardOverlayContainer { background: transparent; border-style: solid; border-width: 6px 6px 6px 6px; border-color: var(--myblue); border-radius: 1.2rem; } /*Add Box to All Items on Movies TV etc */ div.cardScalable { background: transparent; border-style: solid; border-width: 4px 4px 4px 4px; border-color: white; border-radius: 1.5rem; } div.cardScalable button { border-radius: 1.5rem; } Unless I am not understanding the issue as it corrects the issue you displayed above. Neither can I, learning from here and google also. But the way the image is layered in button on cardscaleable is the issue. But each browser seem to handle it differently.1 point
-
We apologize for the issue. We are aware of the reports of crashing and once we have it narrowed down can give a solution. Please stay tuned. We will have something soon and once again apologies you have to suffer this problem. We didn't do this intentionally but it was our fault (ANY time there is a crash it is our fault even if it isn't). You can feel free to throw some heat our way. This isn't something we do often.1 point
-
Did you try/check this?1 point
-
@Luke Okay... for future reader clarity, once successfully installed Emby DOES find and use mono 5.20.... It's the dependency issue, of installing/upgrading Emby, that causes issues... Installing mono 5.20 removes Emby (to be fair it warns you first). If you use "pkg lock emby-server" you're able to upgrade mono, while keeping the currently installed version of Emby. As of Emby 4.6.0.34, mono 5.10.1.57_3 is an installation pre-requisite (specified in the Emby manifest, presumably derived from .../${ABI}/latest). So I assume, now that I have Emby running on 5.20, to get future Emby upgrades, we're going to need to perform the following steps: stop Emby ("service emby-server stop") downgrade to mono ... as of March 2021, "latest" is tied to mono 5.10.1.57_3 ("pkg install mono") upgrade Emby ("pkg add -f https://github.com/MediaBrowser/Emby.Releases/releases/download/x.x.x.xx/emby-server-freebsdxx_x.x.x.xx_amd64.txz") "pkg lock emby-server") **CRITICAL** lock the Emby package ("pkg lock emby-server") upgrade mono 5.20.xxxxxxx ("pkg install mono5.20-5.20.1.34") **OPTIONAL** unlock the Emby package ("pkg unlock emby-server") restart Emby ("service emby-server start") cross fingers * edit 1: Changed step order: Moved "lock" to just before upgrading mono, to make it obvious that the Emby lock is related to upgrading to mono 5.20. * edit 2: I didn't bother to research or test ... but to upgrade Emby, it may be required to perform "pkg unlock emby-server", before upgrading Emby. Optionally, you could "unlock" the Emby package after upgrading mono.1 point
-
@Luke - Further inspection of the Emby manifest... it looks like mono is tied to "5.10.1.57_3". ...emby-server-freebsd11_4.6.0.34_amd64.tar/+MANIFEST: ... "mono":{"origin":"lang/mono","version":"5.10.1.57_3"} ...1 point
-
@Luke - Emby installs and starts fine with 5.10 ... bsd_emby_n:/ # mono -V Mono JIT compiler version 5.10.1.57 (5.10.1.57 Sat Mar 20 02:10:45 UTC 2021) bsd_emby_n:/ # !1003 pkg add -f https://github.com/MediaBrowser/Emby.Releases/releases/download/4.6.0.34/emby-server-freebsd11_4.6.0.34_amd64.txz [bsd_emby_n] Fetching emby-server-freebsd11_4.6.0.34_amd64.txz: 100% 44 MiB 11.4MB/s 00:04 [bsd_emby_n] Installing emby-server-4.6.0.34_1... Newer FreeBSD version for package emby-server: To ignore this error set IGNORE_OSVERSION=yes - package: 1104001 - running kernel: 1103000 Ignore the mismatch and continue? [y/N]: y ===> Creating groups. Using existing group 'emby'. ===> Creating users Using existing user 'emby'. [bsd_emby_n] Extracting emby-server-4.6.0.34_1: 100% bsd_emby_n:/ # service emby-server start Starting emby_server.1 point
-
@Luke bsd_emby_n:/ # mono -V Mono JIT compiler version 5.20.1.34 (5.20.1.34 Sat Mar 20 09:10:34 UTC 2021) bsd_emby_n:/ # mono -V Mono JIT compiler version 6.8.0.123 (tarball Sat Mar 20 23:17:34 UTC 2021) bsd_emby_n:/ # pkg add -f https://github.com/MediaBrowser/Emby.Releases/releases/download/4.6.0.34/emby-server-freebsd11_4.6.0.34_amd64.txz [bsd_emby_n] Fetching emby-server-freebsd11_4.6.0.34_amd64.txz: 100% 44 MiB 11.4MB/s 00:04 [bsd_emby_n] Installing emby-server-4.6.0.34_1... Newer FreeBSD version for package emby-server: To ignore this error set IGNORE_OSVERSION=yes - package: 1104001 - running kernel: 1103000 Ignore the mismatch and continue? [y/N]: y pkg: Missing dependency 'mono' Failed to install the following 1 package(s): https://github.com/MediaBrowser/Emby.Releases/releases/download/4.6.0.34/emby-server-freebsd11_4.6.0.34_amd64.txz1 point
-
Hi. It should be fixed with the next release of the app. Thanks.1 point
-
Hi, If you ever wondered how you could install Emby into a docker container from a brand new vanilla CentOS 8 Linux install, then this video is made for you! Enjoy!1 point
-
I wish I knew how.... Probably. I don't remember Roku saying anything about an update but sounds highly probable.1 point
-
Hi, yes there is: https://github.com/MediaBrowser/Emby.ApiClient.Javascript/blob/master/connectionmanager.js#L12561 point
-
I think the easy answer is we just should have options to disable it. That will help a lot of people. Then perhaps down the line remapping input commands.1 point
-
Did you compare your request to what the web app does? I would start by doing that.1 point
-
Hi, yes it is.1 point
-
For kicks only (know it wasn't a guess) but I've got 41 movies with Cheech Marin in them.1 point